Let's make New Year’s decorations by hand! A collection of ideas you can create with everyday materials.


As the New Year approaches, are you thinking about brightening up your space with handmade New Year’s decorations? Store-bought pieces are lovely, but decorations you craft yourself carry a special warmth and sense of attachment.
In this article, we’ll share easy, DIY New Year’s decoration ideas you can try using familiar materials.
From yarn and felt to origami paper, you can create a wide variety of projects with items that are easy to find.
Try making them with your children, or finish them with your own favorite designs for decorations full of originality.
How about preparing for the New Year with heartfelt, handmade items?
- Handmade New Year’s wreaths: A collection of festive ideas using shimenawa and mizuhiki
- Let's make our own shimenawa! A collection of stylish ideas you can create with paper and artificial flowers
- Welcome the New Year! Ideas for Handmade Kadomatsu
- For New Year’s! A collection of fun origami ideas to make, decorate, and play with in childcare
- A collection of handmade ema ideas: easy crafts perfect for New Year’s
- Handmade winter garlands: cute ideas that are easy to make
- Handmade spinning tops with everyday materials! Easy ideas you can enjoy for New Year’s too
- [Handmade Winter Decorations] A collection of stylish, heartwarming creations you can make with everyday materials
- Christmas crafts for adults: stylish project ideas you'll want to display
- Let's make a handmade hagoita! Fun ideas using milk cartons and cardboard
- A roundup of handmade Daruma ideas: making Daruma with various materials
- Simple yet amazing! Handmade New Year’s card ideas that will delight
- [Easy] Practical craft ideas. Great for beginners too!
Let's handcraft New Year decorations! A collection of ideas using everyday materials (11–20)
Figure-eight shimenawa wreath
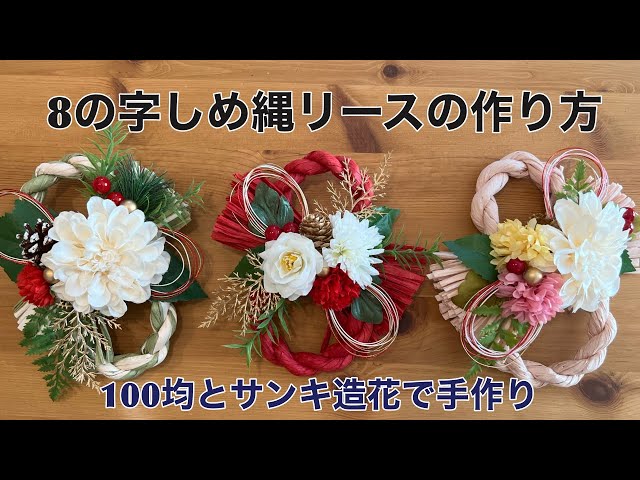
When it comes to New Year’s decorations, the shimenawa hung at the entrance is a classic.
How about creating a festive arrangement that preserves the solemn atmosphere of the shimenawa while incorporating Western-style motifs? Start with a rope-like braided cord as the base, then combine it with seasonal artificial flowers, mizuhiki cords that evoke celebratory feelings, and bell motifs that convey a sense of luxury.
The fun part is freely adding decorations as you like! While making sure the main ornament stands out, keep the overall color balance in harmony.
A bamboo kadomatsu made of straw

Paper straws have been gaining attention in recent years from an environmental conservation standpoint.
Using those paper straws, let’s make a kadomatsu, perfect for the New Year! You’ll need mini creamer cups, two bamboo blinds (sudare), paper straws, decorative beads, and so on.
First, cut the bamboo blinds into pieces about 4 cm long and glue them around the creamer cup.
That completes the pot section of the kadomatsu.
Next, cut the paper straws diagonally to resemble bamboo.
Once each part is ready, place a piece of sponge inside the pot, insert the parts you made, and attach them with glue to finish!
New Year’s decoration made with a shimenawa and artificial flowers

If you want a glamorous vibe, New Year’s decorations made with a shimenawa rope and artificial flowers are also recommended.
First, prepare a wreath base that you can buy at a 100-yen shop.
Tie the rope onto it as if it were winding along the surface to create a New Year’s feel.
Then decorate it with artificial peonies and pine needles.
It’s already looking quite luxurious, isn’t it? Finally, add mizuhiki ornaments as you like, and you’re done.
The tips of pine needles can be sharp, so it’s best to cover them with tape or similar for safety.
Celebratory crane made with origami

As the saying goes, “Cranes live a thousand years,” so cranes are a symbol of longevity and a classic New Year’s motif, carrying the wish for a healthy year.
In this project, we’ll make a crane out of origami and elevate it beyond the standard design to create a more luxurious finish.
Start with a traditional origami crane as the base, add accordion folds to the wings, and attach a separately made fan to the tail to give the whole piece a sense of breadth.
The choice of paper is also key: using washi-style patterned origami and selecting designs that harmonize with your other decorations is highly recommended.
New Year decorations made with quilling

Quilling is the art of tightly rolling long, thin strips of paper around a core and then shaping them.
Using this quilling technique, let’s create three-dimensional, colorful New Year’s decorations.
First, it’s important to decide on a design and sketch it on paper; you will shape the rolled strips to match this design.
Once each part is complete, arrange them snugly in a box and secure them with glue to finish.
Think carefully about which colors and shapes will best convey the feeling of the New Year.
wire shimenawa decoration

Why not try making a Scandinavian-style wire shimenawa decoration? The base is a shimenawa made of wire.
It’s sometimes sold under the name “iron shimenawa,” so try searching for that.
Then, attach decorative elements like pine needles with a hot glue gun.
If you buy decorations that already come with wire, you can attach them without using a glue gun.
Finally, add a decorative cord and you’re done.
If you feel traditional Japanese decor doesn’t suit your home, give this a try.
Let’s make our own New Year’s decorations! A collection of ideas using everyday materials (21–30)
Origami spinning tops you can play with during the New Year!
https://www.tiktok.com/@niconico_mama/video/7456395030828289288Here’s an origami spinning top idea you can make once you know the “zabuton fold.” You’ll use two sheets of origami paper, so prepare your favorite colors.
First, let’s fold the first sheet.
Do a zabuton fold by bringing all four corners to the center, then repeat that same fold two more times.
For the second sheet, also do the zabuton fold three times, but flip the paper over after each fold.
After the third zabuton fold, flip the paper over and open out the corners that are gathered at the center to the outside.
This will be the body of the spinning top; the first sheet will be the handle.
For the handle, squash the areas between the corners so the center stands up, then insert it inside the body of the spinning top, aligning the corners as you go.
Now your top is complete—use the handle to spin it and have fun!