Welcome the New Year! Ideas for Handmade Kadomatsu

Kadomatsu, often displayed in front of homes and shops during the New Year, serve as markers to guide the Toshigami (New Year deity) to visit each household or business.
In this article, we introduce handmade kadomatsu ideas to help you welcome the new year filled with happiness.
We’ve gathered a variety of DIY kadomatsu options: easy-to-make versions, compact designs that don’t take up much space, and simple creations using materials other than bamboo.
Use these ideas as inspiration and try making your own kadomatsu to suit your display location and personal taste!
Let’s welcome a great New Year! Handmade Kadomatsu ideas (1–10)
A kadomatsu made with paper cups
https://www.instagram.com/p/CJDrZGqJq2P/These are kadomatsu decorations you can make with your child using paper cups.
Stick double-sided tape onto the sides of the paper cup, then cover it by attaching jute twine in either a vertical or horizontal direction.
Fill the inside of the cup with pipe cleaners or sponge to raise the base.
Next, decorate the inside with kadomatsu made by rolling origami paper, a fan made by accordion-folding gold origami paper, and pine needles and nandina (heavenly bamboo) that you can buy at a 100-yen shop, and you’re done.
Adding chiyogami paper with “Geshun” (Happy New Year) written on it will make it feel even more festive for the New Year! The steps are all simple, so be sure to try making it at home with your child.
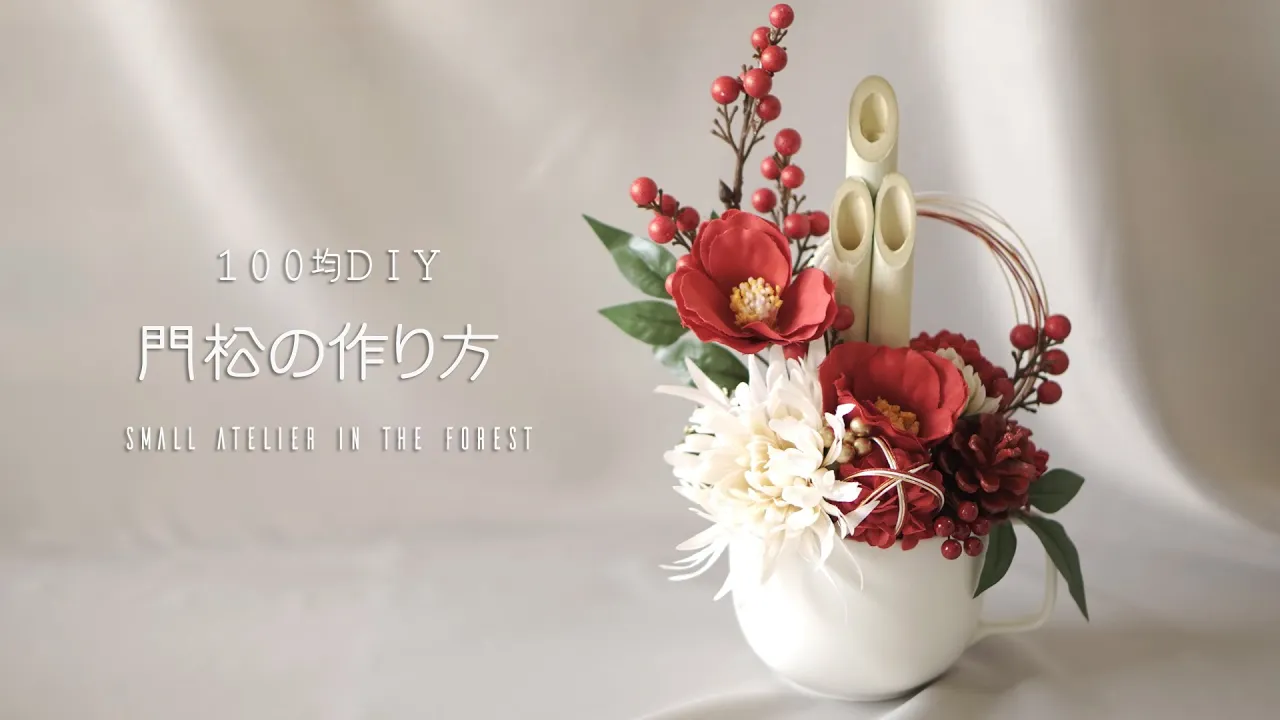
Kadomatsu made with a mug

A stylish kadomatsu arranged in a mug pairs perfectly with Western-style interiors! Cut a piece of floral foam to fit the mug and insert it.
Take a mini kadomatsu from a 100-yen shop, paint it in a milk-white or other color to match the mug’s vibe, and stick it into the foam.
Do the same with pine cones and other pieces—coordinate the colors first, then decorate.
Although a kadomatsu is traditionally made with Japanese-style materials, by changing the color palette and using Western-style flowers and decorations, you can create a chic look that blends seamlessly with the rest of your interior.
Kadomatsu made with flowerpots
https://www.instagram.com/p/CJc33YWAtU3/Let’s make a kadomatsu using a flowerpot you already have at home! It’s very simple: fill the pot with Shirakawa sand, insert green bamboo, and then pack the surrounding space with Japanese evergreen (omoto), bamboo grass, and pine needles.
Decorate it with festive New Year motifs like a phoenix, shishimai (lion dance), layered fans, nandina berries, white plum blossoms, rice ears, and celebratory fans.
If the pot is sturdy, you can leave it by your front door without worry.
You can easily get all the materials at garden shops or 100-yen stores, so give a DIY kadomatsu a try!
Kadomatsu made from an empty snack box

Empty snack boxes transform into festive kadomatsu! Cut a cylindrical paper container—like a potato chip can—6 cm down from the opening.
Apply double-sided tape around the outside and attach jute twine vertically to cover the entire surface.
Then wrap and tie two horizontal lines of jute twine around it; trim any excess to finish the outer base.
Fit a piece of cut cardboard inside, then decorate with “green bamboo” made by rolling paper, artificial flowers, and small New Year’s ornaments.
You’ve got a handmade kadomatsu! Use hot glue to secure each part as you assemble it.
Felt kadomatsu

This is a no-sew kadomatsu you can make that will warm the heart with felt’s cozy texture.
Wrap beige felt around a thin stick, then wrap green felt over it and glue it in place.
Remove the stick and cut the tip on a slant to create green bamboo.
Make three of these, cover them around with purple felt, and tie on a traditional Japanese cord.
Add a camellia made by cutting yellow and red-and-white felt and gluing them together, and a pine made by snipping green felt and rolling it diagonally.
Arrange them beside the bamboo, and your felt kadomatsu is complete!
Kadomatsu made from paper cores

This is an eco-friendly kadomatsu made using toilet paper rolls.
Cut the tops of the rolls diagonally and wrap them with green paper to resemble fresh bamboo.
Place two rolls side by side and glue them together, then attach a third roll behind them in the center so that it sticks up a few centimeters higher.
Next, prepare dark green construction paper with small slits cut at several points along the top and bottom edges.
Wrap the three bamboo pieces with the slit paper, then wrap a slightly narrower strip of red construction paper over it.
Your kadomatsu is complete! Why not make one with your child during the relaxing New Year holidays at home?
Origami Kadomatsu

This is an origami kadomatsu you can make with your child.
Crease the green origami paper along the diagonals, then bring one pair of opposite corners together at the center.
Flip it over, fold it in half, and shape it into bamboo by folding the corners.
Make three of these, glue them together, and add yellow origami paper to represent the bamboo cut ends—your kadomatsu is ready in no time! It’s just folding and gluing, with hardly any scissors needed, so why not try it together over the New Year holiday at home?