[Handmade Winter Decorations] A collection of stylish, heartwarming creations you can make with everyday materials


Precisely because it’s the cold season, you want to make your time at home enjoyable, right? How about transforming your room into a warm, cozy space with handmade winter decorations? With simple, everyday materials, you can create surprisingly lovely winter decor like Christmas trees, snowmen, and New Year’s ornaments! In this article, we introduce ideas for handmade decorations that brighten the winter season—from projects you can do with your children to more elaborate pieces that adults can enjoy as a hobby.
Savor the changing seasons and try making handmade winter decorations that add warmth to your everyday life!
- [Great for killing time!] Winter-Recommended Craft Ideas for Adults
- A roundup of handmade Daruma ideas: making Daruma with various materials
- Handmade winter garlands: cute ideas that are easy to make
- Handmade snow globe ideas: simple yet cute crafts
- Let's make New Year’s decorations by hand! A collection of ideas you can create with everyday materials.
- For seniors: Introducing handmade decoration ideas to welcome a wonderful Christmas
- [For Seniors] Enjoy the Cold Winter! Simple, Recommended Crafts
- Handmade Christmas snow globe
- Let's make a handmade tissue case: a collection of stylish and easy ideas
- Let's make it with acorns! Cute Christmas craft ideas.
- [Origami] Have fun with kids! A collection of easy snowman origami ideas
- Handmade Christmas Hair Accessories: A Collection of Ideas Using Ribbons and Resin
- [Grown-up Cute] Easy Handmade Ideas for Miscellaneous Goods and Interior Accessories
[Handmade Winter Decorations] A Collection of Stylish, Heartwarming Creations You Can Make with Everyday Materials (11–20)
Cotton Light Ball

Because of the season, it gets dark early, so this kind of indirect lighting can add warmth.
These cotton light balls made with cotton thread are very stylish winter decorations.
Wrap cotton thread around an inflated balloon, soak it with glue, and let it dry.
Once the thread is dry, pop the balloon.
You’ll find the cotton thread has hardened into a ball shape! Then just thread a string of lights through the inside and it’s done! One note: choose lights that don’t generate heat even when left on for a long time.
Santa boots
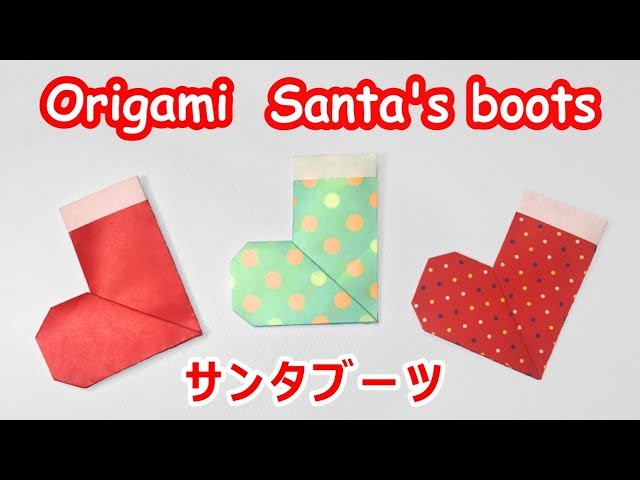
Here’s a great recommendation for when you want to decorate your room’s walls cutely and quickly: Santa boots made from origami.
You can complete each one with just a single sheet of origami paper, so it’s easy to make even in small pockets of time.
The steps are simple, and you can enjoy making them with young children too! As long as the paper is square, you can adapt the size—try using a larger sheet to fold a giant Santa boot.
If you’re thinking, “I don’t have much time, but I’d still like that handmade warmth,” give this a try!
Santa made from a toilet paper roll

Enjoy the winter spirit together with your little ones! Let’s make a Santa using a toilet paper roll.
Wrap it with felt to create the face and outfit, use black beads for the eyes, and add a separately made triangular hat on top.
Finish by attaching a fluffy cotton beard! Its adorable look is sure to bring a smile.
Using this method, you could even try it with a larger empty can, for example.
Have fun creating your very own Santa!
Camellia flowers made of cardstock

Let’s make a camellia flower out of construction paper that evokes the arrival of winter! Tie the center of a bundle of thread wrapped around a ruler, cut the loops to create the pollen part of the camellia, and attach it to the tip of a wire that will serve as the stem.
Cut five small circles from construction paper, make a slit in each, and use a thin stick to give them a gentle curve.
Then use glue to attach them to the wire with the pollen part.
Prepare another wire with leaf-shaped paper attached, combine it with the flower wire, and wrap the stems with masking tape to secure them.
Your camellia, a flower that represents winter, is complete!
Snow rabbit wall decoration

Here’s how to make a snow rabbit wall decoration that’s perfect for the winter season.
Fold an origami sheet into quarters and cut it into an oval shape.
Glue the pieces onto construction paper, then cut around them again and glue them down securely.
For the finishing touch, use craft cotton to add a snow-like effect.
Use green construction paper and decorative parts to make the rabbit’s eyes and ears, and attach them.
Finally, punch a hole at the top of the wall decoration and thread a ribbon through to complete it.
Adding snow illustrations or small accessories around the construction paper will create an even more wintry atmosphere.
sock snowman

How about upcycling old socks into cute snowmen? Cut a sock in half and turn it inside out, tie off the ankle end, then turn it right side out again.
Stuff the inside with leftover fabric or filling to make it round, use a rubber band around the middle to create a waist, and tie off the open top with another rubber band—your snowman base is done! Add eyes and decorations with beads, buttons, and ribbon, and finally slip the toe section of the sock over the top to make a knit hat.
Instead of just throwing them away, it’s lovely to repurpose them into winter-only accessories you can enjoy.
[Handmade Winter Decorations] A Collection of Stylish, Warm Creations You Can Make with Everyday Materials (21–30)
A wreath made using decorations from a ceremonial gift envelope (goshūgi-bukuro)
@maitake666 New Year’s decorations made from gift envelopes 🌸 I upcycled celebratory money envelopes with a friend who just had her wedding‼︎ It was so much fun spending time cutting, attaching, and combining pieces from lots of mizuhiki cords ⏳🫶 Just by cutting and attaching the mizuhiki, you can make something cute easily ☺️✨ How about turning all those congratulations into a keepsake? 🕊️Weddingcelebratory gift envelope#GoshugiEnvelopeRemake#NewYearDecorationsShimenawa wreath
♬ Everyday/Cute Piano Solo(1512061) – Sumochi
Here’s an idea for a beautifully simple shimenawa wreath arranged with mizuhiki cords.
Many people find it hard to throw away the decorative mizuhiki from gift envelopes—if that sounds like you, give this a try.
You’ll need a wreath base, mizuhiki cords, a hot glue gun or adhesive, and scissors.
Combining and attaching the mizuhiki creates a glamorous look.
Add materials like artificial flowers or nuts, and you’ll have a one-of-a-kind shimenawa wreath.
Finish it with memories and gratitude in mind.