[Handmade Winter Decorations] A collection of stylish, heartwarming creations you can make with everyday materials


Precisely because it’s the cold season, you want to make your time at home enjoyable, right? How about transforming your room into a warm, cozy space with handmade winter decorations? With simple, everyday materials, you can create surprisingly lovely winter decor like Christmas trees, snowmen, and New Year’s ornaments! In this article, we introduce ideas for handmade decorations that brighten the winter season—from projects you can do with your children to more elaborate pieces that adults can enjoy as a hobby.
Savor the changing seasons and try making handmade winter decorations that add warmth to your everyday life!
- [Great for killing time!] Winter-Recommended Craft Ideas for Adults
- A roundup of handmade Daruma ideas: making Daruma with various materials
- Handmade winter garlands: cute ideas that are easy to make
- Handmade snow globe ideas: simple yet cute crafts
- Let's make New Year’s decorations by hand! A collection of ideas you can create with everyday materials.
- For seniors: Introducing handmade decoration ideas to welcome a wonderful Christmas
- [For Seniors] Enjoy the Cold Winter! Simple, Recommended Crafts
- Handmade Christmas snow globe
- Let's make a handmade tissue case: a collection of stylish and easy ideas
- Let's make it with acorns! Cute Christmas craft ideas.
- [Origami] Have fun with kids! A collection of easy snowman origami ideas
- Handmade Christmas Hair Accessories: A Collection of Ideas Using Ribbons and Resin
- [Grown-up Cute] Easy Handmade Ideas for Miscellaneous Goods and Interior Accessories
[Handmade Winter Decorations] A Collection of Stylish, Warm Creations You Can Make with Everyday Materials (41–50)
Mini New Year’s decoration made with artificial flowers

Artificial New Year’s decorations are pieces that can add a festive touch even in small spaces.
In the idea that places a wreath on a coaster, you get stability, making it perfect for a little spot in an entryway or on a shelf.
In another idea, you freely arrange New Year-themed ornaments and mizuhiki cords to create a modern, refined look.
In both cases, the impression changes depending on the colors of the artificial flowers and the shapes of the mizuhiki, so you can customize them to your taste.
If you secure everything firmly with glue or a hot glue gun, you can display it year after year.
These are lifestyle-friendly ideas that subtly brighten your New Year’s celebrations.
Horseshoe-shaped New Year’s wreath

Decorate your room or entrance with an elegant, beautiful wreath to welcome the New Year! You’ll need a paper shimenawa, four peonies, a mum, two micro rose spray nuances, cotton, two dancing orchids, golden enkianthus, wire, and more.
You can find all the materials at a 100-yen shop, so feel free to give it a try.
It’s built on a U-shaped wreath base, and the charm is that you can keep it up as interior decor even after the New Year! It also looks fun to play around with the arrangement and balance of the flowers.
Complete with just two pieces of fabric! Easy Christmas tree

This Christmas tree made from two pieces of fabric is a simple project—just sew them together and fold—making it perfect for sewing beginners.
Cut the outer and lining fabrics into half-circle shapes and sew them together.
Simply changing the fabric patterns transforms the look completely, letting you style it in Scandinavian or natural tastes.
Picking cute fabrics with kids and experiencing hand-stitching can also give a great sense of accomplishment.
It’s a Christmas tree idea that adds warmth to your room and is perfect for winter décor.
Let’s try making a pinecone tree!

Here are some DIY Christmas decoration ideas using pine cones and acorns you can pick up on a walk.
Be sure to sterilize the pine cones and acorns in boiling water before using them.
Paint the pine cones in any colors you like, decorate them with beads, pom-poms, pipe cleaners, and ribbon flowers, then glue them onto a coaster to serve as the base.
Next, color the acorns with markers to make Santa and a reindeer.
For the reindeer’s antlers, cut them out of origami paper with scissors.
Glue Santa and the reindeer onto the base, fill any gaps with cotton, and you’re done!
Sparkly stick-on ornaments
@rima_asobi♬ Christmas standard song – 3KTrack
Let’s make sparkly ornaments you can stick on windows using glue, glitter, and sequins.
For tools, use white copy paper, a clear file folder, and a pen.
First, draw your ornament design on the copy paper.
Place it inside the clear file, then apply glue on top in the shape of the ornament.
Be sure to cover not only the outlines but also the inside of the design.
Decorate the glue with glitter and sequins however you like, and let it dry completely.
Your ornament is ready! It works like a sticker, so it’s easy to put on and peel off.
Festive sea bream decoration
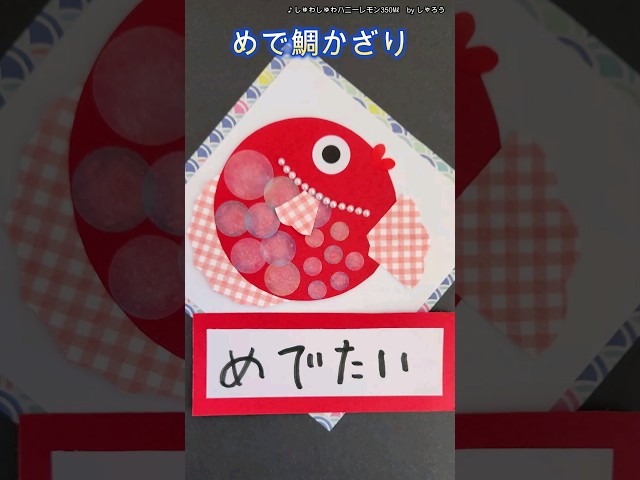
Chic and celebratory! Let’s make a decoration featuring a sea bream motif.
Using red construction paper, cut one circular piece for the body and two small teardrop-shaped pieces for the mouth.
From patterned origami paper in the same color family, make one pectoral fin, one dorsal fin, and one tail fin.
Attach the tail fin to the circular body piece, then add round stickers of various sizes to create the scales.
Gradient stickers that add a 3D effect are recommended.
After the scales are on, attach the dorsal fin and use rhinestones to represent the gill.
Glue on the pectoral fin, and add eyes with white and black round stickers.
Finally, attach the mouth and glue the sea bream onto the base to finish.
A tree garland that also works as a sun catcher

Use a black marker to draw a tree shape on a clear file, then stick translucent flower stickers inside the tree.
You can arrange them however you like, but try to fill the entire area.
Once the stickers are in place, cut along the tree shape.
When cutting, make sure no black lines remain.
Since we want to make a garland, create a few in different colors and hang them on a string with clips.
You can choose any shapes and stickers you like.
If you use transparent stickers, you can also hang them by a window and use them as a sun catcher.