[For Preschoolers] Fold with Fun! January Origami Ideas for Little Ones

Seeing the older preschoolers and kindergarteners, the younger ones start to feel eager to try doing things on their own.
They admire the older kids who freely create with scissors and glue, don’t they?
So today, we’d like to share some January origami ideas that younger preschoolers can enjoy.
Using tools might still be hard to do alone, but origami is easy to enjoy!
We’re introducing simple designs that younger children can fold by themselves to feel a sense of accomplishment, as well as slightly more complex folds for kids who are confident with origami and want a challenge.
We hope you make lots of them and have fun playing!
- [For Preschoolers] Let’s Make It Together with the Kids! Origami Ideas for February
- [Kindergartners (Older Group)] Folding is Fun! Recommended January Origami Idea Collection for Senior Kindergarteners
- [For 4-5-year-olds] Folding is fun! A collection of January origami ideas to enjoy with preschoolers
- Origami for 2-Year-Olds: Fun and Educational! Origami Ideas for Toddlers
- Ideas for Easy Winter Origami Crafts That Even 2-Year-Olds Will Love
- Simple origami for kids: cute, playable origami ideas
- Origami to Enjoy January and Winter! A Collection of Simple Ideas to Use in Childcare
- For older kindergarteners: Let’s make it! A collection of recommended origami ideas for February
- Origami Fun in Winter for One-Year-Olds! Simple ideas for tearing and sticking, too
- Fun spring craft ideas using origami to make with your one-year-old!
- [Origami] Try it with your 2-year-old! Easy spring origami ideas
- For preschoolers! Cute origami ideas to make in December
- Captivating for older kindergarteners! A collection of fun origami ideas for December
[For Preschoolers] Let’s Fold for Fun! January Origami Ideas for Little Ones (21–30)
Let’s make plum blossoms!
@hoikushi_worker Easy with origami! New Year’s kirigami (plum blossoms) We’re introducing a January craft perfect for early childhood settings: “New Year’s kirigami (plum blossoms)” using origami. The moment you open the cut paper is so exciting—what shape will it be? Try arranging different cutting and folding styles and have fun! ================================= We also have a LINE account★ Get exclusive updates by adding us as a friend♪ Check our profile @hoiku_column! ================================= Do you have any concerns in your childcare setting? Even if it’s not related to this post, tell us about your challenges or worries in the comments! Let’s exchange ideas freely♪ ================================#Childcare Crafting#Nursery School Craft#Wall Creationwall surface#Recital#HomeCraftsNew Year’s craftPapercraft#papercraft#kidscraftsOrigami playOrigamiorigami#OuchiMonte#AtHomeMontessoriEarly childhood education materialsChildcare#Nursery schoolNursery teacher / Childcare worker#First year as a nursery teacher#KindergartenKindergarten TeacherKindergarten teacherAspiring childcare worker#NurseryTeacherInTrainingNursery school teacher#NurseryTeacherThingsChildcare student#IWantToConnectWithChildcareWorkersNursery Teacher Worker ================================
♪ Original Song – [Sharing Useful Info for Nursery Teachers!] Hoikushi Worker – [Sharing Useful Info for Nursery Teachers!] Hoikushi Worker
Let’s incorporate the plum blossom—famous as a New Year’s flower—into your New Year’s card design.
Here’s a paper-cutting idea you can enjoy like a craft project.
Fold origami paper following the set steps, draw two curved lines, and cut along them with scissors.
Then slowly unfold the paper, and your plum blossom is complete.
There are only seven folds in total, and two of those are just to make crease lines.
It’s an idea that’s easy for children to make, so please give it a try.
Create plum blossoms in various sizes and colors to make a vibrant New Year’s card.
Origami horse you can make with a single sheet

Perfect for the Year of the Horse! Here’s an idea for making a horse’s face out of origami.
New Year’s cards are often associated with illustrations and drawings, but if you create one by attaching an origami piece, it adds depth and turns it into a very special card.
This design uses a simple series of folds along the creases and can be made with just one sheet of origami paper.
You’ll need a craft knife to make the mane, so have it ready before you start.
Use black round stickers for the eyes and draw the nostrils with a pen.
[For Preschoolers] Let's Fold for Fun! January Origami Ideas for Younger Kids (31–40)
Snow Fairy! How to Fold a Long-tailed Tit (Shima-enaga)

Let’s make a long-tailed tit using a single sheet of origami paper.
Fold the paper into a triangle, then fold both corners up to meet the top corner.
Fold the left and right corners inward to form a triangle, then rotate the paper to swap top and bottom.
Align with the top corners of the left and right triangles, and fold the two bottom corners outward to open them—these will be the wings.
Turn the paper over, squash-fold the triangular wings into squares, then fold the bottom corner up to meet the top corner and change the wings to black.
Tuck in the left and right corners of the black section to refine the shape, and flip the paper over.
Round out the remaining white area in the center, and you’re done.
Draw the face to finish it cutely.
Cozy Penguin

Here’s how to fold an origami penguin that can also wear a hat and scarf.
First, fold it into a triangle twice, then open it once.
With a corner pointing down, fold up the top layer so about 2 centimeters stick out, then fold it down along the edge.
Fold the edge you just made in half to make a crease, then fold the bottom corner up to that crease to set a guideline.
Next, fold the other corner up toward the front crease.
Fold the tip of the corner down just a little.
Fold up along the crease you made earlier, align the edges, and fold the whole piece in half.
Finally, adjust the shape to look like a penguin and draw the eyes with a pen to finish.
Try making a hat and scarf for it, too!
a round and laid-back penguin
This is an easy and cute origami penguin.
First, turn the paper over and make two creases by folding it in half both ways into a square.
Fold one edge down to align with the center crease.
Flip it over, then fold the left and right edges to the center line.
Open the colored corner and squash-fold it.
Fold the bottom edge up to the center to make a crease, open it once, then fold the bottom tip inward along that crease.
Fold the corners to form the feet.
Fold the protruding colored corner to suggest the hands.
Finally, round off the colored tip to finish! Decorate it cutely with round stickers or a pen.
Penguin money envelope

This is a cute penguin folding method that’s perfect for New Year’s gift envelopes.
First, place the origami colored side up, fold it into a triangle twice, then open it once.
Fold both layers of the top corner down to meet the bottom edge to make creases.
Make another crease by folding only the top layer of the top corner down so it sticks out slightly past the bottom center.
Fold only the top layer of the top corner down to align with the bottom crease.
Next, fold along the upper crease, then fold the tip upward so it peeks out a little.
Fold back the part sticking out at the top.
Turn it over and fold both corners toward the center so the tips overlap.
Tuck one corner into the other.
Finally, draw the face with a pen, and you’re done!
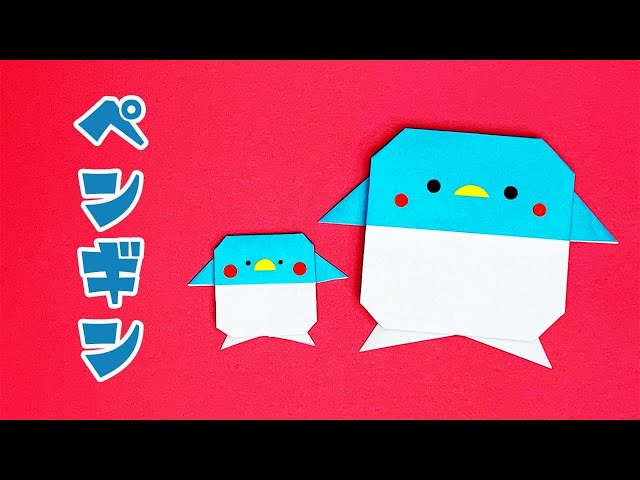
Penguin parent and child
Here’s how to fold cute parent-and-child penguins.
First, turn the origami paper to the back and fold it into a triangle twice to make creases.
Fold one corner to align with the center line, open it, then fold along the creases two more times to set the folds.
Fold the corner up twice.
Next, fold both corners at the folded section toward the center line.
Fold the tip up to the front crease, then flip it over.
After flipping, fold the outer corners diagonally upward toward the center line.
Then, fold both corners outward so they stick out, like in the image of hands.
Finally, adjust the corners to shape them into penguins, and you’re done! If you make them with small origami paper as well, you’ll have a parent and child penguin set.
Decorate the eyes with round stickers or a pen.
In conclusion
We’ve shared January origami ideas to enjoy with preschoolers. From simple designs that are quick to fold to slightly more complex ones for children who love origami and want a challenge, there’s a wide variety! Teachers, please join in and have fun trying January’s origami projects together!