[Childcare] Autumn craft ideas

We’ve gathered fall craft ideas that are perfect for childcare!
Autumn is a comfortable season with plenty of chances to go for walks and play outside.
Children are likely to pick up all sorts of intriguing things—acorns, pinecones, leaves, and more.
In this article, we introduce crafts that use found items as materials, as well as projects made with construction paper, origami paper, and recycled materials.
We’ve collected a wide range of ideas—from toys kids can play with after making them to decorations for wall displays—so try choosing activities that suit the children’s ages and have fun creating together!
- [Childcare] For 5-year-olds! Autumn craft ideas
- [November] Enjoy with 3-year-olds! Craft activity ideas recommended for autumn
- Grape craft ideas to enjoy in childcare! Have fun making autumn fruits
- Hedgehog crafts for daycare and kindergarten! A collection of ideas to enjoy autumn in childcare
- [Childcare] Recommended for 3-year-olds! Craft activity ideas
- Even 1-year-olds will be captivated! A collection of craft ideas to enjoy the art-filled autumn
- September: Autumn crafts! Ideas you can use in childcare
- Exciting September crafts for 4-year-olds! A special collection of fun ideas with autumn-themed motifs
- [Autumn Activities] Nature Play and Craft Ideas for Fall to Incorporate into Childcare!
- [October] Craft ideas for fall you can use in childcare
- Get kids excited in November! A collection of play and craft ideas using autumn’s natural treasures
- Preschool: Autumn-Themed Craft Ideas Recommended for November
- [For 3-year-olds] Perfect for September! A Collection of Craft Ideas to Enjoy Autumn Nature
[Childcare] Autumn Craft Ideas (91–100)
[Ages 4 and up] Hedgehog made with construction paper
https://www.tiktok.com/@hoiku.labo/video/7428433887560289543The hedgehog craft that lets children feel the seasons helps four-year-olds further develop their color choices and tool use.
Prepare construction paper, glue, and scissors, and let’s get started.
Cut out the hedgehog’s body, ears, and fur from construction paper using scissors.
Glue the cut pieces together.
Use zigzag scissors to give the fur a three-dimensional look.
Once you’ve glued all the parts together with a good sense of balance, it’s complete.
This activity also encourages children to think about things like how much glue to use and how to arrange the parts.
Give it a try!
[Ages 1 and up] Easy Hedgehog with Fork and Sponge
![[Ages 1 and up] Easy Hedgehog with Fork and Sponge](https://i.ytimg.com/vi/B7rR6Xau1fI/sddefault.jpg)
Let’s have fun making a hedgehog that squeaks “peep-peep,” using a fork and a sponge.
Prepare disposable plastic forks, sponges, a base sheet of construction paper, a hedgehog template, paints, and a palette.
Apply paint to the entire back side of the fork and press it onto the hedgehog template as you paint.
A rubbed, scratchy-looking texture helps create a more three-dimensional effect—this is a key point.
When dabbing paint with a sponge, the strength of the pressure you apply to the paper will change how the color appears.
This craft is perfect for one-year-old children who are exploring textures—give it a try!
[Ages 2 and up] Let’s make a hedgehog with newspaper!
![[Ages 2 and up] Let’s make a hedgehog with newspaper!](https://i.ytimg.com/vi/F5K2YKZHSU4/sddefault.jpg)
Making newspaper hedgehogs is perfect for two-year-olds who enjoy using their hands.
Prepare construction paper, a hedgehog template, glue, newspaper, and scissors, and get started.
You can cut the newspaper with scissors, but tearing it by hand to represent the hedgehog’s spines or fur is also recommended.
Since two-year-olds aren’t yet familiar with using scissors, be sure to check their grip and how to open and close the scissors before proceeding.
Using tissue paper or origami to make a colorful hedgehog can also be a great way to help them enjoy colors visually.
[Ages 4 and up] Colorful and cute hedgehog
![[Ages 4 and up] Colorful and cute hedgehog](https://i.ytimg.com/vi/UAUdDZ3Hd_g/sddefault.jpg)
Three-dimensional, colorful hedgehogs are a craft that even four-year-olds can enjoy making while exploring colors.
Sketch the shape of a hedgehog and cut along the traced lines.
Cut colored construction paper, fold it in half, and use glue to attach it to the body.
Incorporating the act of folding in half helps children become more aware of creating symmetrical folds.
Apply glue to one side of the halved paper and stick it onto the hedgehog.
You’ll end up with an adorable, colorful, three-dimensional hedgehog.
Swirly Grapes
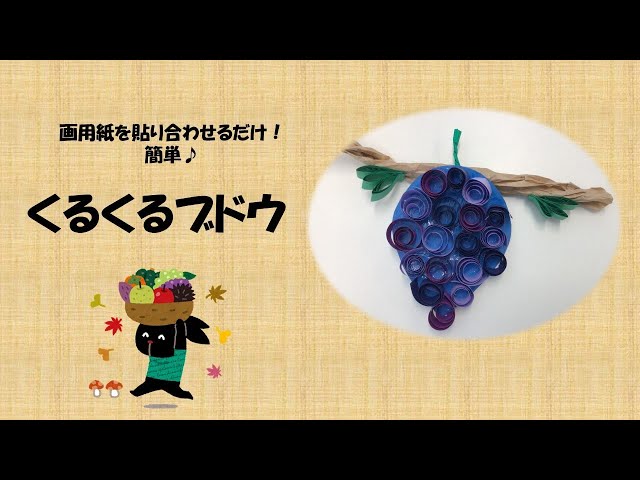
When it comes to the king of autumn flavors, grapes surely take the crown.
Let’s make a seasonal craft by rolling construction paper.
Prepare construction paper, scissors, and glue.
Cut the construction paper into a teardrop shape to create the base for the grapes.
Cut long, thin strips of construction paper and roll them tightly with your fingertips to form grape shapes.
Glue the rolled “grapes” onto the base in a three-dimensional way, making sure there are no gaps.
Finally, cut and roll green construction paper to make the stem and cluster top, then glue it on to finish.
Try making it while paying attention to finger dexterity, size, and overall balance.
Easy grapes—just put them in a plastic bag

Let’s make grapes by crumpling tissue paper—an activity kids can enjoy from around age one.
Prepare a clear plastic bag, tissue paper, and a pipe cleaner.
Shape the clear plastic bag into a triangle, then crumple the tissue paper into small balls to make grape berries.
Put the berries into the bag and twist the opening closed with the pipe cleaner.
Once your 3D grape cluster is done, add a leaf made from a handprint and create a wrinkled pattern on it to finish.
This is a craft that children around one year old, who love squeezing and crumpling, can enjoy.
Give it a try!
Grapes wreath
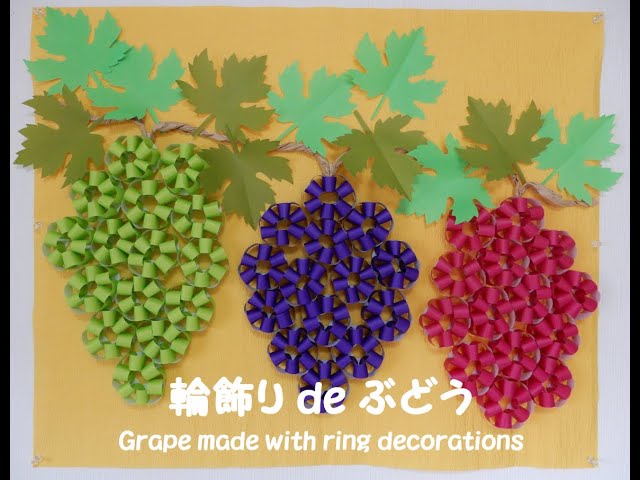
Using origami to make delicious-looking grapes is also perfect as a craft that stimulates fine motor development.
Prepare origami paper, glue, and scissors, and let’s get started.
Cut the origami into strips with scissors and glue the ends to make loops.
Make a total of 12 loops.
Glue the loops together to form a bunch of grapes.
If you use light green origami, you can make Shine Muscat grapes.
You can also make leaves and the stem, which might be fun for wall displays and other decorations.