

As graduation season approaches, many people start thinking, “I want to give a handmade gift to the teacher who took such good care of my child.” Here, we introduce ideas for handmade gifts to give to kindergarten or nursery school teachers.
From cute pipe-cleaner keychains and practical sacoche bags to mini bouquets you’ll want to display, these are all projects you can enjoy making together with your child.
Create a one-of-a-kind gift filled with gratitude to preserve your memories with the teacher in a wonderful way!
- [For Elementary School Students] A Collection of Simple Handmade Gift Ideas
- [For Kids] Collection of Handmade Message Card Ideas
- A gift to give your teacher at graduation that conveys your gratitude
- From current students to graduates! A collection of handmade graduation gift and keepsake ideas
- Feelings That Reach the Heart! Handmade Gift Ideas to Give at Graduation
- [Graduation from Kindergarten] Ideas for Handmade Gifts to Give to Someone Special at Farewell Time
- Recommended decorations for kindergarten graduation! A collection of DIY wall displays and decoration ideas
- [Graduation Commemorative Gifts] Handmade Presents That Kids Will Love! A Collection of Easy-to-Make Ideas
- From Grandchildren with Love! Heartwarming Handmade Gift Ideas for Respect-for-the-Aged Day
- [For Kids] Today’s Handmade Craft Ideas
- Handmade celebration card ideas. How to make a message card.
- Handmade Gifts for Graduates: A Collection of Heartfelt Ideas
- Graduation Ceremony: A Collection of Surprise Ideas That Will Move Both Adults and Children
Ideas for Handmade Gifts for Teachers to Give at the Preschool Graduation Ceremony (1–10)
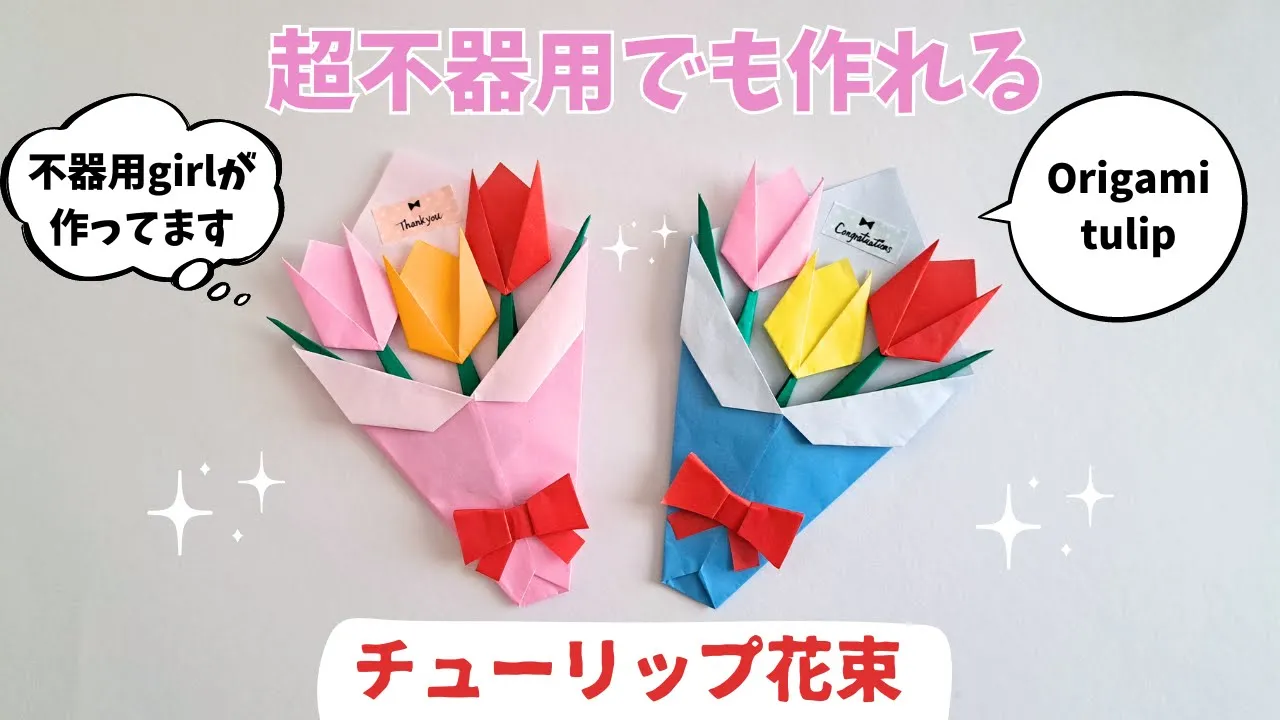
A bouquet of origami flowers you can display forever!

Here’s an introduction to a lovely gift that you can enjoy on display for a long time: make individual flowers out of origami and arrange them into a bouquet.
First, place the colored side of the origami paper facing up and fold it into a triangle.
Using the center as the axis, fold both corners diagonally upward to make a tulip.
Use a green sheet of origami paper cut into four equal parts to make the stems.
After gluing the tulip and stem together, fold a wrapping sheet using origami paper in your favorite color.
Pop the tulips into the wrapping, and you’re done! If you like, add decorations or include message cards from the children to make it an even more heartfelt present.
Since it will never wilt, the teacher can always display it in the classroom or at home and enjoy the memories.
Let’s collect messages and make it!

If you want to express your gratitude to the teachers at the graduation ceremony, a handmade message book is a great idea.
Collect each child’s words of thanks, their portraits, and photos, and compile them into a single book.
First, decide on the card size and prepare message cards in the same size.
Use rubber bands to keep the cards from shifting, then sandwich the cards between two wooden chopsticks.
Secure both ends with rubber bands and apply wood glue along the card edges.
Spread the glue evenly, then attach tissues to the glued area.
Once dry, remove the chopsticks and rubber bands, and stick a strip of cut fabric tape over the tissues.
Finally, add washi (masking) tape, and it’s done!
Clear file decoration

How about handmade decorations using clear files? By punching out cute shapes with a craft punch and sticking them onto a transparent clear file, or decorating it with colored paper and stickers, you can create a one-of-a-kind clear file.
Adding the children’s names or messages is also recommended.
The process is simple and fun to do together as a parent-child activity.
The finished file can be used to hold documents and handouts, making it practical for teachers while also letting them feel the children’s thoughtfulness anytime.
It’s an idea that conveys the warmth and individuality unique to handmade gifts.
Handmade accordion album

How about a handmade accordion album as a graduation gift from preschool? An album that opens like an accordion lets you arrange and paste photos and messages in order, so you can enjoy the children’s memories every time you look back at it.
First, apply fabric glue to the back side of the fabric.
Attach a 10 cm x 10 cm piece of thick paper to the center of the fabric.
Fold construction paper into an accordion at 10 cm intervals.
Glue the construction paper sections together to create as many panels as you like.
Next, cut out photos of the children and paste them onto the construction paper.
Once you attach the fabric-covered front and back covers, it’s complete!
Handmade Colorful Candle

By melting ordinary candles and mixing in grated crayons, you can make colorful candles with a gentle glow.
Be sure to have an adult help you.
First, shave the candles and crayons.
Spread some dish soap inside a paper cup, tie the wick to a toothpick, and set it across the cup.
Next, put the candle shavings and crayons into an aluminum cup and melt them in hot water.
Once it cools and hardens, peel open the paper cup and it’s done! By choosing and layering the colors your children like, you can create a one-of-a-kind original candle.
Decorating it with wrapping and stickers adds an extra-special touch and is highly recommended.
Clay tray made from 100-yen store clay
@myako_crafts I tried making clay trays ♡ I made a lot, but here’s a close-up of the heart-shaped one… You can watch the other clay trays on YouTube at “Atelier Myako.” ✨#100-yen shop DIY#KoreanInterior#TikTokHandmade#점토요리Watch the recipe on YouTube.
Original song – Atelier Myako – Atelier Myako
Clay (kurei) means “clay,” and in this idea we’re using clay from a 100-yen shop to make a tray.
First, shape the base of the tray however you like, then add the sides.
For the sides, you can connect little clay balls, or twist the clay for a different look.
Try making it while experimenting to see which design you like best.
You can mix paint into the clay to create various colors, or make it in white, let it dry, and then paint it afterward.
Original Mug
https://www.tiktok.com/@saki_to_mamalife/video/7469640180710837512An original mug that’s easy to make: just print a photo onto clear sticker paper and stick it onto any plain mug you like.
If you scan drawings to create digital data, you can print kids’ artwork and patterns too, so you can make a mug filled with memories and milestones.
Pop a small gift inside the cup and wrap it up for a lovely present! Have fun planning your design and applying the stickers as you make it.
You can find clear sticker paper at 100-yen shops as well.