[Childcare] Let's make toys you can play with using origami!

Traditional origami play has long been popular across a wide range of ages, from young children to the elderly.
Origami helps develop dexterity and concentration, and gives kids a sense of accomplishment when they finish a piece—benefits that positively support their growth.
In this article, we’ll share several ideas for origami-made toys that will make origami time even more fun.
From nostalgic creations you probably made at least once as a child, to models with amusing motions, to surprising toys that make you say, “You can make that with paper?”—there are plenty of exciting ideas to spark joy!
Make them with your family or friends and have a blast together.
Give them a try and enjoy playing with everyone!
- It moves! You can play with it! Fun origami. How to make origami toys.
- [Childcare] Make and play! Origami ideas
- Simple origami for kids: cute, playable origami ideas
- [Childcare] Today’s Fun Origami Play
- [Childcare] Recommended for toddlers! Toy ideas you can make and play with
- [Nursery/Kindergarten] Crafts you can play with after making them
- Let’s make it with 3-year-olds! Fun handmade toy ideas
- Perfect for first-timers! A collection of origami that’s super popular with kids as young as three!
- [Origami] She’ll love it if you fold these! Simple ideas for girls
- Origami ideas boys will want to make!
- [Age 2] Summer Fun! Simple Origami Toys Perfect for Indoor Play
- Cool origami that boys will love and want to fold
- Simple origami that can be folded from a single sheet
[Childcare] Let’s make toys you can play with using origami! (1–10)
paper airplane
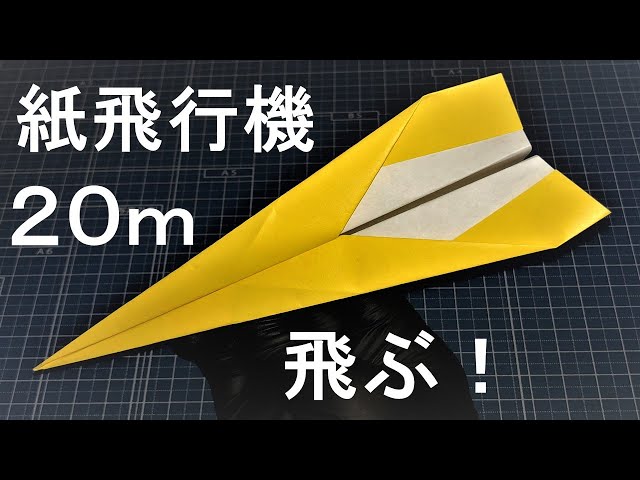
When there’s origami paper around, the first thing you want to fold is a paper airplane.
It’s amazing that you can make a plane that flies far with just a single sheet of origami paper.
It’s also fun that a small tweak to the folding method or a slight change in angle can affect how far it flies and how long it stays aloft.
The basic way to fold a paper airplane is simple, so once you master one design, you can fly it and play anytime, anywhere.
If you fold a paper airplane with your favorite color of origami paper, it’s also fun to have flying contests with friends.
Try experimenting with different folding techniques and see whose plane flies the farthest and stays in the air the longest.
Spinning shuriken

When you hear “shuriken,” you probably picture something you throw to play with.
But this origami shuriken spins when you blow on it! First, crease a cross on the paper, then fold the left and right edges to meet the central vertical crease.
Fold the top and bottom edges toward the center to make a square, and continue folding so it takes on a pinwheel shape.
Overlap the center sections to create a three-dimensional form, then fold back an edge to make a mouthpiece for blowing.
Your spinning shuriken is complete.
Hold it pinching around the center and blow—whoosh—watch it spin!
A toy you can wiggle and play with

Let’s make an origami piece that moves in a mysterious way as it changes shape! Prepare 36 sheets of 7.5 cm square origami paper.
We’ll make many small parts and combine them to complete the piece.
Fold the paper in half so it becomes horizontally long, then fold the two corners toward the center on the opposite side.
Turn it over, fold it so the top and bottom are reversed, open the pocket and flatten it, and one part is complete.
[Childcare] Let's make toys you can play with using origami! (11–20)
jack-in-the-box

A jack-in-the-box made of origami, where a doll pops out when you open the lid.
It’s an adorable-looking surprise box.
Let’s make a mechanical toy where a cute doll springs out of a colorful box.
Assemble the box holding the doll with glue to make it sturdy.
Leave the lid section unattached and the box is complete.
Next, prepare two colors of origami paper to create the popping doll.
Stack the two long, thin strips of origami and fold them alternately.
Now you’ve made an accordion part that expands and contracts like a spring.
Attach the accordion to the bottom of the box, then stick your favorite character’s face on top.
Push the accordion into the box and your jack-in-the-box is finished.
When you open the lid, the doll pops out—it’s so much fun!
Transformation Cube

This is a transforming cube that will surely captivate children as boxes pop out one after another! Fold the origami by bringing the diagonal corners to the center, then fold toward the center once more.
Fold it in half and open it back up, then fold upward and make diagonal folds along the lines.
Make four units by combining two of these parts each, and glue them together to complete a cube that expands and contracts like magic! It can tear if pulled too hard, so remind children to handle it gently.
munch munch

Let’s make a fun toy that moves with a chomping motion, completed using just a single sheet of origami, and offers many ways to play.
Once you learn how to fold it, you can enjoy playing with friends and family anytime, anywhere with just one piece of origami—so be sure to master it.
The folding method is simple, so it’s suitable for small children and older adults alike.
Once it’s finished, you can make it chomp with one hand, or use both hands to move it.
If you write a few selectable questions and answers on each face, you can even play a little psychology-style game.
Spins like crazy! Hand spinner

The hand spinner became extremely popular with both children and adults and even went out of stock for a time.
Believe it or not, you can make one from a single sheet of origami paper! First, make vertical and horizontal crease lines to form a cross, then fold both ends toward these creases.
Rotate it and fold both ends toward the other central line, then fold each end back into a triangle.
Open along those creases, fold back only the two on the diagonal, and form a pinwheel-like shape.
Add creases to each blade-like part, shape it by creating a triangular peak in the center, and you’re done! Pinch the peaked part between your fingers and blow on it—the spinner will whirl around.