Make it with everyday materials! A collection of fun summer vacation craft ideas


Summer vacation crafts are exciting even just to think up ideas, aren’t they? Still, lots of kids probably find themselves wondering, “What should I make?” The truth is, there are plenty of fun, easy projects anyone can make using everyday materials.
With things like plastic bottles, popsicle sticks, and milk cartons, you can create pieces that will make your friends say, “Wow!” So this time, we’re sharing craft ideas that are perfect for summer vacation homework.
Take a look and get inspired by these playful projects that are fun just to browse!
- For summer vacation homework! Simple and amazing crafts for elementary school students that you’ll want to make after seeing them
- Simple yet amazing crafts: craft ideas that elementary school students will want to make
- [Summer Vacation Crafts for Lower Grades] Make It with Everyday Materials! Simple Yet Awesome Craft Ideas
- [Indoor Activities] A Collection of Craft Ideas Recommended for Elementary School Students
- [Summer Vacation Crafts] Not just make-and-done! A collection of practical ideas you can use every day
- Simple and cute summer project crafts! A collection of ideas for girls that will make you want to create
- [For Adults] Fun Craft Ideas Perfect for Killing Time
- A collection of summer vacation craft ideas made with 100-yen shop materials
- [For Upper Elementary Students] Simple but Awesome! A Collection of Summer Vacation Craft Ideas
- [Summer Vacation Crafts] Stylish Ideas for Girls
- Crafts you can make with 100-yen shop items! A collection of fun project ideas that elementary school kids will love
- Craft ideas using felt. Great for kids’ summer vacation projects!
- Christmas crafts for adults: stylish project ideas you'll want to display
Fun Summer Vacation Craft Ideas You Can Make with Everyday Materials (41–50)
Fly! Core Rocket

Here’s how to make an easy “core rocket.” You’ll need a plastic wrap core, a toilet paper core, two rubber bands, and a straw.
First, cut the straw so it’s just a little longer than the opening of the toilet paper core.
Link the two rubber bands by looping them together.
Tape the rubber bands to the straw, then tape the straw onto the plastic wrap core with cellophane tape.
Once it’s set up so the toilet paper core can be launched, you’re done! Decorate the toilet paper core however you like to make your own original rocket.
Have fun and get creative!
Marble-rolling game made with 100-yen shop items

How about making a marble-rolling game like pinball or smart ball using 100-yen shop items? First, prepare a thick document file (the kind used for storing papers) and cut a piece of cardboard to the same size to use as the base.
Paste construction paper on it, then cut out faces of your favorite animals or characters from more construction paper and stick them on.
Punch a hole where the animal’s or character’s mouth is, create a starting point, and slide it into the file—done! Instead of animals or characters, you can also make ramps so the marble slides down, which is highly recommended.
It’s portable, so it’s great as a time-killer for kids when you’re out and about.
Marble-rolling game made with 100-yen shop items
How about making a marble-rolling game like pinball or smart ball using 100-yen shop items? First, prepare a thick document file (the kind used for storing papers) and cut a piece of cardboard to the same size to use as the base.
Paste construction paper on it, then cut out faces of your favorite animals or characters from more construction paper and stick them on.
Punch a hole where the animal’s or character’s mouth is, create a starting point, and slide it into the file—done! Instead of animals or characters, you can also make ramps so the marble slides down, which is highly recommended.
It’s portable, so it’s great as a time-killer for kids when you’re out and about.
You can make it in 10 seconds! Marble run
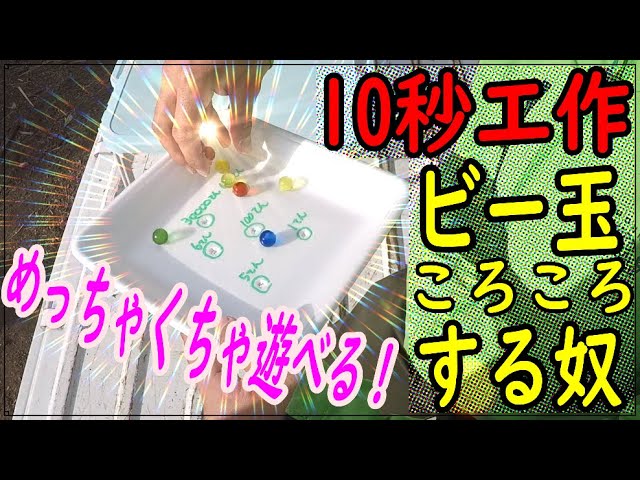
Want to play something right now? For you, here’s a marble-rolling game you can make in 10 seconds.
All you need is a food tray and a pencil.
A slightly larger tray might work better.
To make it, just poke several holes in the tray with the pencil.
Roll lots of marbles on the tray and fit them into the holes you made—done! You can also write point values next to each hole and turn it into a game to see how many points you can score by placing marbles in them.
It’s quick to make even if you don’t have much time, so give it a try!
You can make it in 10 seconds! Marble run
Want to play something right now? For you, here’s a marble-rolling game you can make in 10 seconds.
All you need is a food tray and a pencil.
A slightly larger tray might work better.
To make it, just poke several holes in the tray with the pencil.
Roll lots of marbles on the tray and fit them into the holes you made—done! You can also write point values next to each hole and turn it into a game to see how many points you can score by placing marbles in them.
It’s quick to make even if you don’t have much time, so give it a try!
Marble maze made from a candy box

Here’s a marble run you can make using an empty candy box! Prepare a box where the lid and the compartment for the candy are separate.
On the side that held the candy, glue cardboard strips along two opposite edges and cut a hole where you can retrieve marbles that fall through.
On the lid, sketch the course, glue cardboard where you want walls, punch a few holes, and mark a start and a goal.
Once it’s ready, stack the two parts with the lid on top, and you’re done.
Depending on how you design the course, you can create marble runs with various levels of difficulty!
Marble maze made from a candy box
Here’s a marble run you can make using an empty candy box! Prepare a box where the lid and the compartment for the candy are separate.
On the side that held the candy, glue cardboard strips along two opposite edges and cut a hole where you can retrieve marbles that fall through.
On the lid, sketch the course, glue cardboard where you want walls, punch a few holes, and mark a start and a goal.
Once it’s ready, stack the two parts with the lid on top, and you’re done.
Depending on how you design the course, you can create marble runs with various levels of difficulty!