[November] Enjoy with 3-year-olds! Craft activity ideas recommended for autumn

November ushers in the heart of autumn.
Many children are probably enjoying outdoor play and walks, experiencing the unique nature and creatures of the season.
In this article, we’re sharing craft play ideas perfect for November that will help you feel the autumn vibe even more.
It’s a collection of ideas ideal for three-year-olds, letting them use their fingertips a lot and enjoy free expression through unique techniques!
We’ve included plenty of autumn-themed motifs—like acorns, fallen leaves, mushrooms, and sweet potatoes—so feel free to make the most of these ideas.
注: 子どもたちが作るものを「作品」として扱うため、本稿ではそれらを「制作(せいせい)」と表記します。
- Preschool: Autumn-Themed Craft Ideas Recommended for November
- [Crafts for 3-Year-Olds] A Collection of Fun Ideas for Autumn! Let's Incorporate Seasonal Motifs
- [Preschool] Recommended for 3-year-olds! Easy-to-make fall origami craft ideas
- [For 4-Year-Olds] Recommended in November! Autumn-Themed Craft Activities
- [Childcare] Perfect for 3-year-olds! October craft ideas
- [Childcare] Recommended for 3-year-olds! Craft activity ideas
- [Childcare] For 2-year-olds! November craft activity ideas
- [Childcare] Autumn craft ideas
- [For 3-year-olds] Perfect for September! A Collection of Craft Ideas to Enjoy Autumn Nature
- [Autumn] Easy Origami Ideas for November
- Get kids excited in November! A collection of play and craft ideas using autumn’s natural treasures
- [Childcare] For 5-year-olds! Autumn craft ideas
- [October] Craft ideas for fall you can use in childcare
[November] Have Fun with 3-Year-Olds! Recommended Autumn Craft Activity Ideas (41–50)
A self-standing pine cone!

A three-dimensional pine cone that’s perfect for autumn decorations can be made by gluing together several parts.
Prepare four pieces cut from a single sheet of origami paper divided into quarters.
Fold each piece into a triangle, then fold both sides up at positions set slightly away from the center line.
Open it up and fold the triangular tip to create a part.
Make four identical parts, then glue them together to form the shape of a pine cone.
The key is to glue them while checking the balance and width.
Give this three-dimensional, autumn-inspired pine cone a try!
Two types of Mushichan only for infants and toddlers
Here are two fun bagworm craft ideas using twisted tissue paper and paper tape loops.
First, cut a square piece of tissue paper and round off one side with scissors.
Gently twist the side you didn’t cut, and glue it onto a base for the bagworm made from construction paper.
Prepare tissue paper in various colors to make a colorful “mino” (the bag).
Attach a face made from construction paper to finish.
For the paper tape version, cut the tape to a suitable length, glue one end to the base, then overlap the other end to form a loop and secure it.
Cover the whole body in rows, and finish it the same way by adding the face.
A bagworm papercraft made with an envelope
Let me share an idea for making a bagworm using a brown envelope.
Cut off the top of the envelope with scissors, then fold the top left and right corners to the back.
Stick on eyes made by layering white and black round stickers, and then decorate the body with colored paper or yarn to represent the case.
Tear the colored paper into small pieces beforehand, and cut the yarn into suitable lengths.
Finally, tape a piece of jute string to the back of the envelope, and it’s done.
In addition to colored paper and yarn, you could also glue on leaves or small twigs you collected on a walk for a cute touch.
Make it with handprints! Wobbly bagworm
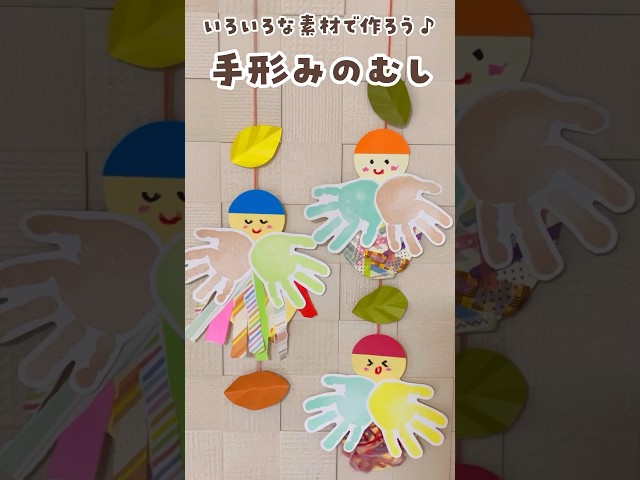
Here’s a craft idea for making bagworms using children’s handprints and footprints! First, create the bagworm’s body out of colored construction paper.
Next, take origami paper in your favorite colors and tear it into long, thin strips.
Paste the strips onto the body with glue, and use the child’s handprints to make a cute outfit.
Draw the face, attach a piece of yarn to hang it, and you’re done! You can also decorate with yarn instead of or in addition to origami paper.
Making lots in different colors and displaying them looks super cute, so it’s highly recommended.
Be sure to have fun tearing and pasting together with the kids!
Hanging grape decoration made of origami

How about an idea for grapes made with paper chains, a classic birthday decoration? Cut origami paper into long, thin strips, glue the ends together to make loops, and link them to represent the grape berries.
Once you have three chains of different lengths, thread them onto a long, thin strip of paper to gather them, add leaves, and you’re done! For the berries, we recommend purple origami in varying shades.
The paper used to gather them will be the stem, so green or brown would work.
By the way, they say grapes with a nicely green stem are the tastiest.
Yarn Winding! Bagworm Ornament

Let’s try making a bagworm craft that also lets you have fun with yarn.
First, glue colored construction paper onto white construction paper and cut it into an egg shape.
Make small slits around the edge, then wind the yarn around and around, tucking it into the slits as you go.
Wrap gently so the paper doesn’t warp, but firmly enough that the yarn doesn’t loosen and come off.
Once you’ve finished wrapping the yarn, decorate the case with round stickers, draw the face with a pen, add a touch of pink to the cheeks with blush, and you’re done!
Autumn wall display! Mushrooms and bagworms

This is a wall decoration of mushrooms and bagworms that’s fun to stick on with glue.
First, make the parts.
Using construction paper in your favorite colors, cut out mushrooms in various shapes.
If you’re working with small children, please cut them in advance.
After cutting slits in the mushrooms, cut separate pieces of construction paper to serve as the stems.
Next, make the bagworms.
Have the children help with what they can, like drawing the eyes.
Now for the assembly.
Tear pieces of construction paper and glue them onto a background sheet to form the bagworm’s body.
Add the eyes and a little hat, too.
Finally, overlap the mushroom pieces at the slits and glue them so they become three-dimensional—that’s it, you’re done.