For Seniors: Brighten Up the Nursing Home with Festive Christmas Decorations!

As the Christmas season approaches, many senior care facilities decorate their interiors in a festive way, don’t they?
In a bright, colorful atmosphere, we want seniors to feel the spirit of Christmas as they spend their time.
So this time, we’ll introduce Christmas decorations suitable for senior care facilities.
Putting up Christmas decorations helps seniors sense the changing seasons and can also spark conversation.
If you incorporate making the decorations into a craft activity, they can enjoy Christmas even more.
And when the room is decorated with Christmas items they made themselves, it can give them a sense of accomplishment.
By all means, try making some lovely Christmas decorations.
- [Care Facilities] Popular Christmas Decorations: Handmade Ideas to Brighten Up Indoor Spaces
- [For Seniors] Brighten Up December Walls! Christmas Decoration Ideas
- For seniors: Decorate the December wall with a tree. Easy ideas using origami and yarn.
- For seniors: Introducing handmade decoration ideas to welcome a wonderful Christmas
- [For Seniors] Wall decorations to fully enjoy the seasonal atmosphere: Fun Christmas decoration ideas
- [For Seniors] Recommended for Christmas Crafts! Simple Handmade Project Ideas
- [For Seniors] Recommended for December Wall Decorations! Santa Craft Ideas
- Recommended winter wall decorations for seniors: heartwarming ideas
- [For Seniors] Try Making a Handmade Christmas Wreath! A Collection of Ideas Using Everyday Materials
- [For Seniors] Recommended for Christmas! Handmade Hanging Ornament Ideas
- [For Seniors] Lovely Christmas Crafts: Easy Ideas Using Recycled Materials and 100-Yen Shop Supplies
- [Elderly Care Facility] Fun-filled recreational activities for a Christmas party: crafts, rhythmic exercises, games, and even a snack-time activity
- [For Seniors] Recommended Wall Decorations for December: Ideas Collection
[For Seniors] Brighten Up Nursing Homes! Christmas Decorations (31–40)
Christmas flower wreath

An origami flower wreath inspired by poinsettias, which are often used as Christmas decorations.
The flowers, which look as if they’re blooming brightly, are made by combining small origami parts.
Seniors who are good with their hands will likely enjoy making it.
Using red and green origami in Christmas colors enhances the festive atmosphere.
Simply attach the origami pieces to a wreath made from construction paper to finish.
You can also decorate it as you like with ribbons or cutouts of gifts and pinecones made from construction paper.
By changing the colors of the origami pieces, you can create a wreath suited to any season.
Christmas lamp tree

Would you like to try making a handmade, tree-shaped Christmas lamp? Light will shine through star- and circle-shaped holes, making it look as if the tree itself is glowing—a lovely idea.
First, draw a net for a square pyramid on construction paper and cut it out, then use a craft punch to make holes in the four side panels.
Imagine you’re placing ornaments and punch the holes in a well-balanced way.
In the center of the square base, make another hole large enough for the tip of the lamp to pass through.
Assemble the construction paper into a tree and decorate the top with a ribbon and a star.
Decorate the sides of an LED lamp, place the tree over it, and you’re done.
Enjoy it in a dark room.
Patchwork Fleece Using Fabric Scraps
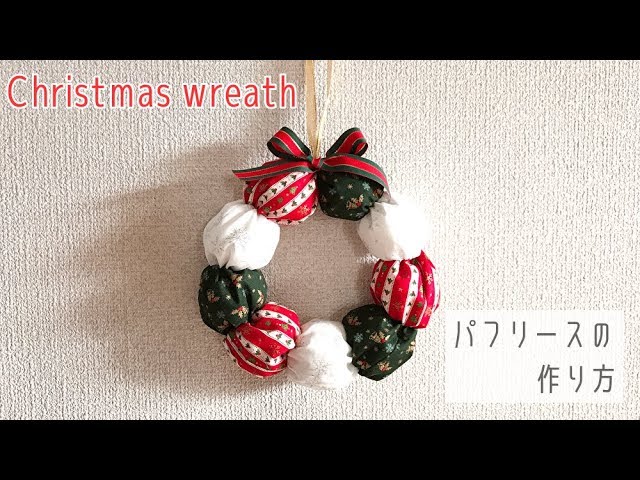
Let’s make a puff wreath that can be sewn by hand.
Prepare nine pieces of fabric measuring 10 cm by 20 cm, stuffing, and a ribbon.
First, fold each of the nine pieces of fabric in half with right sides together and sew them into tubes.
Rotate the fabric so the seam is centered and press the seam allowances open.
On one tube, roughly run a gathering stitch along the top edge to make a pouch; turn the fabric right side out, then nest it inside the second tube with right sides together and stuff it with filling.
Align the top edges of the first and second tubes carefully, then roughly run a gathering stitch to close them.
Repeat this process to form a wreath shape, and finish by decorating with a ribbon.
Santa made of felt

Here’s a handmade idea for a cone-shaped Santa Claus.
First, cut a piece of cardstock into a semicircle and roll it into a cone.
Cover it with felt in your favorite color, then glue a long, thin strip of white felt slightly above the center to represent the hat.
Cut out the face base and clothing pieces from felt and attach them as well.
For the beard, use yarn and a pen, creating it with a method similar to casting on stitches in knitting.
Once you’ve glued the beard around the face base, add eyes using rhinestones painted black and attach a larger bead for the nose.
Finally, add a star-shaped accent to the chest, and you’re done.
Fluffy Origami Wreath

This is a Christmas decoration that’s easy to make with everyday materials.
Roll a sheet of origami paper into a long, thin stick, bend it into a circle, and you’ll have a base for a wreath.
Cut another strip of origami paper lengthwise, fringe one end finely, and wrap it around the base with double-sided tape to create a fluffy, pipe-cleaner-like texture.
Finally, add any decorations you like to finish a bright and cute wreath.
You can freely customize it with different colors and embellishments.
It’s a warm, seasonal craft that older adults can enjoy making easily.
[For Seniors] Brighten Up Nursing Homes! Christmas Decorations (41–50)
Wall-mounted Christmas tree made from paper rolls

Let’s use toilet paper rolls to create a wall-mounted Christmas tree.
First, keeping the triangular shape of a tree in mind, lay out the rolls temporarily in rows to form tiers.
If a roll is too short or too long, cut it to size.
Once you have the triangle, glue the rolls together row by row, and attach green construction paper to the sides.
After everything is attached, secure the whole piece with tape or similar.
For the trunk, connect about three rolls and wrap them with brown yarn.
Fix the triangular section and the trunk to the wall so they connect, and finish by placing a star at the top of the tree.
Adding origami ornaments will make it look even more charming!
Poinsettia Origami Tree

Poinsettias are known as Christmas flowers.
In this idea, we’ll make a wall tree using origami poinsettias.
After folding the origami paper into a triangle three times, open it back up to the state of having been folded twice.
Starting from the outside toward the center, make cuts along the creases.
To round off the corners created by the cuts, trim in a curved line from both corners of the triangle toward the center to shape leaves.
When you open the paper, you’ll have four leaves; stack two of these to make a set of five leaves.
Finish by placing a yellow round sticker in the center to complete the poinsettia.
Make several and arrange them on the wall in the shape of a tree.