For Seniors: Brighten Up the Nursing Home with Festive Christmas Decorations!

As the Christmas season approaches, many senior care facilities decorate their interiors in a festive way, don’t they?
In a bright, colorful atmosphere, we want seniors to feel the spirit of Christmas as they spend their time.
So this time, we’ll introduce Christmas decorations suitable for senior care facilities.
Putting up Christmas decorations helps seniors sense the changing seasons and can also spark conversation.
If you incorporate making the decorations into a craft activity, they can enjoy Christmas even more.
And when the room is decorated with Christmas items they made themselves, it can give them a sense of accomplishment.
By all means, try making some lovely Christmas decorations.
- [Care Facilities] Popular Christmas Decorations: Handmade Ideas to Brighten Up Indoor Spaces
- [For Seniors] Brighten Up December Walls! Christmas Decoration Ideas
- For seniors: Decorate the December wall with a tree. Easy ideas using origami and yarn.
- For seniors: Introducing handmade decoration ideas to welcome a wonderful Christmas
- [For Seniors] Wall decorations to fully enjoy the seasonal atmosphere: Fun Christmas decoration ideas
- [For Seniors] Recommended for Christmas Crafts! Simple Handmade Project Ideas
- [For Seniors] Recommended for December Wall Decorations! Santa Craft Ideas
- Recommended winter wall decorations for seniors: heartwarming ideas
- [For Seniors] Try Making a Handmade Christmas Wreath! A Collection of Ideas Using Everyday Materials
- [For Seniors] Recommended for Christmas! Handmade Hanging Ornament Ideas
- [For Seniors] Lovely Christmas Crafts: Easy Ideas Using Recycled Materials and 100-Yen Shop Supplies
- [Elderly Care Facility] Fun-filled recreational activities for a Christmas party: crafts, rhythmic exercises, games, and even a snack-time activity
- [For Seniors] Recommended Wall Decorations for December: Ideas Collection
[For Seniors] Brighten Up Nursing Homes! Christmas Decorations (41–50)
Christmas tree made with ribbons

This is a handmade tree idea that’s completed simply by sticking teardrop-shaped ribbon pieces onto a cone base made from thick paper.
To make the teardrop-shaped parts, cut ribbon to a suitable length and glue the two ends together.
When attaching the ribbon to the base, face the rounded end downward and stick them in a straight line.
If it’s hard to keep them straight, draw guide lines on the base beforehand to help with placement.
Once all the ribbons are attached, decorate the top with a star to finish! Adding small beads for extra sparkle would also look cute.
Just cut and paste. Shaka-shaka ornament.
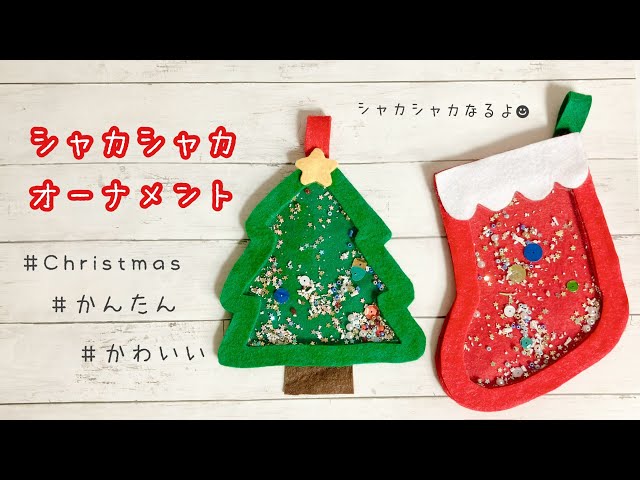
Let’s handcraft warm, felt Christmas ornaments.
First, create your favorite shapes—like a stocking or a tree—using thick paper.
Next, use this template to cut 0.3 mm plastic sheet and the felt that will serve as the ornament base.
Cut out the inside of the thick-paper template to make a frame-only template, then use that to cut three felt frames.
Glue two of the felt frames onto the felt base to add height, and place your favorite beads or sequins inside.
Glue the plastic sheet and the remaining felt piece on top, attach a hanging component, and you’re done!
Papercut Tree

Fold a sheet of green construction paper in half and draw the shape of half a tree.
Cut along the line with scissors and open it up so it becomes a full tree shape.
Once it’s cut, keep it folded and make slits starting from the folded edge.
Cut parallel to the base, being careful not to cut off the outer edge.
To make all the folds into mountain folds, open the slit sections alternately to the left and right.
Decorate with a star made from yellow construction paper, and add round stickers to represent ornaments—then it’s done.
There are also instructions for making snowflakes, so why not make some to decorate together?
Bill of Exchange Tree

Let’s use handprint stamps to create a stylish tree.
Stamp your handprints in green ink on the base paper.
The handprints will form the tree, so keep that image in mind as you stamp.
Place a star above the middle finger, draw a cord wrapping around the hand with a black pen, and add colorful lights using fingertip stamps.
Finish by attaching a paper flowerpot made from construction paper.
How about making a large wall decoration using everyone’s handprints? It also seems like a great idea for a Christmas card.
Easy wreath made from a single sheet of origami paper

There are various ways to make wreaths out of origami.
You can create a cute wreath with just a single sheet.
From a 15-centimeter square sheet of origami paper, cut it into nine pieces measuring 5 centimeters each.
Set one piece aside, and fold the remaining pieces into the parts for the wreath.
The trick is to make four pieces with the colored side facing outward and the other four with the white side facing outward.
Once the parts are finished, assemble them into the wreath.
Fold and cut the remaining piece to make a ribbon and decorate the wreath with it.
You can also enjoy customizing it by adding round or star-shaped stickers.
It’s a project that older adults can enjoy making while chatting with those around them.
A voluminous Christmas wreath made with origami

Origami that can be done while seated is an easy, accessible recreation.
Many older adults may be quite skilled at it.
A Christmas wreath made by combining flower-shaped origami pieces has a delicate feel.
Some seniors might feel inspired to say, “I want to try making that.” Because it’s made by assembling small parts from smaller origami paper, it involves a lot of fine hand movements.
It seems likely to stimulate the brain even more than regular origami crafts.
It’s also a lovely wreath project that can spark conversation as you chat with those around you while making it.
Santa stuck in a chimney

How about making a Santa Claus decoration trying to climb down a chimney to deliver presents? It’s a humorous piece that will surely make you chuckle and feel delighted every time you see it.
All you need are a toilet paper roll, colored construction paper, a pen, scissors, and glue.
First, draw a chimney pattern on brown construction paper with a white pen and paste it onto a slightly flattened toilet paper roll.
Next, use red, white, and black construction paper to create Santa’s lower half.
Once Santa is ready, glue him upside down on top of the chimney.
Finish by adding snow pieces and a white sack to the chimney.