Let's play with paper cups! Crafts and indoor play

Did you know that paper cups, which are handy as simple drinking cups, are also great for crafts and indoor play?
When it comes to paper cup crafts, string telephones are the classic example, but they’re also used for a variety of make-and-play projects like kendama and bamboo-copters.
This time, we’ll introduce some activities that use paper cups you likely have at home.
There are plenty of games that use paper cups as-is, so it’s perfect for anyone who wants to start playing right now.
If you’re looking for safe toys or games for children or the elderly, be sure to take a look for ideas.
- Paper cup crafts that elementary school kids will love! A collection of fun project ideas
- Let's make toys with paper cups! Simple and fun handmade toys
- A roundup of recreational activities and games using paper cups
- A simple yet amazing craft using paper cups! An idea that’s also great for independent research projects.
- Fun crafts using straws
- Made with toilet paper rolls! Exciting and fun easy handmade toys
- Handmade games: DIY craft ideas you can make and play
- Handmade ideas to create and play the traditional Japanese game “Daruma Otoshi”!
- [Make with Kids] Handmade Outdoor Play Toy Special
- [Nursery/Kindergarten] Crafts you can play with after making them
- Let's make toys with milk cartons! Easy and fun DIY crafts!
- Let's Make and Play! A Collection of Homemade Kendama Ideas
- Crafts parents and kids can enjoy together. Recommended craft ideas to keep children entertained.
Let's play with paper cups! Crafts and indoor play (21–30)
[Craft Play] String Telephone
![[Craft Play] String Telephone](https://i.ytimg.com/vi/Tsctf3eHWkE/sddefault.jpg)
When it comes to classic paper cup games, this is the one: the string telephone.
I bet everyone played with it as a child.
As a kid, I’d stretch the string as far as I could, really curious to see how far the sound would travel (lol).
It’s very easy to make: poke a hole in the bottom of a paper cup, thread some twine through it, wrap it around a toothpick, and tape it to the bottom of the cup with cellophane tape.
When the string is pulled tight and straight, your voice travels through the vibrations.
How to Make an Easy Guitar

A simple guitar you can make with paper cups lets you easily live out the dream of strumming a ringing guitar.
First, glue the bottoms of two paper cups together.
Then stack another paper cup on each side with slits cut into them, and attach rubber bands into those slits—done.
The key here is the length of the rubber bands.
By choosing which slit to anchor them in and lining up rubber bands of different lengths, you can create differences in sound just like a real guitar.
Think about what kind of sound will make it feel cool, and fine-tune it into your ideal guitar.
Paper Cup Christmas Lights
@chooobo2 This time, I’m introducing how to make the “Original Light from a Paper Cup 💡” that we’ll create in the workshop on November 16 ✨ The picture you draw will glow in the dark 😳! Since Christmas is coming, I drew a tree! Depending on age, just coloring and adding stickers is enough—the pen colors and sticker shadows glow and look so cute 🩷 This time I drew on a clear file, but drawing directly on plastic wrap is also OK 🙆♀️◎ (Use a transparent clear file.) Using a clear file makes it easier to draw than on plastic wrap, and the finished piece is less likely to break! Workshop details are posted in the Instagram Highlights!Made in DecemberChristmas craftsChristmas partyTranslation#HandmadeToysPaper cup craft
♬ All I Want for Christmas Is You – Mariah Carey
The glowing paper cup lights that shine in complete darkness are a big hit at Christmas parties, too.
Prepare a clear file, colored pens, paper cups, a craft knife, rubber bands, plastic wrap, and a light, and let’s make them.
Cut the clear file into a circle and draw an illustration.
Flip it over, color it in, then use the craft knife to cut out the bottom of the paper cup.
Place the circle on the cup, cover it with plastic wrap, and secure it with a rubber band so it doesn’t shift.
Add stickers around the outside, and you’re done.
If you point the light from the cut-out side toward a wall, the illustration will be projected.
It’s also fun to change the designs and make several different paper cups.
Easy and fun! Paper Cup Race
@houkagoday_yawara Paper Cup Race 🦑 Draw your favorite picture on a paper cup and let’s compete! Time trials or big group races are super fun too 😀 Materials: paper cups, vinyl tape, raffia ribbon (Suzuran tape), ball Goal: Think about how much force to use, pull so the ball doesn’t fall and doesn’t leave the course, and build your thinking skills ✊ Let’s try it! 🇯🇵child# developmental support (ryōiku)#AtHomePlayAfter-school day serviceNagasakiEducational#NeurodevelopmentalDisordersworkTranslationHandmade
♬ Pokopoko cute game style BGM(1527385) – sanusagi
Here’s a fun paper cup race you can make with everyday materials.
Get some paper cups, raffia tape (plastic ribbon), and vinyl tape ready.
Poke holes in the paper cups, thread the raffia tape through, and tie a single knot to assemble it.
It might be nice to draw faces on the cups with a felt-tip pen, too.
Once it’s finished, place a ball on the cup, pull the string, and start the race.
Move slowly and carefully so the ball doesn’t fall off.
Try timing your runs or competing to see who can reach the finish line the fastest and have fun!
A UFO catcher made with two paper cups
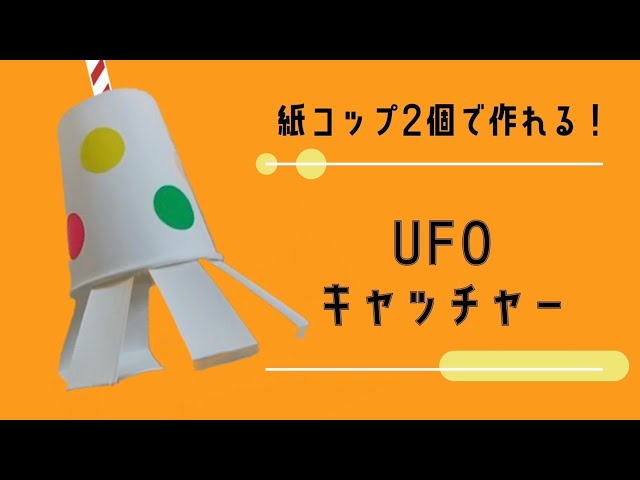
This is a paper-cup craft that lets you enjoy an arcade-like experience using only everyday materials.
Cut slits into the first paper cup, spread them open, and fix a straw in place to create an arm-like mechanism.
Punch a hole in the second paper cup and thread the straw through it to complete a movable arm.
Set lightweight toys or paper-made prizes in place, and kids can enjoy the excitement of aiming and catching them.
Playing with a device they made themselves boosts their sense of accomplishment and helps develop observation and problem-solving skills.
It’s a unique idea that’s both fun and educational, guaranteed to get everyone engaged.
Paper cup spinning top

A paper cup spinning top is also great for practicing twisting motions like turning faucets and doorknobs.
The idea is to cut and open a paper cup, then add decorations to turn it into a top.
The appeal lies not only in the making process but also in the many ways to experiment while playing—try figuring out how to spin it well or invent different ways to use it.
Depending on the situation, caregivers or teachers can offer prompts that spark creativity, such as, “What happens if you spin it the other way?”
Cute crafts for the kitchen

This is a craft project where you use everyday materials like paper cups, paper napkins, and water balloons to make small, play-kitchen-style items.
The book features recipe-style crafts focused on cute sweets such as ice cream, cupcakes, and pudding, making it feel as fun as flipping through a cookbook.
One especially noteworthy method is making a dome-shaped cup by pasting paper napkins onto a water balloon, letting it dry, and then popping the balloon.
Add toppings made from felt or origami to finish it off so it looks like a real dessert.
You can also customize paper plates and drink cups to create displays that look like a charming little shop.
It’s a visually delightful craft that sparks creativity.