Moving! Spinning! Flying! Fun handmade toys made with rubber bands

This time, we’ll show you how to make fun, handmade toys using rubber bands, which are commonly found in every household.
By using rubber bands, you can create entertaining toys that show surprising movements—like paper cups that launch or marbles that spin!
Rubber bands are a fascinating material that can power all sorts of motion.
Be sure to explore and make handmade toys that are fun to build and play with!
Please handle rubber bands carefully and use them safely.
- It's fun to spin! A collection of DIY toy ideas
- Fun games using rubber bands. Recreational games.
- Made with toilet paper rolls! Exciting and fun easy handmade toys
- Let's make toys with paper cups! Simple and fun handmade toys
- Handmade snake toy. A fun idea you can move and play with!
- Let's make toys with straws! Easy and fun DIY toys
- [DIY] A Collection of Handmade Moving Toy Craft Ideas
- [Easy] Rubber Band Magic Tricks Collection [Party Entertainment / Performances]
- [Craft] How to Make a Paper Cup Rocket: Ideas to Make It Fly Far
- Handmade capsule toy machines with everyday materials! Easy craft ideas you can make
- [For Kids] Spins in the wind! A collection of recommended DIY pinwheel ideas
- [Handmade Toys] Fun to Make! A Collection of Pull-Along Toy Ideas
- Kids and adults alike will be captivated! A collection of DIY marble run ideas
Moving! Spinning! Flying! Fun handmade toys made with rubber bands (11–20)
A turtle that runs on rubber power!

Moving toys are appealing no matter how old you are, and they’re especially popular with lower-grade elementary school kids.
This is a paper cup turtle craft that zooms forward using rubber-band power hidden in its shell.
First, cut slits halfway down a paper cup and fold them in to make the legs.
The remaining part becomes the body.
For the face, stick round stickers on as eyes to make it cute.
Take a used AA battery, wrap a rubber band around it, attach kite string with cellophane tape, and set the mechanism inside the turtle’s shell.
Even though it’s a turtle, it moves surprisingly fast and with big motions—so much fun!
Rubber band scooping game

Let me introduce a rubber band scooping game.
Prepare about 30 rubber bands in each of two colors, a candy box, two paper cups, two plastic cups, two straws, and some tape.
Tape a paper cup to each side opposite one another on the candy box, then nest a plastic cup inside each paper cup so it can be lifted out.
Once you mix the two colors of rubber bands into the candy box, you’re ready to play.
Choose your color and immediately start a game to scoop more rubber bands of your color than your opponent using a straw! It also sounds fun to increase the number of players and colors for a four-player match.
Rubber Band Crane Game
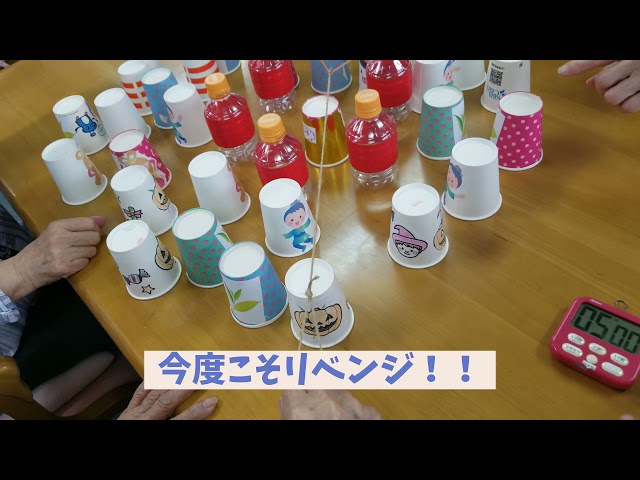
It’s a game where several people hold a tool made by connecting rubber bands and strings, and thread a paper cup through its end to operate it like a crane.
Participants pull the strings together, lifting the paper cup while keeping their balance.
Placing the cup in a target spot or stacking it is challenging, requiring cooperation and concentration.
It can be enjoyed by large groups, making it great for parties and school events, and it also helps spark communication.
Although it’s made from simple, everyday materials, it’s captivating and works as a hands-on crafting game—an engaging and appealing idea.
Cool rubber band gun

Let me introduce a strong and cool rubber band gun.
Prepare 17 bendable straws, a clothespin, tape, and scissors, and let’s make it.
Take two straws and tape their bendable sections together to secure them.
Attach one clothespin to the gap of the joined straws to create the base.
When bundling straws, secure them tightly so the stacked pieces don’t shift.
Stack eight straws by grouping them in sets of four, extend the bendable sections, and build the structure.
When attaching parts together, make sure the straws are firmly fixed so they don’t slip.
Once it’s finished, hook on a rubber band and give it a try!
Powerful! Chopstick Gun
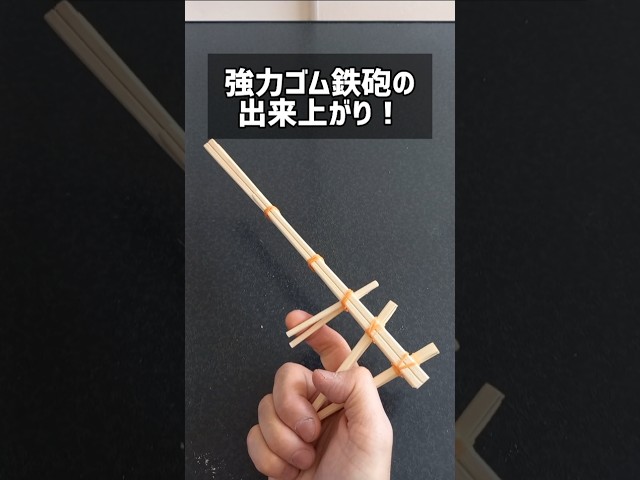
Prepare seven pairs of disposable chopsticks and plenty of rubber bands as materials.
First, use five pairs of chopsticks to make the main body.
Stack the chopsticks for the body alternately left and right so that about two-thirds overlap.
Secure them firmly at two points with rubber bands, then cut a notch at the front end to hook a rubber band.
Attach a short, cut chopstick to the rear of the body as the trigger, and glue another chopstick fixed in a V-shape behind that as the grip.
Your powerful chopstick gun is complete!
In conclusion
How was it? It can be difficult to make toys using rubber bands alone, but when you team them up with paper cups, plastic bottles, or other empty containers and scrap materials, they can transform into really fun toys. These days, rubber bands come in various colors too, so be sure to find your favorite and give making one a try!