[For Seniors] Color Your Care Facility’s Spring: Wall Decoration Ideas


In many elderly care facilities, such as day service centers, wall decorations are changed each month to match the season.
It’s also enjoyable to have the seniors help make them and decorate together.
In this article, we’ll share spring wall decoration ideas designed for older adults!
There are many motifs that come to mind when you think of spring: cute flowers like cherry blossoms and dandelions, and themes related to the Doll Festival (Hinamatsuri), among others.
A common feature is that they’re bright and charming.
Use lovely wall decorations that bring a sense of spring indoors to brighten up your facility’s walls.
- [For Seniors] Spring Wall Decorations: A Collection of Ideas to Brighten Up Your Room
- [For Seniors] Embraced by Spring: Wall Decoration Ideas to Enjoy in April
- For Seniors: Recommended Wall Decoration Ideas for March
- For Seniors: Feel the Arrival of Warm Spring. Cherry Blossom Wall Decoration Ideas
- For Seniors: Come, Spring! Recommended March Craft Ideas for Daycare Services
- [For seniors] Enjoy spring: April craft ideas
- [For Seniors] Enjoy May: A Collection of Seasonal Craft and Wall Decoration Ideas
- [For Seniors] Brighten Up Hinamatsuri: Wall Decoration Ideas
- [Day Service] Excited for Hinamatsuri! Craft ideas to brighten up your room
- Recommended winter wall decorations for seniors: heartwarming ideas
- [For Seniors] Feel the Arrival of Spring: A Collection of Cherry Blossom Craft Ideas
- [For Seniors] May-Themed Wall Decoration Ideas Full of Seasonal Flair
- [For Seniors] Enjoy Cherry Blossoms Indoors: Wall Decoration Ideas
[For Seniors] Coloring spring at care facilities: Wall decoration ideas (61–70)
rapeseed blossoms

Rapeseed blossoms, which brightly color spring flower fields, are also enjoyed as edible flowers in Japan and China.
When decorating spring wall displays, items made with tissue paper are perfect.
Separate the petals and leaves into parts and cut yellow and green tissue paper.
Next, arrange the leaves on the base and layer the petal pieces on top.
It’s recommended to make many items while imagining a real flower field.
If you’re creating them for recreation or an event, it could be fun to make free-form pieces like torn-paper art.
How about creating a fresh, translucent spring wall decoration?
Full-bloom cherry blossoms made with tissue paper

Here’s a craft made with tissue paper that looks like fully bloomed double-flowered cherry blossoms.
Accordion-fold the tissue paper and tie the center with a plastic string.
A key tip is to split the ends of the plastic string; the frayed ends will stand in for the stamens and pistils of the cherry blossom.
Cut the tips of the accordion fold as well, then fan it out and shape it.
This will let you express the many layered petals of a double cherry blossom.
The plump, rounded blossoms are likely to delight older adults, too.
If you also make a cherry tree and decorate it with the double blossoms, you can enjoy a hanami atmosphere indoors.
Koinobori garland
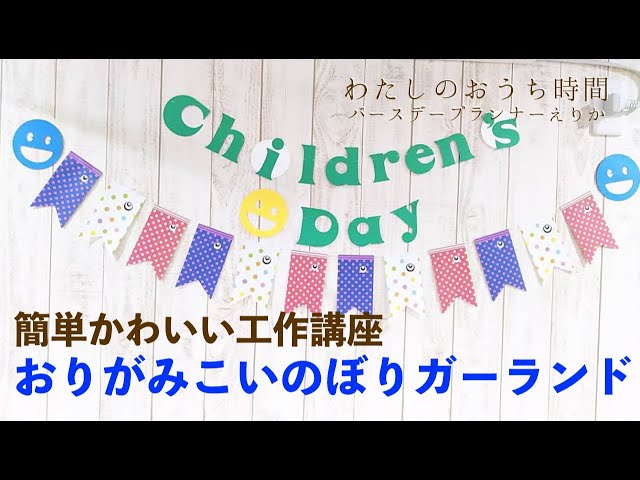
Cut paper such as origami, chiyogami, or wrapping paper to make a carp streamer garland that brightens up Children’s Day! It’s also perfect for decorating walls in senior care facilities.
The method is very simple: cut your favorite patterned paper into koi-shaped streamers, fold back the mouth section, and decorate with masking tape of your choice.
For the carp’s eyes, round stickers make it easy.
Finally, thread a string through the folded mouth section and secure it with cellophane tape—and you’re done! Display lots of carp streamers in different patterns for a lively and stylish garland.
Azaleas and butterflies

Azaleas, which bloom in vivid pinks and purples, are at their best from mid-April to mid-May.
As a May wall decoration idea, how about making azaleas and butterflies? Let’s fold azaleas using red and pink origami.
First, make crease lines and use them as guides as you fold.
While the paper is still folded, cut it with scissors into the shape of petals.
Then use the scissors to round and shape the cut petals.
For the butterflies, using washi-patterned origami will really make them stand out.
Butterflies fluttering over a brightly colored field of azaleas is sure to lift the spirits of anyone who sees it.
Please use this as a reference!
Hanging ornaments

We’d like to introduce a lovely spring hanging decoration that gently sways in the breeze.
You can make it with just origami paper and string, so it’s perfect for craft activities in senior care facilities.
Prepare both solid-colored and patterned origami paper, cut three circles of each, and fold them in half.
Glue the solid and patterned halves alternately, attach them to a string, and your temari ball is finished.
Next, fold three sheets of origami paper in half vertically, stack and glue them together, then draw a pencil outline so it forms a cherry blossom shape and cut it out.
When you open it, you’ll have a symmetrical flower.
Snip small cuts into the petals to make it look like a sakura blossom, then attach it to the string to complete the piece.
Gazing at your hanging decoration while feeling the warm spring breeze is sure to bring a peaceful moment.
Carnation wreath

Carnations have long been loved as flowers for Mother’s Day.
Why not recreate their distinctive ruffled petals in a paper flower wreath? In a day-care setting, several people can work together to make each flower.
Fold origami paper, then use pinking shears to cut a circle.
One sheet of origami yields four petals.
Add plenty of creases to each piece, then press it over a glue cap to create wrinkles—this gives the petals a carnation-like texture.
Stack and secure the pieces to complete the flower.
Finally, cut construction paper into a donut shape for the wreath base, attach the flowers, and you’ll have a delicate, stylish wreath.
You can also add a pop of green with leaves as an accent.
Paper pom-pom butterfly

A cute butterfly wall decoration made with tissue paper pom-poms.
First, stack several sheets of tissue paper in two colors and fold them in an accordion.
Unfold once, then fold in half perpendicular to the creases, and cut with scissors to form a butterfly shape.
Return it to a fine accordion fold, secure the center with wire, and gently fluff out the tissue paper to create a three-dimensional butterfly.
Make them in various colors and decorate an entire wall—the room will instantly look bright and festive!