[For Seniors] Spring Wall Decorations: A Collection of Ideas to Brighten Up Your Room


With the arrival of spring, it’s only natural to want to brighten up the atmosphere in senior care facilities and rooms.
Spring is full of delightful motifs—cherry blossoms, dandelions, the Doll Festival, carp streamers, and more.
In this article, we introduce ideas for spring wall decorations that older adults can enjoy making.
Projects using origami and construction paper are appealing because they offer the pleasant sensation of moving the fingers and the joy of completing a piece.
Creating together can spark conversations about seasonal memories and liven up interactions with those around them.
We hope you’ll find these ideas helpful!
- [For Seniors] Color Your Care Facility’s Spring: Wall Decoration Ideas
- [For Seniors] Embraced by Spring: Wall Decoration Ideas to Enjoy in April
- For Seniors: Feel the Arrival of Warm Spring. Cherry Blossom Wall Decoration Ideas
- For Seniors: Recommended Wall Decoration Ideas for March
- [For Seniors] Enjoy Cherry Blossoms Indoors: Wall Decoration Ideas
- For Seniors: Come, Spring! Recommended March Craft Ideas for Daycare Services
- [For Seniors] March Origami: Ideas to Brighten Your Room with Seasonal Flowers and Events
- [For Seniors] Brighten Up Hinamatsuri: Wall Decoration Ideas
- For seniors: Heartwarming and cozy. Recommended handmade Hina dolls
- For Seniors: Wall Decorations to Brighten Up February — Festive Ideas for Setsubun, Valentine’s Day, Plum Blossoms, and More
- For seniors: Year-round ideas for wall decorations
- [For Seniors] May-Themed Wall Decoration Ideas Full of Seasonal Flair
- [For Seniors] Enjoy the Arrival of Spring Indoors! Recommended April Origami
[For Seniors] Spring Wall Decorations: A Collection of Ideas to Brighten Up Your Room (151–160)
caterpillar

May, with its warm climate, is a season when beautiful flowers bloom and caterpillars become active.
The pleasant weather makes you want to go out for a walk, doesn’t it? In this article, we’ll introduce a wall decoration idea featuring caterpillars that will make you feel like you’re taking a stroll outside, even while indoors.
Roll thin, long strips of construction paper into coils to make the caterpillar’s body.
You can also make the eyes and antennae from construction paper.
It’s a fun project where personality shines through depending on the shape of the eyes and where you attach the antennae! How about making and displaying dandelions and other plants alongside it? It’s sure to be an enjoyable crafting time!
paper flower fan

Paper fans are popular as decorations for parties and events.
Let’s create flower-themed decorations perfect for brightening up a care facility in spring.
First, stick your favorite masking tape onto a rectangular sheet of paper and make an accordion fold.
Next, apply glue to both ends of the paper and join them together to finish.
If you’re making a larger size, adjust the number of sheets of copy paper and the number of accordion folds.
It’s also recommended to create designs themed around spring-blooming flowers like plum, peach, and cherry blossoms.
Wisteria flowers made with tissue paper and cellophane tape

Making wisteria flowers with tissue paper and cellophane tape is such a lovely craft.
Shall we make wisteria together that seems to carry the scent of spring? It’s simple work, so you can enjoy it slowly while keeping your fingers moving.
Just fold each piece of tissue paper carefully and connect them with cellophane tape.
Once you make the vine and shape the decoration, stick it on the wall or ceiling.
Working while chatting with older adults will likely make for a delightful time.
Gazing at the finished wisteria will surely soothe the heart.
onion

Many senior care facilities change their wall decorations with each season.
Some staff may be troubled because the walls end up looking similar every year.
So this time, we’d like to introduce a slightly unusual onion-themed wall decoration.
Sweet and delicious new onions are said to be in season from March to May.
Let’s try making lifelike onions together with the seniors! Crumple a sheet of copy paper into a ball, then insert leaves made from similarly crumpled green origami.
Use pale orange origami to represent the onion skin.
Tie on a string, and your realistic onion is complete! If you also create eaves or a hanging rack to suspend them from, the atmosphere becomes even more authentic.
Dandelions and Horsetails

These wall decorations are recommended for care facilities and let you feel the arrival of spring indoors.
Crumple yellow origami paper to create a soft texture, then shape it into a circle.
By attaching small cut pieces of origami, you can express the fluffy, three-dimensional look of dandelion flowers.
For the leaves, cut green origami into rectangles, draw vein patterns, and make slits so they connect.
For the stems, roll thin, elongated strips of origami to give them a solid three-dimensional feel—this is key.
To depict grass, cut green origami into jagged shapes and place them randomly.
For horsetails, use brown origami, forming rounded shapes; arranging them at slightly different heights will create a more natural scene.
Swaying Cherry Blossoms
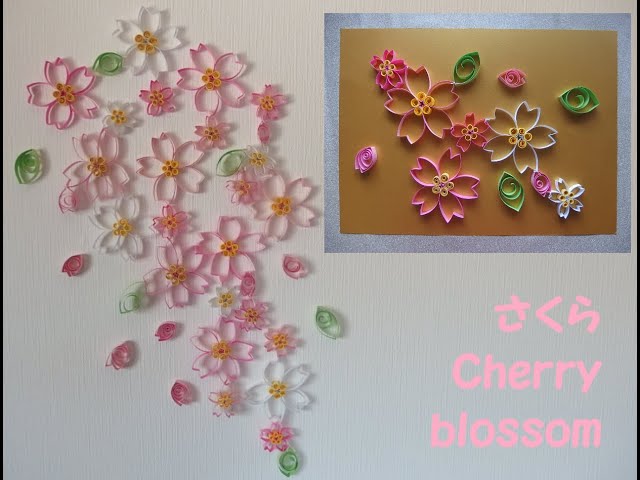
Here’s an idea for a wall decoration that evokes cherry blossom petals swaying in the wind.
Make petals by cutting origami paper into rectangles and forming each piece into a loop.
Combine four to five petals and glue a yellow piece in the center to create a three-dimensional cherry blossom.
If you press the inside of the flower and leaf pieces with a bamboo skewer to add curvature, they’ll gain a soft, rounded 3D look.
Connect the finished blossoms and leaves with thread and attach them to the wall so the design sways when a breeze passes through.
It’s a decoration that’s both visually striking and dynamic, letting you feel the arrival of spring.
[For Seniors] Spring Wall Decorations: A Collection of Ideas to Brighten Up Your Room (161–170)
Lotus Blossoms and a Ladybug

Small pink flowers that bloom from around April to June.
When Chinese milk vetch blooms, you can feel the transition from spring to early summer.
This time, we’re sharing an idea for a wall decoration featuring ladybugs flying over a field of Chinese milk vetch.
Make templates from thick paper, then create the petals and calyx.
Combine the petals to form a single flower.
To add a three-dimensional effect, gently round the tips of the petals using scissors.
Make the stems and leaves, and attach each piece to complete the design.
The ladybugs are also crafted to look three-dimensional, so please use that as a reference.
It’s an idea that will instantly brighten the walls of a senior care facility—give it a try!