[Childcare] Winter Projects You’ll Want to Try! Recommended Craft Ideas


Winter is packed with events like Christmas and New Year’s.
With one fun event after another, children are surely full of excitement.
Plus, winter-specific activities and warm, cozy motifs add color to everyday life.
In this article, we’ll introduce craft ideas to enjoy during the winter season.
If your ideas have been getting repetitive or you’re looking for a hint, please use this as a reference.
Since the things children make are treated as works, we use the term “seisaku” (production) in the text.
- December craft ideas! A collection of childcare activities to enjoy with Christmas and winter themes
- Ideas for Winter-Themed Crafts and Bulletin Board Projects for 5-Year-Olds
- [For 1-year-olds] Fun to make! A collection of winter craft activity ideas for use in childcare
- [Childcare] Perfect for December wall displays! A collection of Christmas tree ideas
- [For 2-year-olds] A collection of craft ideas useful for winter childcare
- [For 3-year-olds] Winter craft activities and bulletin board decoration ideas for use in childcare
- Christmas Crafts to Enjoy with Kids: A Stylish and Easy Idea Collection
- From New Year’s games to winter crafts! A roundup of January recreation activities to enjoy in childcare
- Fun January Crafts! A Collection of Ideas You Can Make and Play With for 5-Year-Olds
- [Handmade] Christmas DIY gift ideas you can enjoy with a 3-year-old boy
- [Childcare] For 4-Year-Olds! Fun December Craft Ideas
- [Childcare] Recommended for 3-year-olds! Origami ideas with a winter theme
- [For Toddlers] A Big Collection of Craft Ideas to Enjoy at Christmas [Part 3]
[Childcare] Great winter projects! Recommended craft ideas (191–200)
Daruma

Here are some daruma craft ideas that are perfect as New Year decorations.
First, flatten a toilet paper roll and make three cuts from one edge with scissors.
On the cut sections, glue thin strips of yellow, orange, and purple origami or colored paper, and cover the remaining areas with red paper.
Wrap the paper all the way around.
Then gently reshape the toilet paper roll back into a round cylinder; it’s fine to leave the red part as is.
Make a daruma face from a separate piece of paper, attach it to the red section, and add the daruma’s decorative pattern below the face—and you’re done! Try making them in different colors and display them!
Santa and Reindeer Wreath
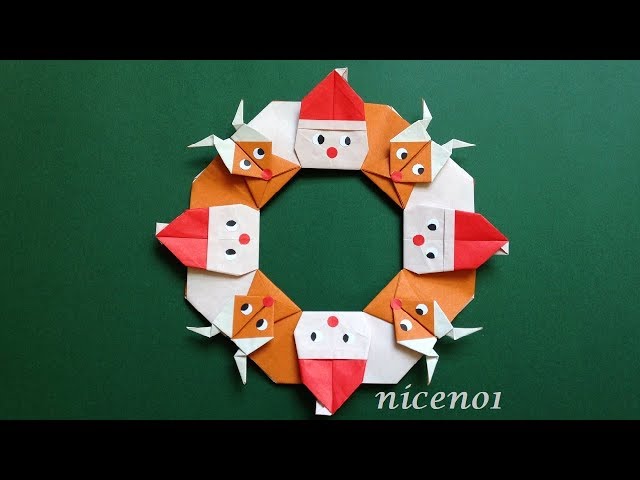
Let’s make a “Santa and Reindeer Wreath” together with children who are eagerly waiting for Christmas! This wreath is easy to create—just make the Santa and reindeer parts and connect them into a circle.
There’s no need for scissors or glue, so you can enjoy it together safely and with peace of mind.
You can also draw the eyes and noses of Santa and the reindeer to add a personal touch, or use round stickers for a quick and simple look.
It’s sure to capture the children’s excitement for Christmas and become a fun craft that brightens up the winter season!
Tree mobile

This is a gently swaying Christmas tree mobile you can hang as a decoration.
Attach tree and star templates to construction paper, then use a pencil and ruler to score a fold line down the center of each.
Cut along the templates, and fold each piece along the pre-scored center lines.
Apply a thin strip of double-sided tape along the center, then stick the folded pieces together to create 3D trees and stars.
Punch a small hole, thread string through, and connect the trees and stars at a pleasing distance.
Finally, attach a hanging cord—and you’re done!
A penguin toy that moves side to side

This unique toy recreates the waddling movement of a penguin.
It’s easy to make with paper cups, making it perfect for winter crafts in preschools and kindergartens.
First, decorate a light blue or blue paper cup with the penguin’s belly, beak, and eyes.
Next, attach a rubber band to a battery, then tuck the rubber band into two slits cut on each side of the cup—and you’re done! To play, simply twist the battery, then set it on the floor or a table.
The penguin’s unpredictable movements will delight both children and teachers alike.
Handmade snow globe

Sparkling snow globes are a fun craft to look at and play with.
Be sure to make them together with the kids.
First, draw and color the motif you’ll put inside the snow globe on shrink plastic.
For children who aren’t confident drawing freely, it’s helpful to prepare a tracing template.
Next, bend the edge of the shrink plastic, apply glue, and fix it to the jar lid.
For the liquid inside the jar, mix water and liquid laundry starch (or glue) at a ratio of 3 to 7, and pour it in.
Measuring is also a valuable experience for children, so it’s great to do it together.
Finally, add beads or pom-poms, close the lid, and it’s done! It’s very beautiful, but please be careful to prevent accidental swallowing of small parts.