
Origami tends to be associated with flat designs, but you can actually make lots of three-dimensional pieces too.
In this article, we’ll introduce ideas for 3D origami projects.
From simple shapes like hearts, stars, and dice to small containers and toys you can play with, we’ve gathered a variety of ideas.
If you want to try making 3D origami or are looking for something a bit more challenging than flat designs, feel free to use this as a reference.
All of these ideas involve relatively simple steps, so give them a try without hesitation!
- [For Adults] Simple yet Impressive Crafts: A Stylish, Eye-Catching Collection
- Simple origami that can be folded from a single sheet
- Kids will love it! Easy origami ideas—great as gifts too!
- Cool origami that boys will love and want to fold
- Origami ideas boys will want to make!
- [Origami] She’ll love it if you fold these! Simple ideas for girls
- [For Kids] Let's Fold! Today's Origami Idea Collection
- Popular characters that are easy to make with origami. A collection of creations you can enjoy with children.
- 3D craft ideas made with drawing paper and colored construction paper
- Easy flower craft ideas you can make with a single sheet of origami paper
- Children’s Origami: Easy Single-Sheet Flower Ideas
- Simple yet amazing crafts: craft ideas that elementary school students will want to make
- Kids’ Origami: Cute and Easy Ideas to Make for a Birthday
Let's make origami! Ideas for simple 3D creations (1–10)
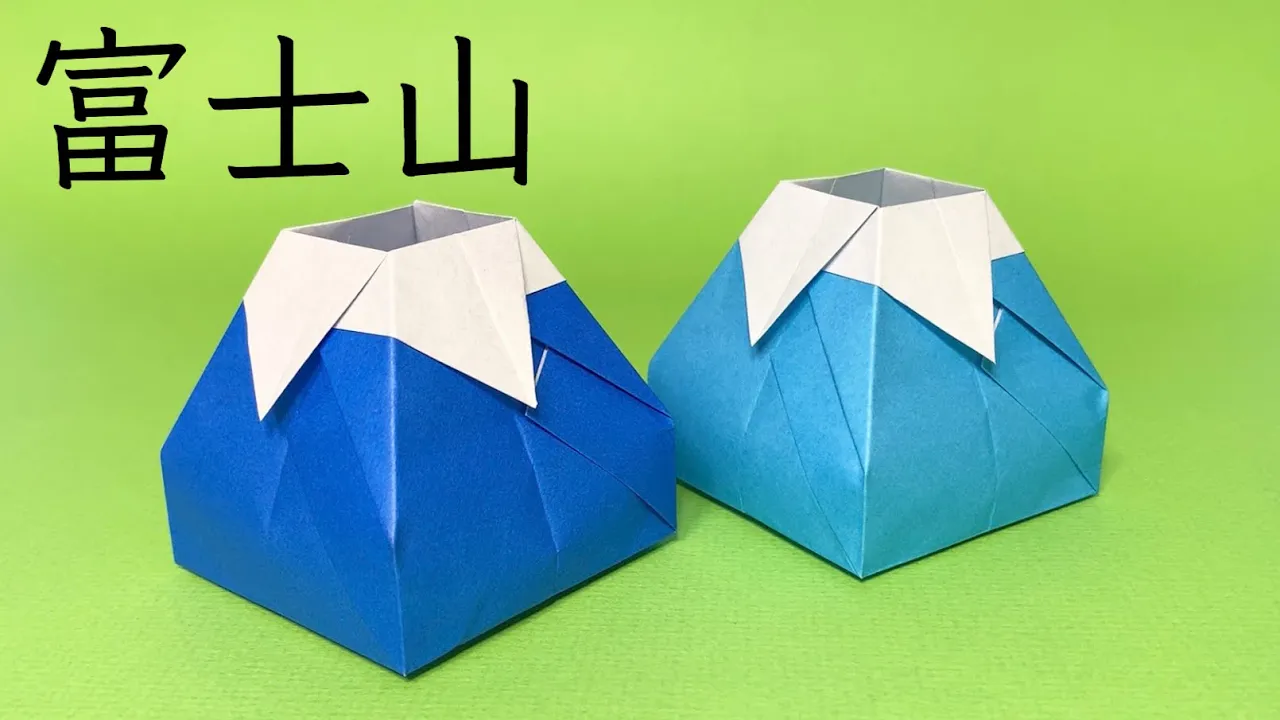
Mount Fuji

Let’s make a three-dimensional box inspired by Mount Fuji, a symbol of Japan.
Although it tapers toward the top, it still has a solid box structure, making it practical as a small container.
Fold by carefully layering triangles, paying attention to the base and the opening as you go.
This care helps achieve a beautiful, three-dimensional finish, so a key point is to fold neatly to avoid creases.
While Mount Fuji typically evokes overlapping blue and white, it could be fun to experiment with other colors to enjoy different impressions.
Push Pop

Push pops, loved for their addictive pressing sensation, are all the rage.
Here’s an idea for making a push pop ring out of origami! It’s very simple to make, so you’ll be tempted to try it in lots of different colors.
The push-pop part is fairly sturdy, so you can actually press it and play.
The ring band is quite long when just folded, so cut it to fit your finger.
Once you’ve decided on the length, secure it with tape to form the ring.
Wear it on your finger and enjoy that endlessly addictive feel anytime!
soft serve ice cream

Let’s try making a cute soft-serve ice cream in origami, with a gentle swirl sitting on a cone.
Use triangular creases as a guide to form the base edges, then glue the ends together to shape the cone into a diamond-like form.
Next, twist the portion that extends above the cone and shape it into the soft-serve swirl to complete the whole piece.
Aim for a sturdy look on the cone by paying attention to the layered paper, and a soft look for the cream by twisting gently.
When we think of soft-serve, we often picture a yellow or ocher cone with white cream, but it’s also fun to enjoy how changing the colors alters the impression, or to arrange a display of soft serves in various colors as decoration.
Stackable pentagonal pencil box

It’s a cute little container shaped like a pentagonal pencil.
Since it’s built from stacked boxes, making each section sturdy and shaping the pencil-like lid are key points.
For the lid parts, use a sheet of origami cut in half, fold it into six equal sections, and add triangular creases at each end.
Once the creases are made, fold while paying attention to front and back, shape it to resemble a pencil, assemble, and you’re done.
The box parts also use six equal creases; by assembling multiple tightly folded layers, you’ll end up with a sturdy box.
The most important aspect of this craft is ensuring the paper layers are firmly overlapped and assembled into a solid structure.
star

Making a three-dimensional star with origami is surprisingly easy! It’s the perfect idea when you want to try something a step up from a flat star.
Just fold and cut the paper according to the steps, then crease along the lines as mountain and valley folds, and you’ll have a plump, 3D star in no time.
Using thicker origami paper or cardstock helps it keep its shape and look cleaner.
It’s also great as a Christmas ornament or home décor.
It’s amazing how a little ingenuity can create such a lovely piece—origami really has incredible depth!
kusudama (decorative paper ball used for celebrations)

Let’s make a colorful kusudama—an evergreen celebration decoration—by combining origami units.
Use four crease lines as guides to layer the paper and create a parallelogram-shaped unit with a small gap that allows other pieces to be inserted.
Then add creases to each unit, assemble them together, and work your way toward forming a sphere.
As you interlock the units, the structure becomes sturdy, and it’s fun to see the corners emphasized as the shape builds three-dimensionally.
The more colors you use, the more vibrant and beautiful your kusudama will be.
dice

This is a sturdy, colorful cube assembled by combining parts made from origami.
The key points are to make six identical parts precisely from six sheets of paper and to pay attention to where each piece is inserted during assembly.
Each part is a parallelogram guided by quarter-fold creases; be mindful of the paper layers and create firm slots.
Then insert each part into the slots of the others and assemble them into a cube to finish.
Since you use six sheets, you can also enjoy experimenting with color combinations—think about how to assemble the parts so that the colors end up in the positions you want.
How to fold Anpanman candyNEW!

Why not try making Anpanman candies that are perfect for pretend play? By changing the origami colors and the character faces you draw, you can enjoy candies of various characters! Prepare 7.5 cm origami paper and fold about 5 mm along three sides except the top edge.
Apply glue to the folded part of the bottom edge, overlap it with the top edge, and stick them together to form a pouch.
Fold the left and right edges inward by about 5 mm, insert your fingers to puff up the pouch, then gently flatten the top and bottom to shape it like a candy.
Finally, draw your favorite character’s face, and cut the left and right edges with scissors into a zigzag pattern to finish!
How to fold a cute heart-shaped box

Here’s an idea for making a heart-shaped box using two sheets of origami paper.
First, make precise creases, then form a three-dimensional square tube.
Once you have the tube, indent one pair of opposite sides on one end to create two triangles, and sink-fold the top corners of those triangles.
Make two of these and combine them to form a heart shape.
The creasing step is extremely important, so press the paper firmly with your fingers to set the folds well.
As long as the creases are clean, turning it into a tube won’t be difficult.
How to Fold a Randoseru Using 3 SheetsNEW!

This is an origami school backpack that you can actually put small items into.
Use two sheets of origami paper for the main body of the backpack, and one more sheet for the flap and shoulder straps.
For the flap, use a half-size sheet; for the shoulder straps, use a quarter-size sheet and then fold it in half again.
For the first sheet that becomes the main body, perform the “zabuton” fold three times.
After each fold, rotate the paper so you’re folding on a different face.
After the third fold, you should see four squares with crease lines on the reverse side; open these sections and squash-fold them into rectangles.
For the second sheet, continue folding so that you create three of these rectangles.
Combine it with the first sheet to form a box, then insert the flap into the one remaining rectangle.
Attach the narrowly folded shoulder straps to complete the backpack!