Recommended for elementary students! A collection of fun craft ideas for 3rd graders

Third graders are growing in their ability to think for themselves and come up with ideas.
They’re full of curiosity and learn many things through play with friends.
It’s also a stage where working with their hands gives them a strong sense of accomplishment.
Here, we introduce craft ideas recommended for third graders.
We’ve gathered projects that spark creativity and are fun to make.
Each one uses everyday materials so kids can enjoy the process of creating something delightful.
Be sure to use this as a guide and try crafts that are enjoyable both while making them and after they’re done!
- Third graders will be hooked! A collection of science project ideas using everyday materials
- Recommended for elementary students! A collection of fun craft ideas to make for 6th graders
- Recommended for elementary school kids! A collection of fun craft ideas for 2nd graders
- [Indoor Activities] A Collection of Craft Ideas Recommended for Elementary School Students
- Recommended for Elementary Students! A Collection of Fun Craft Ideas for 4th Graders
- Recommended for elementary schoolers! A fun collection of craft ideas for 5th graders
- Recommended for elementary school students! A fun collection of craft ideas for first graders
- Recommended for 3rd graders! A collection of easy self-study ideas you can try
- Recommended for lower elementary school students! A collection of plastic bottle craft ideas made with everyday materials.
- [For Elementary School Students] A Fun Collection of Paper Clay Craft Ideas
- Simple yet amazing crafts: craft ideas that elementary school students will want to make
- Crafts you can make with 100-yen shop items! A collection of fun project ideas that elementary school kids will love
- [For Elementary School Kids] Handmade Toy Craft Ideas
Recommended for elementary school students! A fun craft ideas collection for 3rd graders (91–100)
Cute goldfish scooping

When you think of summer, you think of festivals—and goldfish scooping, right? Let’s make a cute, handmade goldfish scooping game and have some fun! Prepare a cardboard box as the base and cut several slits into the sides.
Thread a thick blue string across the slits to represent water and create an aquarium.
Next, cut a paper cup to make a ring from the rim.
Attach a popsicle stick as the handle, and glue tissue paper to the inside of the ring to complete the poi (scooper).
Finally, tie individually wrapped candies with rubber bands, add eyes to make goldfish, and you’re done.
Arrange the goldfish in the aquarium and try scooping them up with the poi!
Sparkling Kaleidoscope

If you’re unsure what to make for your summer vacation craft project, why not try a sparkling kaleidoscope? You can make this kaleidoscope with recycled materials and items from the 100-yen shop.
Cut a hard plastic case and form it into a triangular prism, then place beads in the bottom and secure them.
On the opposite end, attach a piece of black construction paper with a peephole.
Glue a milk carton—lined on the inside with black construction paper—around the triangular prism, and decorate it as you like to finish.
While kaleidoscopes typically use mirrors, in this idea the hard plastic case serves that role.
Recommended for elementary school kids! A fun collection of craft ideas for 3rd graders (101–110)
Sparkling hourglass

Let’s make a cute, sparkly hourglass that doubles as interior decor.
Prepare two small bottles, glitter to use as sand, a clear plastic file sheet, and decorative parts.
Cut the clear file slightly larger than the bottle opening and make a hole in the center for the glitter to pass through.
Attach tape and half-cover the hole, then glue it to the bottle.
Add the glitter and glue on the other bottle.
Finish it off cutely with decorative parts.
After adding the glitter, be careful not to turn it over until the adhesive has dried.
lampshade

Here’s a lampshade idea that also works as room decor.
Brush glue mixed with water onto an inflated balloon, then stick on small torn pieces of washi paper.
For sturdiness, layer the washi several times until the balloon’s color isn’t very visible.
Be sure to leave an opening where the light will go.
Since washi is white, use tissue paper if you want to add color.
Once it’s completely dry, pop the balloon and remove it, then secure a wire along the inside edge of the opening for the light to finish it off.
Experimenting with resin?!
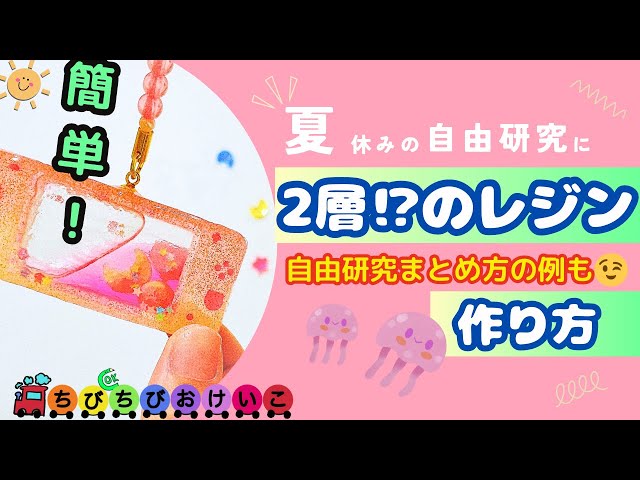
If you want to try your hand at making things with resin, why not purchase a resin craft kit? It comes with all the basic materials and tools, so you can start creating right away.
Deciding what shape to make and which parts to decorate with—and bringing your ideas to life—is a lot of fun.
While resin is often used for crafts, you can also do experiments, such as comparing how quickly different resin liquids cure! If it’s your first time, please work together with a parent or guardian.
Gem-like soap

Gemstone soaps are available as DIY kits, but they’re easy to make as long as you have glycerin soap and coloring.
Cut the glycerin soap into small pieces and place them in a container, then heat in a microwave at 500W for 10 seconds.
Mix in your favorite colorant to add color, and add aroma for fragrance.
Once you’ve made a few colors, pour them into another container in layers and let them set—that’s it! Try changing the color combinations and see what kinds of gemstones you can create.
Using a clear soap base also gives a light, airy look and is highly recommended.
Crafts to enjoy with 100-yen store hacks
@n.annlee321 100-yen store DIY/arrangement ☺️✨Summer Vacation Craft#HandmadeToysParenting#100-yen shop DIY
♬ Utopia – imase
Let’s customize some 100-yen shop items to make a cream soda stand.
For the base, use a flower vase.
Since the top is rounded, apply white masking tape there to represent the ice cream.
For the soda part, attach green iridescent origami paper and add round stickers to mimic bubbles.
Thread a craft pipe through a pom-pom to make a cherry, and stick it onto the base to finish.
You can use it to hold pens or clip memos.