Recommended for elementary students! A collection of fun craft ideas for 3rd graders

Third graders are growing in their ability to think for themselves and come up with ideas.
They’re full of curiosity and learn many things through play with friends.
It’s also a stage where working with their hands gives them a strong sense of accomplishment.
Here, we introduce craft ideas recommended for third graders.
We’ve gathered projects that spark creativity and are fun to make.
Each one uses everyday materials so kids can enjoy the process of creating something delightful.
Be sure to use this as a guide and try crafts that are enjoyable both while making them and after they’re done!
- Third graders will be hooked! A collection of science project ideas using everyday materials
- Recommended for elementary students! A collection of fun craft ideas to make for 6th graders
- Recommended for elementary school kids! A collection of fun craft ideas for 2nd graders
- [Indoor Activities] A Collection of Craft Ideas Recommended for Elementary School Students
- Recommended for Elementary Students! A Collection of Fun Craft Ideas for 4th Graders
- Recommended for elementary schoolers! A fun collection of craft ideas for 5th graders
- Recommended for elementary school students! A fun collection of craft ideas for first graders
- Recommended for 3rd graders! A collection of easy self-study ideas you can try
- Recommended for lower elementary school students! A collection of plastic bottle craft ideas made with everyday materials.
- [For Elementary School Students] A Fun Collection of Paper Clay Craft Ideas
- Simple yet amazing crafts: craft ideas that elementary school students will want to make
- Crafts you can make with 100-yen shop items! A collection of fun project ideas that elementary school kids will love
- [For Elementary School Kids] Handmade Toy Craft Ideas
Recommended for elementary school kids! A fun collection of craft ideas for 3rd graders (11–20)
pull-back car

This craft lets you experience the fun of a car you built yourself zooming forward powered by rubber bands.
Cut corrugated plastic (plastic cardboard) to match the size of the car body.
For the wheels, use bottle caps: make a hole in the center, then pass a bamboo skewer through to create the axle.
If you firmly attach this to the body with hot glue, it will start to look like a real car.
Hook a rubber band onto the rear axle and wind it by turning the axle forward, and you’re ready to go.
When you let go, the car surges ahead under the power of the rubber band.
You can freely design and color the body, so you can get particular about the appearance too.
Using everyday materials and a simple mechanism, it’s a hands-on project that’s both fun to build and a great way to learn, delivering dynamic motion.
How to make a paper popper

Here’s how to make a simple paper pop gun using a plastic wrap core.
First, roll up some paper to make a small ball about 1 cm in diameter.
Cut a balloon around the middle and attach it to the end of the wrap core.
Secure it with a rubber band so it doesn’t come off, and you’re done! Put the paper ball inside, pull the balloon back, and launch the paper ball you made.
You can also decorate the gun however you like or use cardboard to give it a cool gun shape.
Have fun with your own original ideas!
How to make a paper popper
Here’s how to make a simple paper pop gun using a plastic wrap core.
First, roll up some paper to make a small ball about 1 cm in diameter.
Cut a balloon around the middle and attach it to the end of the wrap core.
Secure it with a rubber band so it doesn’t come off, and you’re done! Put the paper ball inside, pull the balloon back, and launch the paper ball you made.
You can also decorate the gun however you like or use cardboard to give it a cool gun shape.
Have fun with your own original ideas!
How to Make an Easy Guitar

A simple guitar you can make with paper cups lets you easily live out the dream of strumming a ringing guitar.
First, glue the bottoms of two paper cups together.
Then stack another paper cup on each side with slits cut into them, and attach rubber bands into those slits—done.
The key here is the length of the rubber bands.
By choosing which slit to anchor them in and lining up rubber bands of different lengths, you can create differences in sound just like a real guitar.
Think about what kind of sound will make it feel cool, and fine-tune it into your ideal guitar.
A three-step chopstick rubber-band gun

This is a chopstick rubber-band gun that you can make with a simple procedure: use chopsticks as the base and attach a clothespin with a rubber band.
Insert the metal part of the clothespin into the gap between the chopsticks, then secure the clothespin in that position with a rubber band.
After that, to keep the chopsticks from spreading apart, wrap a rubber band around the tips of the chopsticks, and it’s done.
The mechanism is that you launch a rubber band stretched from the tip by opening and closing the clothespin.
The appeal is that you can make a chopstick rubber-band gun easily with only a few materials.
Even grade-schoolers can make it! Triple-shot chopstick rubber band gun
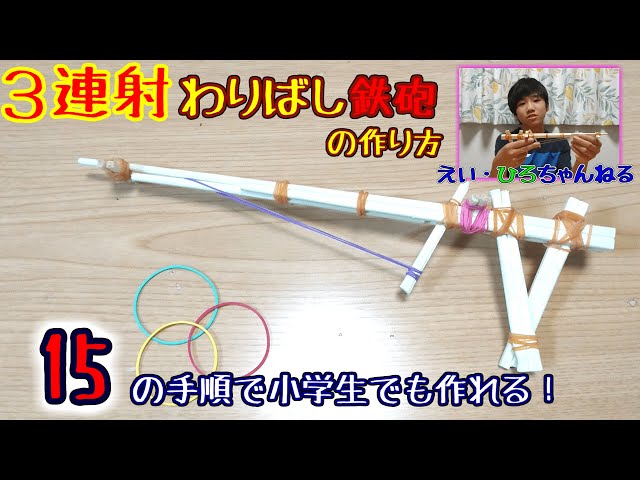
You might think it’s just a simple chopstick rubber band gun, but it actually has a feature that lets you fire three rubber bands.
The building process is straightforward: attach a handle to a bundle of chopsticks that serves as the base, then install a movable trigger so that it’s sandwiched in place.
What’s crucial here are the trigger shape and the positions where the rubber bands are hooked.
By attaching three rubber bands at different positions, they will fire in sequence.
The hooking method for each band is also intricate, so doing that accurately is a key point.
Recommended for Elementary School Kids! Fun Craft Ideas for 3rd Graders (21–30)
Puru-Koro Soap
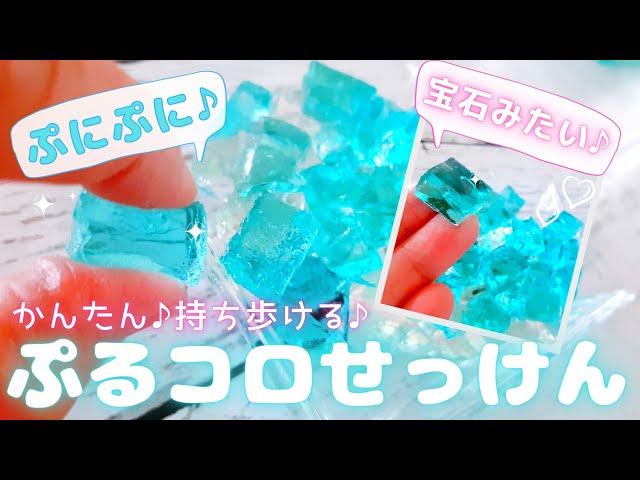
It’s like a jewel! Let me show you how to make cute, jiggly soap.
You’ll need liquid hand soap, gelatin, hot water, and food coloring.
Dissolve the gelatin in hot water, then mix in the liquid hand soap.
The trick is to stir slowly so it doesn’t foam.
Add food coloring, pour into a flat container, and chill in the refrigerator for 1–2 hours.
Then just cut it into your favorite shapes and you’re done! It looks adorable and might make handwashing more fun.
Just be careful to prevent small children from accidentally swallowing it.