[Part 3] At Nursery Schools and Kindergartens! A Collection of Halloween Decoration Ideas

When it comes to fun events in October, Halloween tops the list!
Many teachers at nurseries and kindergartens are probably thinking about how to decorate for Halloween.
In this article, we’ve put together a variety of Halloween decoration ideas to brighten up your school.
From simple styles to more elaborate decorations, we’ve included plenty of suggestions.
There are also craft projects that little children can enjoy making!
Be sure to read to the end and get ready for a wonderful Halloween day!
- At daycare and kindergarten! A collection of Halloween decoration ideas
- Handmade Halloween costume ideas! A roundup of outfits you can make with everyday materials.
- Get the Crowd Excited! Perfect Performance Ideas for Halloween at Daycare and Kindergarten
- Fun Halloween Game Ideas for Preschools and Kindergartens
- [October] Craft ideas for fall you can use in childcare
- Irresistible for 3-year-olds! A collection of fun Halloween craft ideas to make
- [Age 2] Have fun with Halloween crafts! A collection of ideas perfect for October
- [Childcare] Perfect for 3-year-olds! October craft ideas
- Get kids excited in childcare! A collection of ideas for making Halloween treat bags
- [For 4-Year-Olds] Fun to Make! A Collection of Halloween Craft Ideas
- Let's Make and Display! Origami Perfect for Halloween
- [Halloween] Pumpkin Origami Ideas for 3-Year-Olds
- [Preschools & Daycare] Costume and Cosplay Ideas for Halloween
[Part 3] In Nurseries and Kindergartens! A Collection of Halloween Decoration Ideas (1–10)
A candle made using a toilet paper roll core
@thecraftaisle this halloween we’re serving hogwarts vibes 🕯 #harrypotter#halloween#halloweendecor#diyhomedecor#easydiy#fyp#foryou#foryoupage
♬ Hedwig’s Theme – John Williams
Here’s how to make a candle decoration perfect for Halloween.
Prepare a toilet paper roll, white paint, white construction paper, a hot glue gun, a needle, thread, and an LED candle.
Paint the toilet paper roll with white paint and let it dry, then use the hot glue gun to create drips of candle wax.
Once the glue dries, paint those parts white as well.
Cover the bottom with construction paper to make a lid.
Pierce the toilet paper roll with a needle and thread the string through so the LED candle won’t fall out.
Leave the thread a bit long, tie it at the top, and you’re done! It really enhances the Halloween vibe—highly recommended!
Halloween paper fan

Why not try making a Halloween-themed paper fan, a classic decoration for parties? Divide a standard sheet of origami paper into four equal parts and use three pieces folded in an accordion style.
If dividing into quarters feels like too much work, you can save time by using smaller-sized origami paper.
Any steps involving scissors or a craft knife should always be done by an adult.
You can have the kids do the accordion folding, and let an adult assemble the pieces into a paper fan! Decorate them with Halloween motifs—orange for a jack-o’-lantern, black for a black cat or bat, and white for a mummy—to enjoy a festive look.
Cute ghosts made with tissue paper
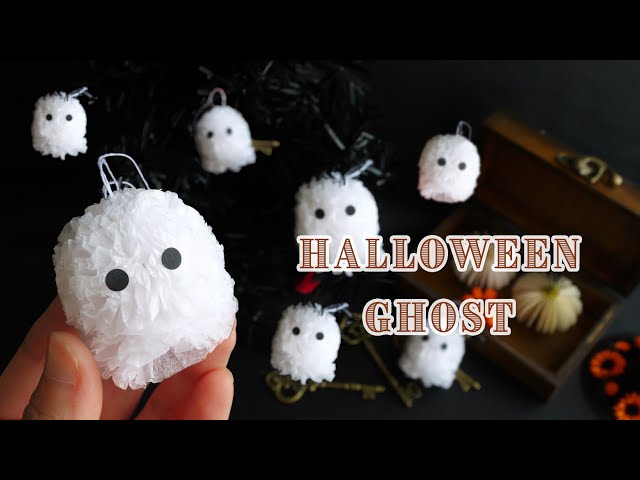
Here’s how to make cute tissue-paper ghost ornaments for your Halloween tree.
Prepare white tissue paper, thread, black construction paper, a hole punch, scissors, and glue.
First, fold two sheets of tissue paper in half twice horizontally and twice vertically, then unfold and cut down the center vertically.
Fold the cut pieces again and cut vertically once more.
Make two sets with three sheets each and one set with two sheets.
Accordion-fold all three sets, then, keeping in mind space for the hanging area, tie them securely with a long piece of thread to form a bow shape.
Use the hole punch on the construction paper to make eyes.
Open up all three bow-shaped tissue paper pieces, trim with scissors to neaten the shape, glue on the eyes, and you’re done!
Part 3: Halloween Decoration Ideas for Nurseries and Kindergartens (11–20)
Mickey Halloween hanging ornament
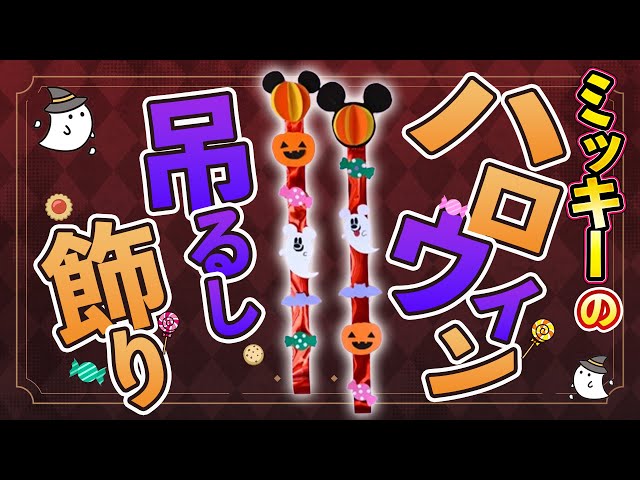
Here’s how to make a cute Mickey Halloween hanging decoration.
Prepare construction paper in black, pink, green, purple, orange, and yellow.
You’ll also need twine, glitter tape, clear tape, and double-sided tape.
First, cut two pieces of construction paper into Mickey shapes, attach twine to the back with clear tape, and stick them onto the glitter tape using double-sided tape.
For the parts, cut two circles each from the orange and yellow paper, fold them in half, apply glue, and accordion-fold them.
Using templates, cut out two pieces each for ghosts, candies, bats, and pumpkins.
Decorate the candies with round stickers.
After putting double-sided tape on the back of each part, stick them onto the glitter tape—and you’re done!
origami skeleton

I’ll show you how to make an easy origami skull.
Please prepare one 15 cm × 15 cm sheet of origami paper.
Fold it into a triangle, then open it up.
Fold one triangle toward the center once, then unfold the triangle and fold the paper in half once as if returning it, creating a crease toward the center.
After you’ve done both sides, open it, change the angle, and make more creases again.
Open the skull’s face and mouth area and fold carefully.
Finally, fold the center section and you’re done! Add eyes or patterns as you like and have fun! The skull will move in a fun way!
Cotton Ball Monster Made with Yarn

Here’s how to make a cotton ball Halloween decoration.
Prepare yarn, water balloons, shoji glue (rice paste), felt for decorations, and scissors.
Inflate a water balloon, then soak the yarn in the shoji glue.
Wrap the glue-soaked yarn around the balloon, adding more yarn as needed.
Let it dry for 2–3 days.
Once dry, pop the balloon with scissors, then attach felt eyes and a mouth to finish.
It’s simple and cute—give these cotton balls a try! It might be fun to use different kinds of yarn to make cotton balls in a variety of colors.
Swaying Balloon Halloween Decorations
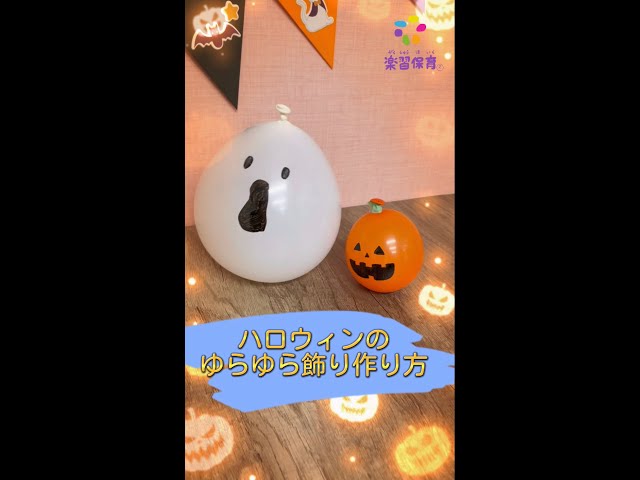
Here’s how to make a wobbling decoration.
You’ll need a balloon, a marble, a rubber band, and a felt-tip pen.
First, put one marble inside the balloon and tie off the part with the marble using the rubber band.
Turn the balloon inside out front and back so the marble sits inside, then blow air into the balloon to inflate it.
Draw freely on it with the felt-tip pen, and you’re done! Try using balloons in your favorite colors and changing the facial expressions to create your own original wobbling balloon!