Get kids excited in childcare! A collection of ideas for making Halloween treat bags


How about handmade bags to make Halloween even more fun? Here are some cute candy bag ideas you can create with everyday materials like paper plates, cups, and milk cartons.
Crafting with Halloween-themed motifs such as bats, ghosts, and pumpkins will spark children’s imaginations.
Making them together and filling them with treats will surely become a special memory.
Celebrate Halloween with your very own original bag and make it even more exciting! Note: We refer to items made by children as “creations” in the text.
A hit in childcare! A collection of ideas for making Halloween treat bags (1–10)
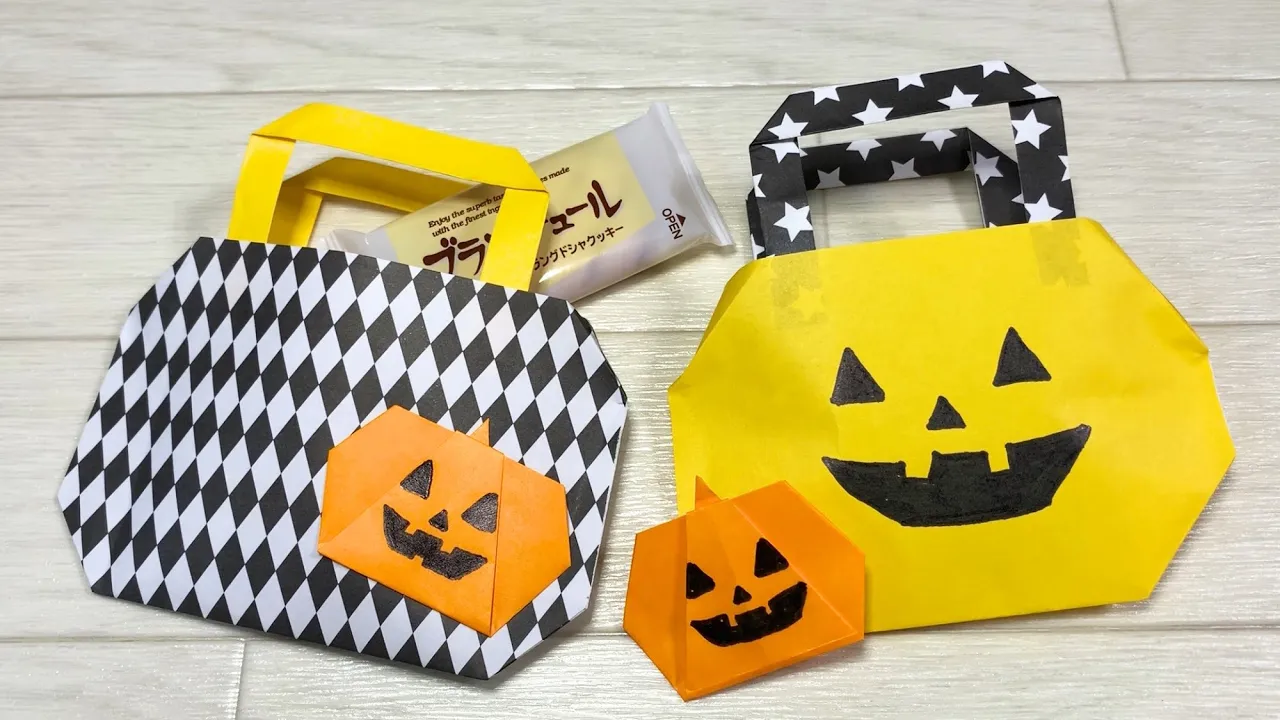
Pumpkin bag made with origami

A pumpkin bag made with origami is recommended because both the materials and the steps are simple.
Choose origami paper in the color you like, fold it into a bag shape, and make the handles—since the shape is easy to picture, children around age three and up can enjoy making it.
If you draw a jack-o’-lantern face with markers to give it a Halloween feel, it’ll create a great atmosphere and be a big hit at events.
It’s simple yet practical, and its design will brighten up Halloween, so give it a try!
Heart-shaped candy bag

A candy bag with a heart design is cute not only for girls but also for boys.
By making evenly spaced cuts in two sheets of construction paper and weaving them together into a heart shape, you can create a bag design that can’t be achieved with a single sheet.
You can go with Halloween-inspired colors or choose your own original palette—combining favorite color schemes freely will boost excitement both during crafting and after it’s finished.
Since each child will come up with their own design, it’s enjoyable for adults to watch as well.
Candy bag made with craft band

A treat bag made with craft bands created from recycled materials like milk cartons and waste paper.
Because you need to prepare many materials—vertical strips, horizontal strips, and weaving strips—and the bag is woven together in a complex way, it’s a rewarding craft for children aged four and up.
Since the parts that children struggle with or find difficult will differ, it’s best to work in small groups.
The woven basket is sturdy, so after enjoying Halloween at the preschool, it can be used at home for a long time.
We hope the children can make a basket they really love.
Mini bag with rosette

This craft lets you make a mini bag with a rosette from a single sheet of origami paper.
Simply cut the origami into the bag, handle, and rosette sections and assemble to create a stylish mini bag.
Because the folding is detailed, it’s suitable as a guideline for children aged 4 and up.
The rosette requires millimeter-precise work, so adults should provide support.
If you want to use it as a treat bag or similar, prepare a larger sheet of paper instead of origami and adjust to the purpose—it’s a great way to add flair to Halloween events.
A Halloween ghost that can also be used as a bag

This bag can be made using scraps of drawing paper and origami that come from your usual craft time.
Even though you might not get many scraps from just one session, if you collect them every time you make something, you’ll end up with quite a lot.
Crumple the scraps and tear them into smaller pieces to use—kids love this step! Then paste the torn pieces onto an inflated balloon; once it’s dry, remove the balloon from inside.
After that, reinforce it, add handles, and finally attach a face—like a Jack-o’-Lantern or any monster you like—and you’re done! It’s an easy, eco-friendly Halloween bag, and the making process is fun too!
Ghost Candy Bag

Let’s make a candy bag that looks great despite the simple steps.
First, cut off the rim of a paper cup and mark the drinking side so it’s divided into 16 sections.
Then draw straight lines from each mark down to the bottom of the cup, and make cuts along those lines with scissors.
Finally, take each strip that forms and tuck it into the neighboring slit, folding as you go—repeat this for all the strips.
That completes the main body of the candy bag.
To finish, use tape to attach the rim you cut off at the beginning to make a handle, and draw a ghost face on the body.
Done! It’s a practical craft you can use to hold candy or as a small container.
Ghost candy bucket

While ghosts are usually something children find scary, at Halloween they become cute designs that brighten up events.
Using a paper cup as the base and adding a clear cup creates a candy bucket that looks just like a translucent ghost.
However, to make the most of the clear cup’s transparency, you’ll need to cut holes in the paper cup with scissors, so please be careful if small children are helping during the crafting process.
Since the candy inside the bucket can be seen from the outside, it’s sure to get kids excited.