[Age 4] Easy origami ideas perfect for summer! A collection of cool, refreshing motifs


Four-year-olds are getting better at crafts and making things.
With origami too, they start enjoying adding their own ideas and making little tweaks.
Since summer is hot, here are some simple origami ideas you can enjoy indoors.
We’re featuring motifs that feel cool and items you can use for pretend festival play.
Even with the same folding method, each child’s personality shines through, so it’s fun that everyone’s work turns out differently.
We also recommend using the origami as wall decorations.
Be sure to enjoy origami with the children and make some summer memories together!
- [For 4-year-olds] Recommended for August! Craft ideas: Enjoy a variety of motifs
- Origami perfect for summer. Fun and easy for kids to make!
- Have fun in August! A collection of summer origami ideas recommended for preschoolers (4–5 years old)
- [Age 3] Simple summer origami ideas. A roundup of classic summer motifs.
- Fun with preschoolers! July origami ideas to feel the season
- [Childcare] A roundup of easy summer origami ideas to enjoy with 5-year-olds
- [Origami] Easy spring-themed origami ideas to enjoy with 4-year-olds
- Enjoy August with preschoolers using origami! A collection of summer-perfect ideas
- Recommended for older preschoolers! A collection of origami craft ideas to enjoy summer in August
- Simple Origami Ideas to Enjoy in Autumn (For 4-Year-Olds)
- Perfect Summer Craft Ideas to Try in July for 4-Year-Olds
- [Childcare] [Origami for 4-year-olds] Introducing origami for 4-year-old children!
- [Childcare] For 4-year-olds! Easy winter origami ideas
[Age 4] Easy Origami Ideas Perfect for Summer! A Collection of Refreshing Motifs (81–90)
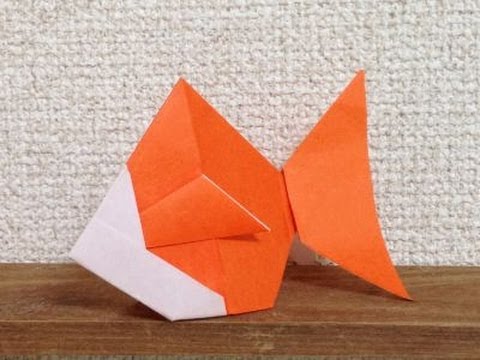
plump goldfish

Here is a three-dimensional goldfish you can make from a single sheet of origami paper.
Because it has a 3D finish, there are quite a few steps where you create creases first and then assemble, but watching a goldfish take shape from a flat sheet makes an excellent way for children to develop spatial awareness.
It’s also nice to work through the tricky parts together with a parent or guardian.
Making goldfish in different colors or adding water plants to recreate a pond or fishbowl is fun, and it would look cute pasted onto a fan as well.
Wobbling Goldfish

This goldfish origami can be moved to recreate the gentle swaying motion of swimming.
The folding process is similar to the yakko-san, pinwheel, and trick boat models up to a certain point, so it should be easy to get started.
Every part is three-dimensional, and when you move the tail fin, it looks as if the fish is actually swimming, so you can enjoy not only making it but also playing with it.
You can also make it cute by adding eyes with round stickers or a felt-tip pen.
Be sure to give it a try!
Simple goldfish
Let’s make it with scissors! Here’s a simple goldfish craft idea.
All you need is origami paper in your favorite color and a pair of scissors.
It’s a fun activity for both kids and adults to enjoy together! The process of making a goldfish with your favorite colored origami paper and scissors is simple yet helps build concentration.
In particular, after cutting the origami, it’s important to fold carefully so you don’t tear the paper—this is a key point.
This step will help develop dexterity and focus.
The finished goldfish is adorable and fun to display!
whale shark

Let’s make a cool shark! Here are some ideas for a whale shark.
What you’ll need: blue-toned origami paper, 8 mm white round stickers, and/or a white pen.
The whale shark is known as the largest fish in the world and is characterized by its gentle nature.
Let’s try making a cool whale shark out of origami! The key point is the step where you leave small gaps at the creases to form the shape.
This is the secret to recreating the shark’s unique body shape.
Children can learn the folding techniques while creating a highly polished finished piece!
Pac-Pac Fish

Let me show you an easy way to fold a fish whose mouth opens and closes.
Fold the origami paper into thirds both vertically and horizontally to make crease lines, then unfold.
If you have a 3×3 grid of squares, you’re set.
Fold the paper into a triangle twice to make creases and unfold, then add one vertical crease on each side of the center line and unfold again.
Fold the top and bottom corners inward along the three vertical creases to form the protruding parts.
Pinch the left and right corners and fold along the creases—like magic, it turns into a fish shape! Fold the tail fin and dorsal fin inward, puff it up slightly, and it’s done.
If you pinch it top and bottom, the mouth opens and closes—very fun!