Origami perfect for summer. Fun and easy for kids to make!


Summer is full of fun events like swimming at the beach or pool and fireworks festivals! How about expressing that summer with origami? Here, we’ll introduce origami that’s perfect for the season.
There are lots of designs, like cool ice cream, lanterns from summer festivals, and seasonal flowers and insects.
All of them are easy to make and can be completed in a short time, so they’re great even after water play.
Fold a variety, decorate your room, or enjoy a pretend festival with friends.
Have a fun summer with origami!
Origami perfect for summer. Fun and easy for kids to make! (1–10)
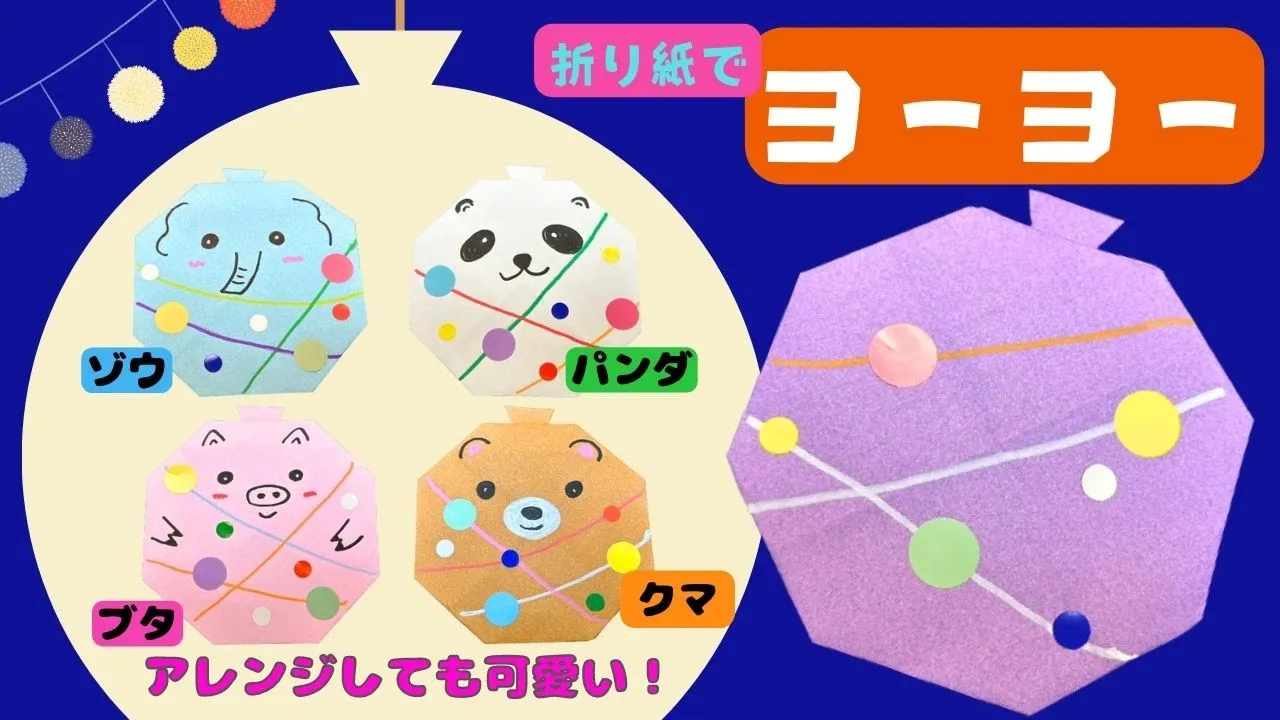
yo-yo

Here’s an idea for making a classic summer festival game toy—a yo-yo balloon—using just one sheet of origami paper.
Fold the paper in half twice to make a smaller square, then unfold it.
Using the crease lines as guides, fold all four corners toward the center.
Next, pick one corner and fold it outward, then fold just the tip of that corner back inward once more.
Fold all four corners slightly inward to round the shape—now it’s starting to look like a yo-yo balloon.
Make small snips with scissors on the left and right sides of the folded-back section, then fold the part above the cuts inward to represent the tied mouth of the balloon.
That’s the end of the folding steps.
Finish by drawing your favorite patterns or adding stickers.
Plump Wind Chime

How about making a wind chime out of origami that captures the feeling of summer with its cool tone and a strip of paper swaying in the breeze? First, fold the origami paper in half into a square twice.
Next, draw lines on the square as if shaping flower petals, then cut along the lines with scissors.
Snip off a tiny bit in the center so there’s a small hole.
Open the paper; once it looks like a flower, gather the tips of the petals toward the center, overlap them, and glue them down.
Finally, thread a string through and attach a tanzaku (paper strip) to the string to finish.
If you thread a small bell onto the string, it will make a sound and feel even more like a wind chime.
This softly rounded, cute wind chime is perfect to make and display by your window!
A cute turtle on a flat plane

We’ll show you how to make a cute flat turtle using origami.
Prepare one sheet of your favorite origami paper and let’s start folding.
For the parts where you inflate the paper as you fold it in, the key is to teach children slowly and carefully.
Once the flat turtle is finished, draw a face to give it a cute, original touch.
It’s also recommended to paste it onto a light blue background to evoke the ocean.
Be sure to have fun using crayons while imagining sea creatures!
Easy with kirigami! How to make a star
Simple with kirigami! Let’s show how to make a star.
Prepare one sheet of origami paper and start folding while making crease lines.
After folding, draw a guide line, then cut along the line with scissors.
When you open the paper, you’ll have a star with a hollow center.
If you apply glue to the tips of the star and stick them together, you’ll get a beautiful star that looks like the Milky Way—perfect for Tanabata decorations.
Try making them in different sizes and colors.
It’s also great to decorate by sticking them on wish strips (tanzaku) for an even more Tanabata-like touch.
Tanabata decorations that even children who struggle with crafts can make

We’d like to introduce simple Tanabata decorations that kids can make with excitement.
Many teachers are probably planning decorations for Tanabata on July 7 or for their preschool’s Tanabata party.
Depending on the children’s age and development, it’s also recommended to have them use glue and scissors as they create.
By sticking together circles cut from origami paper, you can make decorations with a cute, soft look.
There are many Tanabata decorations that children can enjoy making according to their age and growth, such as triangle chains, square chains, circle chains, and watermelon decorations.
Be sure to try making them with the kids!
watermelon lantern
https://www.tiktok.com/@chooobo2/video/7501292964560260359We’d love to use this for Tanabata decorations too! Here are some watermelon lantern ideas.
If you’re looking to add a touch of humor to your Tanabata décor, these watermelon lantern ideas are perfect for you! What you’ll need: red origami paper, green origami paper, a black pen, washi tape, regular tape, and string.
The outside uses green origami to depict the watermelon’s wavy rind pattern, while the inside represents the beautiful flesh and seeds.
By changing up the colors, you can even create a yellow-watermelon motif.
Cute origami of Orihime and Hikoboshi

Let’s make cute, rounded Hikoboshi and Orihime figures with origami.
Since the body and head are made from separate sheets, prepare a total of four pieces of origami paper.
For the body, create creases and fold the corners inward to form an egg shape.
For the head, fold it into a shape that’s half the size of the body, then tuck it into the top of the body.
Glue the body and head so they don’t come apart, add round stickers for the eyes, and draw the mouth with a pen to finish.
If you want to recreate Orihime’s hairstyle, fold a strip of origami paper thinly, shape it into a heart, and attach it to the back of her head.