Origami perfect for summer. Fun and easy for kids to make!


Summer is full of fun events like swimming at the beach or pool and fireworks festivals! How about expressing that summer with origami? Here, we’ll introduce origami that’s perfect for the season.
There are lots of designs, like cool ice cream, lanterns from summer festivals, and seasonal flowers and insects.
All of them are easy to make and can be completed in a short time, so they’re great even after water play.
Fold a variety, decorate your room, or enjoy a pretend festival with friends.
Have a fun summer with origami!
- [Childcare] August origami: simple and cute ideas
- [Age 4] Easy origami ideas perfect for summer! A collection of cool, refreshing motifs
- Fun to make in childcare! A collection of easy origami ideas recommended for July
- Simple yet amazing crafts: craft ideas that elementary school students will want to make
- [Age 3] Simple summer origami ideas. A roundup of classic summer motifs.
- [Childcare] A roundup of easy summer origami ideas to enjoy with 5-year-olds
- [For 4-year-olds] Crafts to make with preschoolers in July and August: Creative activities that let kids feel the summer
- Recommended in July! Summer craft play ideas
- It moves! You can play with it! Fun origami. How to make origami toys.
- [For 3-year-olds] A fun collection of easy origami fish to make!
- Handmade Lottery Draws Kids Will Love! A Fun Collection of Ideas to Make and Play
- Enjoy August with preschoolers using origami! A collection of summer-perfect ideas
- Have fun in August! A collection of summer origami ideas recommended for preschoolers (4–5 years old)
Origami perfect for summer. Fun and easy for kids to make! (21–30)
How to fold a Hercules beetle (origami)

The Hercules beetle, whose name was cemented by the smash hit “New Beetle Champion Mushiking,” is said to be the largest in the world, with the biggest specimens reaching 180 mm.
At that size, it’s not just cool—it’s a little scary, right? Let’s try making a Hercules beetle that’s hugely popular with kids.
Prepare two sheets of paper: one gray and one yellow.
Fold along the diagonal, then fold both sides inward to meet the center line.
Next, fold that section diagonally… this part will be the head.
Take the yellow paper, fold it in half and then in half again to make a square, and from there fold a section diagonally to form the tail.
Finally, attach the body and the head to complete it.
Even without using large paper, it’ll still have an impressive presence.
Double-sided origami sunflower

This sunflower features slightly three-dimensional petals and looks lovely.
For this method, use double-sided origami paper, so please prepare one that’s yellow on one side and brown on the other.
Fold it in half twice so the brown side ends up on the inside, forming a square.
Open it, then fold it twice again to make a triangle.
Fold the four corners toward the center where the creases intersect to create the petals.
Continue folding as you would when making a crane, and you’ll end up with eight petals.
A nice point of this piece is that it’s completed with just one sheet of origami paper.
Be sure to get double-sided paper and give it a try!
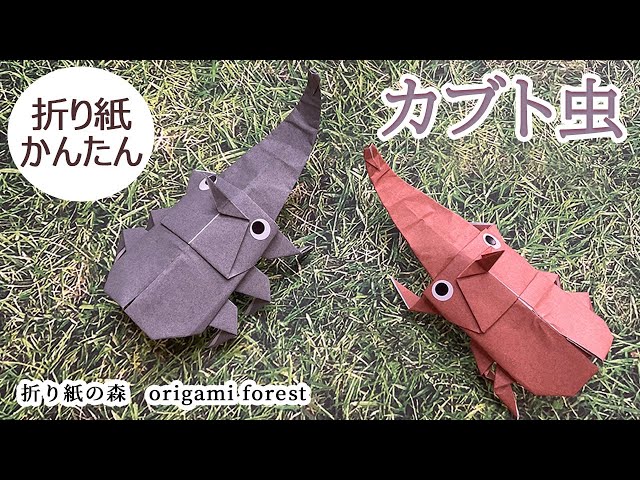
Summer Origami! How to Fold a Rhinoceros Beetle

Origami rhinoceros beetle creations have a cute, round, chubby shape.
Because the design is rounded, there are some parts where you need to make fine folds.
Still, carefully folding each step will give you a satisfying sense of accomplishment when the beetle takes shape.
Adding sticker-made eyes to the finished beetle or attaching legs folded from origami can change the overall style.
Trying different arrangements can be fun, don’t you think? Once it’s done, you can mount it on a backing sheet to display, or place it on a shelf to bring a seasonal touch to your room.
How to fold a small rhinoceros beetle

Introducing an adorably tiny origami rhinoceros beetle.
It’s so small it fits not only in a child’s palm but even in a baby’s.
It looks great as a letter decoration or a pop accent on a postcard.
Just note that the paper you fold is quite small, so take your time and enjoy the process without getting impatient.
You’ll use two 3.5 cm squares of paper.
You’ll make the horn piece, the body piece, and the leg piece separately, then glue them together at the end.
Scissors are also used, so it should be suitable for upper-elementary school students and older.
Once you make one, you’ll want to make more—such a cute mini-mini beetle!
Flat 3D is cute! How to fold a rhinoceros beetle
Compared to other beetle origami, this one is a bit simpler and less difficult.
The leg parts are made separately and attached later.
If you’re doing this with a child, it might go smoothly if the child makes the body and the adult makes the legs.
First, fold the paper diagonally, then fold both sides along the center line.
Flip it over and fold so that the tips overlap.
You’ll start to see something like a beetle’s horn appear, and at this point it’s sure to get everyone excited and shouting, “A beetle!”
The hole punch is cute! Sunflower paper cutout

How about making sunflower kirigami out of origami paper? Kirigami is a fun craft that lets you enjoy the surprise and excitement when you unfold it.
Fold a sheet of yellow origami paper twice to make a square, and once more to make a triangle.
Fold it in half again, then use a pencil to draw the shapes and patterns of the petals.
Cut along the lines you drew with scissors, punch some holes with a hole punch, and then unfold it.
Thinking about what shape it will become as you cut—only to open it and find something completely different!—is one of the real pleasures of kirigami.
Be sure to add your favorite patterns and try making your very own original sunflower.
Paper-cut sunflower you can even make the leaves for!

With a single sheet of origami paper, you can make everything from the sunflower’s bloom to its stem and leaves! First, fold the paper in half vertically with the colored side facing inward.
Next, draw half of a sunflower—from the flower through the stem and leaves—on the paper.
Then simply cut along the lines you drew! By adding fine slits, you can show the border between the yellow petals and the brown center, as well as the veins on the leaves.
If you like, add facial features with round stickers to finish a cute sunflower!