Recommended for elementary schoolers! A fun collection of craft ideas for 5th graders

Fifth graders are at an age where their interests broaden, and they enjoy communicating and playing with friends.
They are also becoming able to express their own opinions, and their thinking skills are developing.
As they get better at using their hands to shape their ideas, their creativity grows even more during this stage of elementary school.
Here, we introduce craft ideas recommended for fifth graders.
Using familiar materials, they can create projects that are fun and educational.
We hope this guide helps them enjoy crafting—whether by collaborating with friends or expressing their individuality.
- [5th Grade Elementary School] Independent Research Themes & Crafts | A Collection of Ideas That Lead to Learning
- Recommended for elementary students! A collection of fun craft ideas to make for 6th graders
- [Indoor Activities] A Collection of Craft Ideas Recommended for Elementary School Students
- Recommended for Elementary Students! A Collection of Fun Craft Ideas for 4th Graders
- Recommended for 5th graders! A collection of easy self-study ideas you can enjoy while learning
- Recommended for elementary students! A collection of fun craft ideas for 3rd graders
- Recommended for elementary school kids! A collection of fun craft ideas for 2nd graders
- Recommended Independent Research Projects for 5th Graders [Elementary School Students]
- Recommended for elementary school students! A fun collection of craft ideas for first graders
- [For Elementary School Kids] Handmade Toy Craft Ideas
- Recommended for lower elementary school students! A collection of plastic bottle craft ideas made with everyday materials.
- DIY science projects that elementary school boys will love: ideas you can make with everyday materials
- Simple but awesome! Craft ideas for upper-grade girls
Recommended for elementary school students! Fun craft ideas to make for 5th graders (71–80)
How to Make an Easy Guitar

A simple guitar you can make with paper cups lets you easily live out the dream of strumming a ringing guitar.
First, glue the bottoms of two paper cups together.
Then stack another paper cup on each side with slits cut into them, and attach rubber bands into those slits—done.
The key here is the length of the rubber bands.
By choosing which slit to anchor them in and lining up rubber bands of different lengths, you can create differences in sound just like a real guitar.
Think about what kind of sound will make it feel cool, and fine-tune it into your ideal guitar.
For demon-slaying only! Bean-throwing rubber band gun
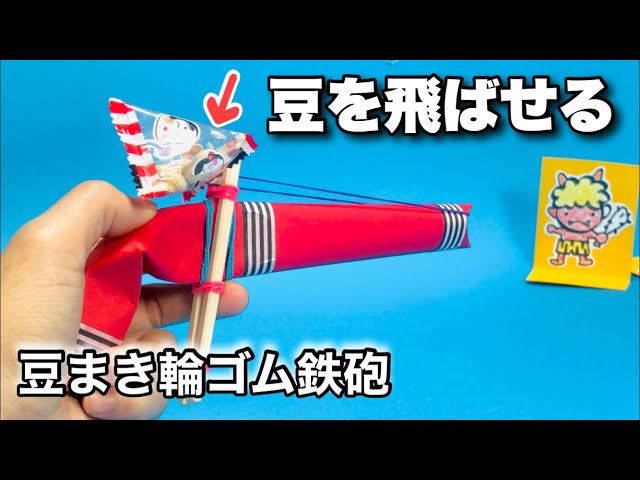
Oni-busting only! Here’s how to make a bean-throwing rubber band popper.
Prepare chopsticks, roasted soybeans (fukumame), construction paper, tape, scissors, and rubber bands.
Roll the construction paper into a tube, then secure the tube with rubber bands by clamping it between a pair of chopsticks folded in half.
The key is to wrap the rubber bands tightly so they don’t loosen.
Be careful not to cut your hand on the ends of the chopsticks.
When launching, dent the tip of the paper tube, hook on a rubber band, set it, and play.
When playing, don’t aim at people and make sure to play safely.
A turtle that runs on rubber power!

Moving toys are appealing no matter how old you are, and they’re especially popular with lower-grade elementary school kids.
This is a paper cup turtle craft that zooms forward using rubber-band power hidden in its shell.
First, cut slits halfway down a paper cup and fold them in to make the legs.
The remaining part becomes the body.
For the face, stick round stickers on as eyes to make it cute.
Take a used AA battery, wrap a rubber band around it, attach kite string with cellophane tape, and set the mechanism inside the turtle’s shell.
Even though it’s a turtle, it moves surprisingly fast and with big motions—so much fun!
A beanbag-toss game using ping-pong balls

Here’s a fun and engaging game using ping-pong balls: a ball-toss challenge.
Gather chopsticks, clothespins, tape, and paper cups to make it.
When building the launcher, be mindful of the angle as you fix the chopsticks in place with tape.
Secure them firmly with tape and test to make sure it works properly as you build.
Attach a pair of plastic bottle caps to the back end of the chopsticks, and it’s complete.
You can decorate it however you like.
Stick paper cups on the wall to create goals, then try shooting from the launcher and have fun playing!
Paper yo-yo made from disposable chopsticks and wrapping paper

Let me introduce a paper yo-yo made from chopsticks and wrapping paper that’s fun to stretch and snap back.
Prepare some chopsticks and wrapping paper, and let’s get started.
Measure the length and cut the wrapping paper into a rectangle, then join the pieces with glue or tape.
Secure a chopstick with tape and roll the paper around it.
The key is to roll it tightly so there are no gaps.
Finish with decorations, and it’s done.
Try different wrapping papers to make your own original paper yo-yo and have fun! Be safe and don’t aim it at people.
Target-throwing game with disposable chopsticks and clothespins

Let me introduce a target-shooting game that launches with a burst of energy using chopsticks and a clothespin.
Prepare two chopsticks, a clothespin, tape, and a plastic bottle cap to make it.
For the launcher, clip the clothespin’s metal spring onto a chopstick, then tape the clothespin’s handle and the chopstick together to form the base.
Cut a slit in the plastic bottle cap and fasten it to the chopstick with a rubber band.
Make a target out of a milk carton and draw point values on it.
Set a marble-sized ball on the finished launcher and try aiming at the target.
Have fun seeing how many points you can score!
Disposable chopstick holder
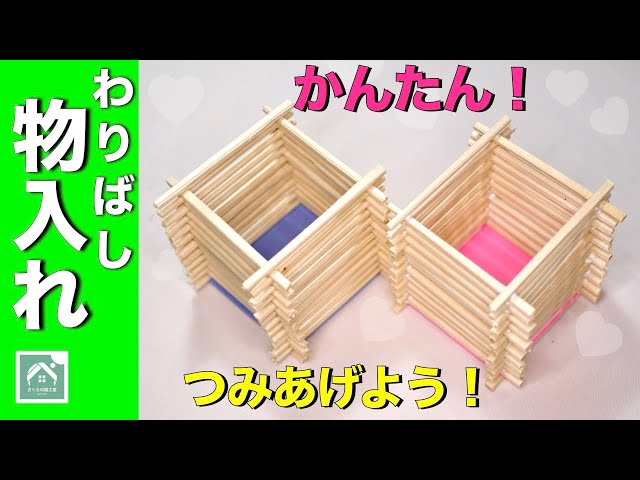
Here’s a chopstick accessory holder that’s perfect for a summer vacation craft.
Prepare 12 pairs of disposable chopsticks, glue, and colored construction paper.
Split the chopsticks in half, then use scissors to cut all the way around the midpoint to make them half-length pieces.
With 12 pairs, you’ll get 48 sticks.
Cut the colored paper into a square, apply glue to the left and right sides, and attach chopsticks; then flip it over, rotate it, and glue chopsticks onto the sides that don’t have them yet.
Apply glue where the chopsticks overlap and stack the sticks one by one.
Make sure they stack up straight.
Let it dry thoroughly, and it’s done!