Recommended for elementary students! A collection of fun craft ideas to make for 6th graders

Sixth graders grow rapidly and begin to develop their own opinions.
As they discover the joy of cooperating with friends, they also start to value their friendships even more.
Their interest in learning increases, making them eager to try many new things.
This is also a time when their creativity flourishes, so crafts are a great way to draw out those feelings.
Here, we’ve gathered unique projects that use a variety of materials and ideas.
We hope they’ll enjoy both the fun of making things and the fun of playing with friends using what they’ve made.
- Recommended for elementary schoolers! A fun collection of craft ideas for 5th graders
- [Indoor Activities] A Collection of Craft Ideas Recommended for Elementary School Students
- Recommended for Elementary Students! A Collection of Fun Craft Ideas for 4th Graders
- Recommended for elementary students! A collection of fun craft ideas for 3rd graders
- For 6th Graders: Unique and Fun Ideas for Independent Research Projects
- Recommended for elementary school kids! A collection of fun craft ideas for 2nd graders
- Recommended for elementary school students! A fun collection of craft ideas for first graders
- Recommended for 6th graders! A collection of easy self-study ideas you can enjoy while learning
- [For Elementary School Kids] Handmade Toy Craft Ideas
- [For Elementary School Students] A Fun Collection of Paper Clay Craft Ideas
- Simple but awesome! Craft ideas for upper-grade girls
- Play ideas kids can enjoy from 1st to 6th grade [indoors & outdoors]
- Crafts you can make with 100-yen shop items! A collection of fun project ideas that elementary school kids will love
Recommended for elementary school students! A fun collection of craft ideas for 6th graders (71–80)
Disposable Chopsticks Chomping Crocodile
@habii.jp Simple Crafts Series: Chopstick Chomping Crocodile. “Habi,” the official Child Development Support and After-School Day Service that supports the growth of children with developmental concerns. <Posts around 7 p.m. on Tue/Thu/Sat> The official account of Wellbe for Employment Support is here → @Wellbe Employment Support [Official]#NeurodevelopmentalDisordersParenting# developmental support (ryōiku)Habi
♬ All the Fun We Had Together – Official Sound Studio
Let me introduce the Chopstick Chomping Crocodile—its moving face is super fun! Get some chopsticks, rubber bands, and origami, and let’s make it.
First, split two pairs of chopsticks.
Align each pair lengthwise and secure them with rubber bands.
Once you have two secured sticks, attach them together top and bottom with rubber bands so they can open and close.
Finally, glue or tape a face and mouth to the tips of the chopsticks, and you’re done.
Give it a try for some chomp-chomp fun! Since the method is simple, it could also be fun to swap the crocodile for another animal.
Snowflakes made of yarn
@hoikushisatomi [From around age 4] Snowflakes with yarnNursery teacher / Childcare workerKids will love it#NurseryTeacherDailyLifeHand gamesworkTranslation#NurseryTeacherThingsKnitting yarn#YarnPlay
♬ Stylish cafe-style BGM – Hiro Hattori
After cutting three disposable chopsticks short, use two of them to make an X shape, then place it over the remaining stick set vertically and secure them with yarn.
Next, wrap more yarn around them to create a snowflake.
When wrapping, go one stick at a time: loop the yarn once around a stick, then move on to the next chopstick.
The yarn doesn’t have to be the same color—switching to a different yarn partway through creates a pretty pattern.
You’ll get a variety of snowflakes depending on how many wraps you make and the types of yarn you use, so try making several kinds.
paper cup light
@chooobo2 This time, I’m introducing how to make the “Original Light from a Paper Cup 💡” that we’ll create in the workshop on November 16 ✨ The picture you draw will glow in the dark 😳! Since Christmas is coming, I drew a tree! Depending on age, just coloring and adding stickers is enough—the pen colors and sticker shadows glow and look so cute 🩷 This time I drew on a clear file, but drawing directly on plastic wrap is also OK 🙆♀️◎ (Use a transparent clear file.) Using a clear file makes it easier to draw than on plastic wrap, and the finished piece is less likely to break! Workshop details are posted in the Instagram Highlights!Made in DecemberChristmas craftsChristmas partyTranslation#HandmadeToysPaper cup craft
♬ All I Want for Christmas Is You – Mariah Carey
Let’s make an exciting item using a paper cup! First, cut a piece of a clear file (plastic folder) to match the size of the paper cup’s rim.
Use a permanent marker to draw any picture you like.
Next, cut out the bottom of the paper cup and decorate the sides with stickers, etc.
Finally, place the drawing you made on the rim side of the paper cup, cover it with plastic wrap from above, and secure it with a rubber band—that’s it! If you shine a light through the hole where you cut out the bottom and aim it at a wall, your picture will be projected on the wall.
It looks perfect for Halloween or Christmas too.
Try playing with it in a dark room!
Recommended for elementary school students! A collection of fun craft ideas to make for 6th graders (81–90)
How to Make an Easy Guitar

A simple guitar you can make with paper cups lets you easily live out the dream of strumming a ringing guitar.
First, glue the bottoms of two paper cups together.
Then stack another paper cup on each side with slits cut into them, and attach rubber bands into those slits—done.
The key here is the length of the rubber bands.
By choosing which slit to anchor them in and lining up rubber bands of different lengths, you can create differences in sound just like a real guitar.
Think about what kind of sound will make it feel cool, and fine-tune it into your ideal guitar.
For demon-slaying only! Bean-throwing rubber band gun
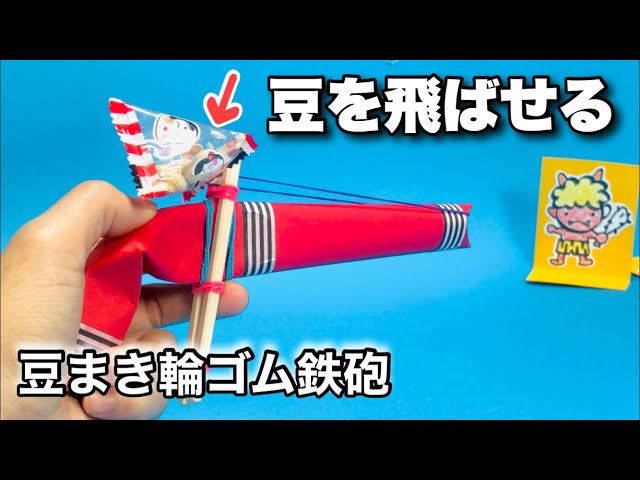
Oni-busting only! Here’s how to make a bean-throwing rubber band popper.
Prepare chopsticks, roasted soybeans (fukumame), construction paper, tape, scissors, and rubber bands.
Roll the construction paper into a tube, then secure the tube with rubber bands by clamping it between a pair of chopsticks folded in half.
The key is to wrap the rubber bands tightly so they don’t loosen.
Be careful not to cut your hand on the ends of the chopsticks.
When launching, dent the tip of the paper tube, hook on a rubber band, set it, and play.
When playing, don’t aim at people and make sure to play safely.
How to make a croaking frog

This is a cute craft where a frog hidden inside a paper cup peeks out while croaking.
You make a hole in the bottom of the cup and insert a bendy straw; by using this straw, you can move the frog up and down.
The key is the bendable part of the straw—when it rubs against the hole in the paper cup, it makes a sound like a frog’s croak.
You can add originality by choosing the frog’s expression and decorating the paper cup however you like.
A turtle that runs on rubber power!

Moving toys are appealing no matter how old you are, and they’re especially popular with lower-grade elementary school kids.
This is a paper cup turtle craft that zooms forward using rubber-band power hidden in its shell.
First, cut slits halfway down a paper cup and fold them in to make the legs.
The remaining part becomes the body.
For the face, stick round stickers on as eyes to make it cute.
Take a used AA battery, wrap a rubber band around it, attach kite string with cellophane tape, and set the mechanism inside the turtle’s shell.
Even though it’s a turtle, it moves surprisingly fast and with big motions—so much fun!