Easy-to-make crafts for adults. Projects recommended for beginners.

Some of you may be interested in crafts and handmade projects but find it hard to get started.
Crafting and DIY are popular not only for kids’ science projects but also as hobbies for adults.
In this article, we’ve gathered easy craft ideas suitable for adults.
The appeal of original items is that you can freely design the decorations, colors, and sizes.
From practical items you can use in everyday life to stylish home decor, give it a try and create your favorite pieces!
- [For Adults] Simple yet Impressive Crafts: A Stylish, Eye-Catching Collection
- [For Adults] Fun Craft Ideas Perfect for Killing Time
- Craft projects recommended for adult hobbies: a stylish and cute collection of works
- [100-Yen Store Crafts] Handmade ideas that captivate adults too. Stylish DIY/handmade.
- [Grown-up Cute] Easy Handmade Ideas for Miscellaneous Goods and Interior Accessories
- Ideas for paper cup crafts for adults: from interior decor to practical items.
- Crafts you can make with 100-yen shop items! A collection of fun project ideas that elementary school kids will love
- [For Adults] Recommended Craft Kits
- Construction paper craft ideas adults can enjoy—from small accessories to stylish home decor
- [Easy] Practical craft ideas. Great for beginners too!
- Adults will be hooked! A collection of craft ideas using toilet paper rolls
- [For Girls] Make It with Everyday Items! Easy but Super Cute Craft Ideas
- [Handmade] Delightful Handmade Fabric Accessories to Receive
Easy crafts for adults that are simple to make. Recommended projects for beginners (1–10)
Solitaire-style beaded ring

Like a big gemstone! Here are ideas for making beaded rings with Swarovski beads.
You’ll need one main Swarovski bead and about 70 tiny seed beads.
First, create a base around the Swarovski bead, then make the ring band.
The delicate look is very feminine and has a design even adults will want to wear.
There are some fine steps like crossing the fishing line through the beads, but the method is simple—try making it with your favorite Swarovski bead.
gel candle

Here’s a handmade gel candle idea that creates a soothing atmosphere.
You’ll need a candle container, gel wax, and a candle wick.
After thoroughly removing any dust from the container, warm the gel and pour it in.
Place the wick in the center.
Since it may topple over if left as is, secure it upright by clamping it with something like chopsticks laid across the top.
Once the gel sets, your candle is complete.
Tie some jute twine around the container or decorate it with your favorite embellishments—it could make a lovely gift for a friend!
Felt bookmark
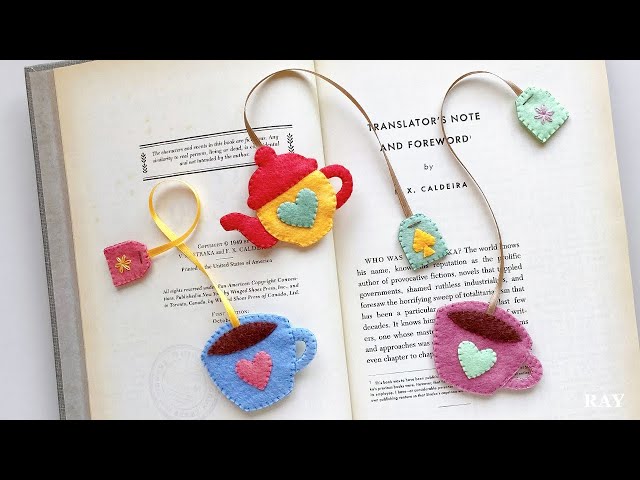
If you enjoy reading, why not try making a felt bookmark? All you need to do is cut the felt according to a template to make the parts and then attach them with glue, so it’s an idea even those who aren’t confident with sewing can try.
First, think about what motif you’d like to use.
Book, mug, or leaf shapes are all cute.
The ribbon serves as the bookmark, and you’ll attach motifs to both ends, so please prepare two felt motifs.
You can also buy felt at 100-yen shops.
Easy-to-make crafts for adults. Recommended projects for beginners (11–20)
paper lampshade

Here’s a handmade paper lampshade idea that also works as interior decor.
This version uses papier-mâché, so prepare a balloon for the base and some shoji paper.
First, inflate the balloon to a suitable size, tie the end, and secure it on a stand.
Brush diluted glue onto the balloon and apply pieces of shoji paper that you’ve torn into small bits.
Be sure to leave the top part of the balloon uncovered.
If you want some color, mix in flower paper or similar.
Once the glue dries, pop the balloon and remove it, trim the opening at the top, and place the shade over your lamp to finish.
The amount of shoji paper you layer will change how the light diffuses, so adjust to your liking.
Patchwork scrap accessory pouch

If you sew, you probably have lots of fabric scraps piling up at home.
In that case, why not make this little storage tray? It has folded gussets, so when you’re not using it as a small organizer, you can fold it flat for storage.
All you need are two fabric scraps measuring 16 cm by 20 cm.
If you want it to be a bit sturdier, apply fusible interfacing.
Sew the two scraps right sides together, fold the fabric to form the gussets, and sew both ends.
Turn it right side out through the opening, topstitch along the upper edge, and you’re done.
wall shelf

Let me share an idea for an easy-to-make wall shelf.
This idea doesn’t require drilling holes, so it’s suitable for rentals.
You’ll need two 45 cm × 9 cm wooden boards, one 45 cm × 12 cm wooden board, and 20 strong magnets, all available at 100-yen shops.
First, glue the two 45 cm × 9 cm boards together, then glue the 45 cm × 12 cm board on top of that.
Attach 10 magnets to the side that will adhere to the wall.
Next, apply masking tape to the section of the wall where you’ll mount the shelf.
Tape 10 magnets onto the masking tape using duct tape, and once you fix the wall shelf onto those magnets, you’re done.
Resin accessories

You might think making resin accessories is difficult, but the basics are simply pouring resin and components into a mold, curing, then repeating coating and curing.
While there are tasks like removing air bubbles, it’s surprisingly easy to make—so why not give it a try? Resin accessories are naturally clear, and using parts like shell pieces or sequins gives them an even lighter look.
With findings for earrings, necklaces, rings, and more, you can make virtually any accessory.
Some 100-yen shops also carry the materials and tools you need for resin crafting, so try looking for them if you like.