Easy-to-make crafts for adults. Projects recommended for beginners.

Some of you may be interested in crafts and handmade projects but find it hard to get started.
Crafting and DIY are popular not only for kids’ science projects but also as hobbies for adults.
In this article, we’ve gathered easy craft ideas suitable for adults.
The appeal of original items is that you can freely design the decorations, colors, and sizes.
From practical items you can use in everyday life to stylish home decor, give it a try and create your favorite pieces!
- [For Adults] Simple yet Impressive Crafts: A Stylish, Eye-Catching Collection
- [For Adults] Fun Craft Ideas Perfect for Killing Time
- Craft projects recommended for adult hobbies: a stylish and cute collection of works
- [100-Yen Store Crafts] Handmade ideas that captivate adults too. Stylish DIY/handmade.
- [Grown-up Cute] Easy Handmade Ideas for Miscellaneous Goods and Interior Accessories
- Ideas for paper cup crafts for adults: from interior decor to practical items.
- Crafts you can make with 100-yen shop items! A collection of fun project ideas that elementary school kids will love
- [For Adults] Recommended Craft Kits
- Construction paper craft ideas adults can enjoy—from small accessories to stylish home decor
- [Easy] Practical craft ideas. Great for beginners too!
- Adults will be hooked! A collection of craft ideas using toilet paper rolls
- [For Girls] Make It with Everyday Items! Easy but Super Cute Craft Ideas
- [Handmade] Delightful Handmade Fabric Accessories to Receive
Easy-to-make crafts for adults. Recommended projects for beginners (11–20)
Small item storage shelf
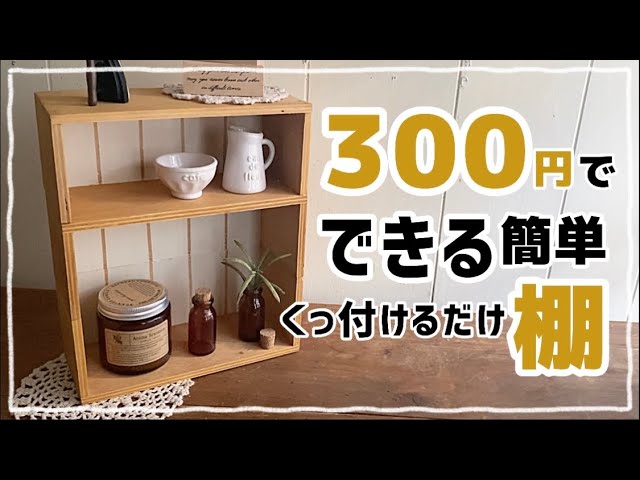
By using wall shelves sold at 100-yen shops, you can easily make a small storage rack! All you have to do is stack three wall shelves and glue them together, so you can even do it in a spare moment.
Of course, you can use it just with the glue, but if you want to put in a bit more effort, try staining or decorating it! If you apply masking tape before painting, the areas where you peel off the tape will become a pattern, and adding tiles to the sides of the shelves would look cute, too.
small pouch with handle

Let me introduce a small handled organizer made from straws.
Lately, you often hear the word “sustainable,” meaning environmentally friendly.
Bamboo straws, which are an eco-conscious alternative to plastic, are even sold at 100-yen shops.
Take 10 bamboo straws and secure them together with glue, then attach them to a small wooden plate with holes.
Glue bamboo straws to both sides as well, insert a bamboo straw into the plate’s hole, and it’s complete.
It’s perfect for holding remote controls or seasonings.
Since it’s made of bamboo and wood, you can create a piece that feels warm and handmade.
basket-style accessory case

Let’s start by making the basket’s body.
First, cut around the tissue pull-out opening with scissors.
Keep the piece you cut out—it will be used as the basket handle.
Draw a line down the center of the remaining box and mark points at equal intervals from there.
It’s easier to fold if you crease it in advance, so make the creases first and then shape it into a basket.
Secure the overlapping creases with double-sided tape to finish the basket.
Attach the handle you saved, then decorate it with your favorite origami paper.
You’ll have your very own basket-style organizer.
It’s easy to make, so it’s also recommended as a recreation activity in senior care facilities.
Flower Keychain
@salt_kosodate The trick to not failing is… heat control!! 1) The cleanest finish is with a hot water bath (but it takes time to melt!). 2) If you have an oven, check after about 2 minutes at 200°C and reheat if needed! ↑ I don’t have one, so I couldn’t test this 🙏 3) If you have a toaster oven, start checking after 1 minute on the lowest setting. Doing 2 sets of 1 minute at 170°C will almost completely melt it! If you heat it all at once, bubbles will form, so I recommend low and slow! It’s definitely better to make one test piece rather than jumping straight into the real thing 🙌🏻 Also, even if you pack it full, the glue volume will shrink a lot once it melts, so add clear glue partway through and aim to fill it so it’s just shy of overflowing the mold—then it turns out nicely 😊 Materials: • Glue sticks — having clear as well as colored is GOOD • Mold • Glitter • Screw eye pins (heaton) • Ball chain • Backing card When an adult’s help is needed: • Glue sticks are hard, so have an adult do the cutting • Right after heating it’s very hot, so adults should be careful too! • Attaching the screw eye pins is a bit tough, so it’s good for an adult to handle 😊 Other than that, let the child take the lead and just watch over the parts they can do—it’ll be fine! Hope you make a wonderful gift 🌟 Cost breakdown (about 300 yen): • Clear glue sticks: ~50 yen (half a pack) • Colored glue sticks: ~40 yen (less than half a pack) • Screw eye pins: ~10 yen • Chains: 200 yen (2 packs) ← This is the pricey part 😂#AtHomePlayEducationalwork#Graduation from kindergarten HandmadePresent
Haruka – YOASOBI
Let’s try making keychains using colorful glue sticks.
Glue sticks are used with a glue gun, a tool that bonds with heat, and they come in a variety of colors.
Cut the glue sticks into short pieces and place them into a mold.
If you add glitter to the mold as well, you’ll get a sparkly keychain.
After heating in a toaster oven or regular oven, remove them from the mold once they’ve hardened.
Trim any excess that sticks out with scissors, attach the keychain hardware, and you’re done.
Depending on the mold, you can make many at once, so they could make great gifts for friends.
[Leather Craft] Smartphone Shoulder Bag
![[Leather Craft] Smartphone Shoulder Bag](https://i.ytimg.com/vi/O1iHSrpdKb8/sddefault.jpg)
Let’s try making a smartphone shoulder bag using cowhide leather you can even find at 100-yen shops.
When you hear “leathercraft,” many of you might think it sounds difficult, right? But there are projects you can make without sewing, using pre-cut cowhide.
The smartphone shoulder bag—highlighted after making the top 10 in the Buzzword Awards—can be created easily, too.
Leathercraft can give your usual handmade projects a chic, stylish finish.
You can also get materials other than cowhide at 100-yen shops, so go ahead and make a smartphone shoulder bag in your own style.
Small storage box with a lid

It’s handy to have a small container for little items like snacks or stamps, isn’t it? The ones sold at variety stores are nice, but you can make one with things you have at home.
Prepare an empty tissue box.
Take the box apart and cut it so you get a rectangle.
Fold it to create eight equal sections, and you’ll end up with an octagonal piece.
Cut the lid into an octagon as well, add some padding, and cover it with fabric.
Using double-sided fabric tape makes it easy.
Attach fabric to the sides of the box body, and you’re done.
Try changing the fabric pattern to make the box cute or give it a chic look—have fun customizing it!
Easy-to-make crafts for adults. Recommended projects for beginners (21–30)
rope coaster

Easy to make! Here’s a DIY idea for a rope coaster.
First, draw a circle of your preferred size on a clear plastic file.
This circle will determine the size of your coaster.
After applying glue over the circle, start arranging the rope in a spiral from the center of the circle.
Once the entire circle is filled with rope, cut the rope and glue the ends together so it doesn’t unravel.
Press down on the rope from above to smooth the surface, then cut the clear file to match the size of the rope.
That’s it! Choose any rope color you like.