Craft projects recommended for adult hobbies: a stylish and cute collection of works

Some of you might be looking for a new hobby to take on during your days off from work.
Even when you decide to get started, it’s easy to draw a blank on ideas or feel unsure about what to try.
So in this article, we’ve handpicked a collection of stylish craft ideas for adults.
We’ll introduce accessories you can wear and decor for your home, so it’s also a great idea to make them in your favorite colors and materials.
If you’re interested in crafts or DIY, be sure to give these a try!
- [For Adults] Simple yet Impressive Crafts: A Stylish, Eye-Catching Collection
- [For Adults] Fun Craft Ideas Perfect for Killing Time
- [Grown-up Cute] Easy Handmade Ideas for Miscellaneous Goods and Interior Accessories
- [100-Yen Store Crafts] Handmade ideas that captivate adults too. Stylish DIY/handmade.
- Easy-to-make crafts for adults. Projects recommended for beginners.
- [Great for killing time!] Winter-Recommended Craft Ideas for Adults
- Ideas for paper cup crafts for adults: from interior decor to practical items.
- [Adult Craft] Ideas for Relaxing Home Decor and Accessories Made with Paper Clay
- Adult crafts recommended for spring
- [Craft] A Collection of Handmade Stained Glass Ideas [DIY]
- [Easy] Practical craft ideas. Great for beginners too!
- Handmade accessory ideas that will delight the recipient! Easy DIY with everyday materials
- [Easy and Simple] Popular DIY Ideas You Can Make with Materials from 100-Yen Shops
Recommended crafts for adult hobbies: a stylish and cute collection of works (21–30)
Sofa-shaped accessory case

Let’s use tissue boxes to make a lovely sofa-shaped organizer you can place in your room.
Prepare two tissue boxes.
Cut and fold one box to create the base of the sofa.
Use the other box to make the sofa’s backrest and armrests.
Attach your favorite fabric to the sides of the tissue boxes.
For the parts where you add stuffing, cover them by making the fabric like a pouch.
Since you’ll use double-sided fabric tape, there’s no sewing required.
Once it’s finished, try placing a plush toy on it or decorating it with accessories.
A round box with a lid

A small storage box can also serve as interior decor when placed in your room.
Let’s try making a round lidded trinket box using a tissue box.
Cut the tissue box into long rectangles or circles and assemble the pieces.
Once finished, the tissue box’s pattern will become a lovely design on the box.
For this project, tissue boxes with decorative designs are recommended.
It also looks great if you attach fabric to the sides of the box.
Thinking about what to put inside and where to place it will be an enjoyable part of the process, too.
Crafts recommended for adult hobbies. A stylish and cute collection of works (31–40)
lease
Paper plates and cups transform into wreaths that color the seasons.
Gentle crafting time to enjoy with a refined, grown-up sensibility.
With simple paper plates and cups, your wreath can become a perfect art piece for any season or interior—limited only by your ideas.
Cut, paste, and decorate: within these simple steps, a distinctly adult sense of style shines.
Combine natural elements like nuts and cake picks for a refined, organic finish.
Hang it by the entryway or on a windowsill, and the handmade warmth will gently enrich your everyday life.
The materials are simple, but the result is deep and nuanced.
Savor the joy of this “grown-up crafting” experience.
Handmade star wand
@n.annlee321 Replying to @miukanon0101 Star wand ☺️✨#tiktok classroom#StayHomeTimeLife with childrenTanabata#Summer Vacation
Shuwa-shuwa Honey Lemon 350ml – Sharou
Many girls probably love wands, don’t they? You often see them in anime with magical-girl themes.
This time, I’ll introduce an idea for making a simple wand.
Thread ten 2 cm pieces of straw and five beads alternately onto a 30 cm chenille stem (pipe cleaner), then shape it into a star.
Twist the two ends of the stem together to secure it, trim any excess, then take a 15 cm chenille stem folded in half, hook it onto the star, and twist it into a single rod.
Slide on a straw and glue it in place to finish.
It might also look cute decorated with washi tape, etc.
toolbox

You can make a cute little tool box from an empty tissue box.
How about making a small box to store items like pens and masking tape that tend to get scattered? First, cut a diagonal slit in the top of the empty tissue box and remove only the long side.
Apply double-sided tape to the remaining three sides and fold them inward.
Prepare another box—this will be the lid.
Cut it so that only the bottom and its rim remain.
Use the leftover box material to make a handle and attach it to the lid with a split pin.
Finally, add a tab to insert and it’s complete.
drawer storage
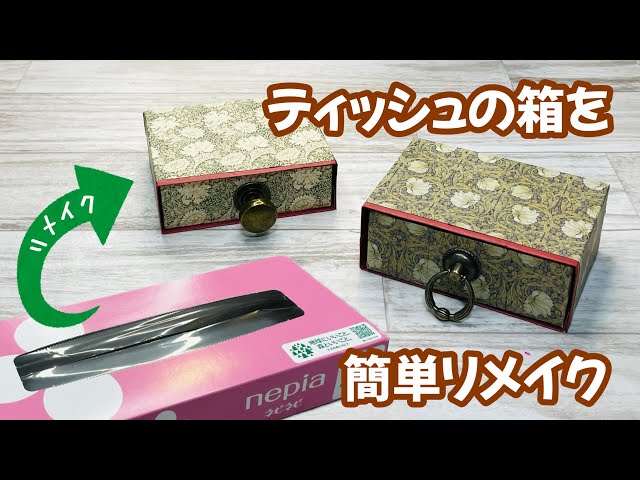
This drawer-style storage is so functional you’d never guess it’s made from a tissue box.
Take the box apart, then cut and shape the outer and inner pieces separately.
After reassembling, punch a hole in the front of the drawer section, thread a knob through, and secure it with a screw and washer for smooth opening and closing.
Add dividers inside to neatly organize stationery and small items.
Decorate with design paper to give it a polished look that doesn’t feel utilitarian.
It’s a storage-focused idea that broadens the ways you can repurpose empty boxes.
Star-shaped shelf
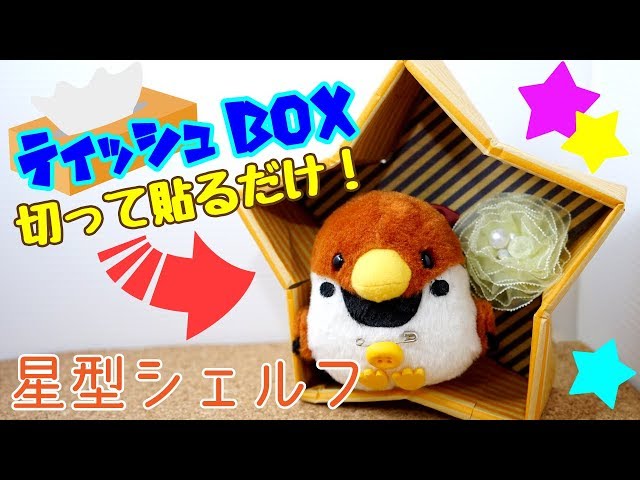
A star-shaped shelf made from a tissue box not only brightens up a space but is also perfect for displaying small items.
Cut both ends of the back of the box into triangles, remove the center section, and take off the film.
Next, make a star-shaped template using A4 paper and use it to cut cardboard.
Decorate with your favorite origami paper, then assemble the cut tissue box pieces into a star shape and attach the cut cardboard to secure it.
When hung on a wall, it becomes an eye-catching piece of decor, and you can enjoy seasonal variations.
It’s a creative idea that balances playfulness and practicality.