Craft ideas for summer that even adults will want to make! Let’s enjoy creating things.

A collection of craft ideas that adults can really get absorbed in! If you’re thinking, “I want to make something in those spare moments this summer,” use these ideas as inspiration and give them a try.
From quick projects using materials from 100-yen shops to pieces you can take your time to complete, we’ve carefully selected ideas that help adults enjoy truly fulfilling creative time.
The time you spend making things will surely bring healing and joy to your heart.
Even if you don’t usually do crafts, take this opportunity to give it a try.
- [For Adults] Fun Craft Ideas Perfect for Killing Time
- A collection of summer vacation craft ideas made with 100-yen shop materials
- [100-Yen Store Crafts] Handmade ideas that captivate adults too. Stylish DIY/handmade.
- Craft projects recommended for adult hobbies: a stylish and cute collection of works
- Easy-to-make crafts for adults. Projects recommended for beginners.
- [Great for killing time!] Winter-Recommended Craft Ideas for Adults
- [For Adults] Simple yet Impressive Crafts: A Stylish, Eye-Catching Collection
- Handmade ideas for summer decorations. Perfect for interior decor and craft activities!
- Make it with everyday materials! A collection of fun summer vacation craft ideas
- [For Adults] Recommended Craft Kits
- Christmas crafts for adults: stylish project ideas you'll want to display
- Crafts you can make with 100-yen shop items! A collection of fun project ideas that elementary school kids will love
- [Summer Vacation Crafts] Not just make-and-done! A collection of practical ideas you can use every day
Projects adults will want to make! A collection of summer craft ideas: Let’s enjoy making things (21–30)
SDGs car

Why not try making an SDGs car that runs a motor with a solar cell instead of using dry-cell batteries? Simply put, you connect a solar panel to a solar motor, then link the motor to the car’s wheels with a rubber band to transmit power.
When the sun isn’t out, you can make the car move by hand-cranking it, like the battery on a bicycle.
By experimenting with combinations such as the compatibility between the motor and the solar panel, you might be able to build a car that runs even better.
Creating projects like this also helps you think about how power is generated, which is important.
Melon Soda Clip
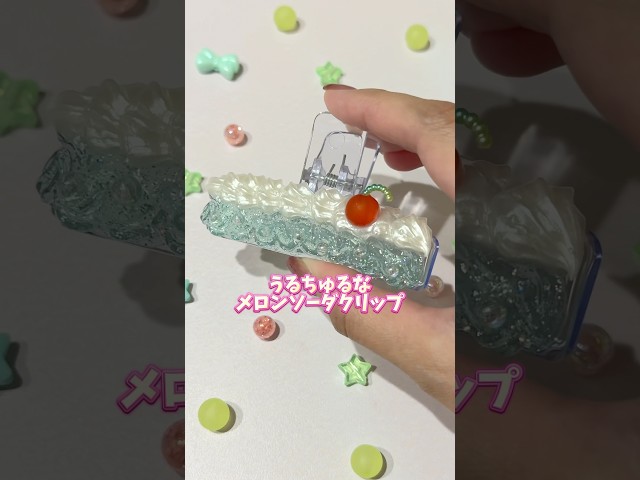
Let me introduce a refreshing and mature-cute melon soda clip.
Prepare a clip, whipped-cream glue, red beads, and deco parts, and let’s get crafting.
Pipe the whipped-cream glue onto the clip.
The key is to pipe it in wavy swirls.
Attach a deco part to a red bead to make a cherry accent, then stick it on.
Put a cap on top and let it dry, and you’re done.
Give this original clip a try!
Remaking a 100-yen shop clock
@nantomokuzai Remake a 100-yen shop clock! Clip clock 👍✨Summer Vacation Craft#Summer Vacation Workshop#100-yen shop DIY#100-yen shop arrangement
♪ Original song – Nanmo-kun – Nanmo-kun
The part you can see from the back of a table clock or wall clock—the section with the battery compartment and the knob for setting the time—is called the movement.
You could say it’s the heart of the clock.
In fact, clock movements are sold on their own at 100-yen shops and home improvement stores, and you can use them to make your own original clock! If you’re good at woodworking, try starting from scratch by buying a wooden board and cutting a groove to fit the movement.
If that’s not your strong suit, there are also assembly kits with pre-cut grooves available, so you can use those instead.
Cake-shaped accessory case
@hoikushisatomi [Even kids can make it] Cake-like trinket box 🍰Seasonal craftsChildcare ideasLife with childrenNursery teacher / Childcare worker#Creative PlayKids will love itChildren's Day#crafts#craftkids
♫ Winter Maple Leaves – Sasa.
Here’s an idea for a cake-themed trinket holder made with paper cups.
First, take one paper cup and cut straight from the rim down to the base, then cut out the base as well.
Use this as the template base, and decorate it by attaching felt or construction paper to make it look like a cake.
Once you’ve finished decorating the base, attach it to another paper cup, and you’re done.
It’s easy and cute, and you can customize the decoration however you like—highly recommended! With a bit more effort, you can even add a lid to the trinket holder, so give that a try if you have the time.
Refreshing! Square Bag
@n.annlee321 A cool-looking square bag design 💕 Perfect for a summer vacation craft project, too 🥰🫶✨#100-yen-shop#100-yen shop DIY#Summer VacationSummer Vacation CraftDaiso
♬ Good luck to me tomorrow – NANAOAKARI
Here’s an idea for making a bag using bag hardware from a 100-yen shop, plant pot mesh, and yarn in your favorite color and material.
First, cut the plant pot mesh to match the size of the bag hardware, then crochet or stitch the yarn onto the mesh.
Once you’ve finished attaching the yarn, sew the mesh and the bag hardware together.
Finally, add the handles and your favorite decorations to complete the bag.
With this method as a reference, it seems like you could create all kinds of items depending on your ideas!
desk lamp
@gakky_07 How about this for your summer vacation project?Summer Vacation Craft#Summer VacationDesk lamp
♬ Fun Isono Family / Sazae-san [Cover] – Sound Works
Here’s an idea for making a desk lamp that uses a magnet-mountable LED light.
The stand is entirely wooden, and the arm is movable so you can adjust the angle.
First, think about what size you want and what kind of structure you’re aiming for, and try drawing a design plan.
Once the plan is ready, figure out the lengths and quantities of wood you’ll need and source the materials.
These days, you can even find small pieces of wood at 100-yen shops, so those might work as well.
One of the joys of woodworking is choosing the finish—whether to go for a natural look with varnish or oil, or paint it your favorite color—so definitely consider a variety of options.
Key rack made from 100-yen shop materials

This is a key rack packed with ideas, made using photo frames.
Prepare three identical photo frames: two will form the body and one will be the lid.
Start by making the body.
First, cut a cork sheet to fit the inside dimensions of a photo frame, apply a decorative remake sheet, and attach it to the first frame.
Next, glue the second frame on top of the first.
That completes the body.
Then, use hinges to connect the third frame to the body as a lid.
Finish by attaching an arch latch.
By inserting aluminum pins into the cork sheet, you can hang your keys on them.
It’s a creative project that turns photo frames into a key rack.
Try painting it or adding your own touches to make it uniquely yours.