Craft ideas for summer that even adults will want to make! Let’s enjoy creating things.

A collection of craft ideas that adults can really get absorbed in! If you’re thinking, “I want to make something in those spare moments this summer,” use these ideas as inspiration and give them a try.
From quick projects using materials from 100-yen shops to pieces you can take your time to complete, we’ve carefully selected ideas that help adults enjoy truly fulfilling creative time.
The time you spend making things will surely bring healing and joy to your heart.
Even if you don’t usually do crafts, take this opportunity to give it a try.
- [For Adults] Fun Craft Ideas Perfect for Killing Time
- A collection of summer vacation craft ideas made with 100-yen shop materials
- [100-Yen Store Crafts] Handmade ideas that captivate adults too. Stylish DIY/handmade.
- Craft projects recommended for adult hobbies: a stylish and cute collection of works
- Easy-to-make crafts for adults. Projects recommended for beginners.
- [Great for killing time!] Winter-Recommended Craft Ideas for Adults
- [For Adults] Simple yet Impressive Crafts: A Stylish, Eye-Catching Collection
- Handmade ideas for summer decorations. Perfect for interior decor and craft activities!
- Make it with everyday materials! A collection of fun summer vacation craft ideas
- [For Adults] Recommended Craft Kits
- Christmas crafts for adults: stylish project ideas you'll want to display
- Crafts you can make with 100-yen shop items! A collection of fun project ideas that elementary school kids will love
- [Summer Vacation Crafts] Not just make-and-done! A collection of practical ideas you can use every day
Projects adults will want to make! A collection of summer craft ideas. Let’s enjoy making things (31–40)
Sea memo stand

Some families may go swimming at the beach during summer vacation, right? When we think of the hot summer, many children surely picture the sea.
So why not make a memo stand using resin with an ocean theme? Prepare parts to embed in the resin, such as seashells, sea creatures, and clear or blue stones.
Of course, it’s also nice to include shells you picked up at the beach.
Place your favorite parts and the memo stand into a container, then pour in the resin.
After that, leave it undisturbed for the specified time.
At this stage, the key is to prevent dust and debris from getting in—for example, by placing the piece in a box.
If you include seashells you collected at the beach, you can create a lovely piece that captures your summer memories.
stone art

Let’s make stone art using materials close at hand, like those from rivers and parks.
Start by collecting stones and twigs.
Choosing stones without sharp edges will help you create cute pieces.
Also, selecting twigs with branches is a key tip for making a lovely work.
Arrange the stones and twigs you found on a frame or cork board, which you can also buy at a 100-yen shop.
As children think, design, and create on their own, it boosts their imagination.
You can paint the pieces, and it’s also nice to add pinecones, leaves, and other items besides stones and twigs.
Let’s make a bamboo lantern

Here’s how to make a bamboo lantern that looks beautiful when it glows at night.
Use a saw to cut the bamboo.
Make slits in the cut bamboo, then gently tap from above with a hammer to create openings where the light will shine through.
The key is to tap with the hammer without using too much force.
Drill holes to create several small windows for the light to leak out.
Wrap yarn around the top and bottom of the bamboo tube, using double-sided tape to secure it.
Place an LED light inside, switch it on, and let it shine.
It emits a soft glow that gives off a traditional Japanese ambiance.
Cute herbarium

Why not try making a herbarium, a popular interior decoration? Prepare a container, your favorite flowers and beads, and baby oil.
First, place the flowers and beads into the container, being careful not to overfill it.
Also, if anything tends to float when put in liquid, soak it in the liquid beforehand.
Once you’ve added all the parts, slowly pour in the baby oil, close the container lid, and it’s done.
You can also focus on choosing a stylish container and decorate it with stickers or washi tape to make it extra cute.
Torokira Keychain
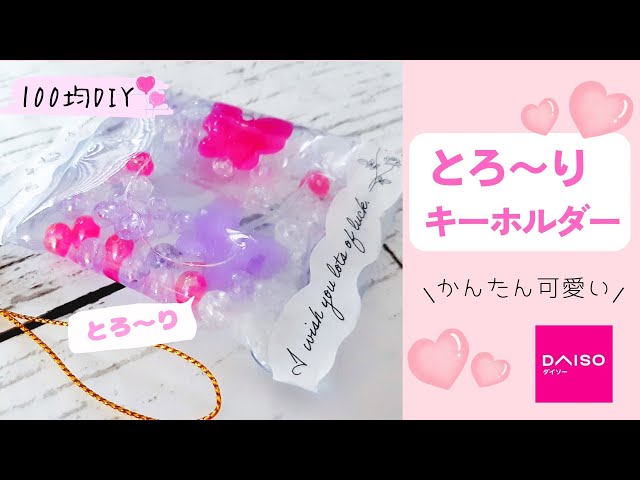
Do you know those cute accessories with a little doll floating in a tiny plastic bag? You often see them as prizes at festival raffles, but actually, you can make them yourself.
You only need items mostly from a 100-yen shop—like a soft card holder, beads and glitter, liquid laundry starch, and masking tape—so it’s a budget-friendly craft project.
Add cutouts of your favorite character or idol to the decorations, and it instantly becomes merch for your fave! You’ll want to make them for everyone!
Projects adults will want to make! A collection of summer craft ideas. Enjoy making things (41–50)
Sparkling Kaleidoscope

If you’re unsure what to make for your summer vacation craft project, why not try a sparkling kaleidoscope? You can make this kaleidoscope with recycled materials and items from the 100-yen shop.
Cut a hard plastic case and form it into a triangular prism, then place beads in the bottom and secure them.
On the opposite end, attach a piece of black construction paper with a peephole.
Glue a milk carton—lined on the inside with black construction paper—around the triangular prism, and decorate it as you like to finish.
While kaleidoscopes typically use mirrors, in this idea the hard plastic case serves that role.
Transparent cute coaster

Summer is supposed to be hot, but don’t you feel like the summers lately are getting hotter every year? When it’s hot, we crave cold drinks—so why not make coasters to brighten up your drink time and turn it into a summer science project? You’ll be using two-part resin and other chemicals, so be sure to have an adult or an older sibling help you when handling them.
Aside from working with the chemicals, it’s basically just decorating coasters, so even small children can join in! We’re looking forward to seeing your cool, refreshing coasters!