[For Seniors] Recommended for day-service centers. A collection of craft ideas for April


April brings warmer weather and a lighter mood.
How about incorporating seasonal flowers like cherry blossoms and hyacinths, as well as spring-themed motifs, into your craft recreation activities? Participants can take their finished pieces home, so they can enjoy the feeling of spring there as well.
Craft activities that use the fingertips allow for focused engagement, which many older adults particularly enjoy.
We’ve gathered a wide range of projects—from simple to more elaborate—so please choose the ones that best suit each individual and give them a try.
Let’s all enjoy them together while communicating and connecting!
- [For seniors] Enjoy spring: April craft ideas
- [Day Service] Spring Take-Home Crafts: Ideas to Warmly Brighten Your Room
- [For Seniors] Enjoy the Arrival of Spring Indoors! Recommended April Origami
- [For Seniors] Enjoy Cherry Blossoms Indoors: Wall Decoration Ideas
- [For Seniors] Making a March Calendar: Introducing Spring-Themed Motifs and Arrangements
- [For Seniors] Feel the Arrival of Spring: A Collection of Cherry Blossom Craft Ideas
- For Seniors: Come, Spring! Recommended March Craft Ideas for Daycare Services
- [For Seniors] Make an April Calendar: Fun Ideas to Brighten Your Mood
- [For Seniors] Enjoy at Day Service: A Roundup of May Craft Ideas
- For Seniors: Feel the Arrival of Warm Spring. Cherry Blossom Wall Decoration Ideas
- [For Seniors] March Origami: Ideas to Brighten Your Room with Seasonal Flowers and Events
- [For Seniors] Embraced by Spring: Wall Decoration Ideas to Enjoy in April
- [For Seniors] Introducing Fun Crafts Made with Plastic Bottle Caps
[For Seniors] Recommended for Day Service. April Craft Ideas (21–30)
Hanami Three-Color Dango Calendar
Spring is the season for cherry-blossom viewing—and no hanami is complete without hanami dango.
In this piece, rolled-up tissue paper is wrapped with pink, white, and green crepe paper to represent the dumplings.
Colorful cherry blossoms are scattered around, creating a very festive finish.
You can simply arrange the dumplings on a backing sheet, or make skewers out of construction paper to turn them into skewered dango.
Pink is the basic recommended color for the blossoms, but if you prepare various colors and let the maker choose, it will add individuality to the work.
Simple bouquet
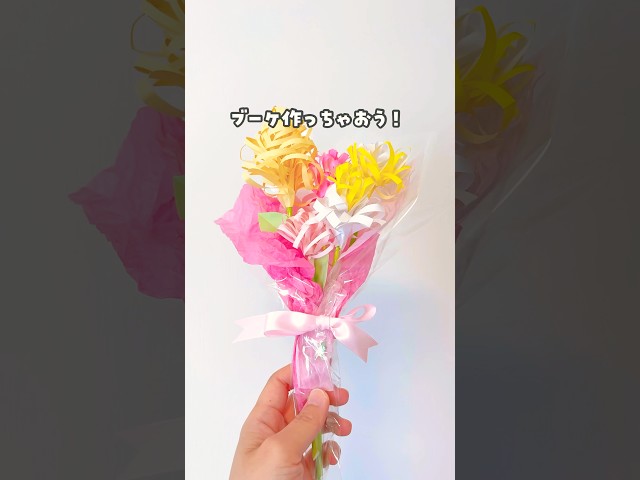
This origami piece stands out for its three-dimensional look, achieved by adding creative touches to the petal expression.
By leaving a border and making vertical slits in the paper, then curling them to create petals that clearly convey the feel of the seasonal event, a softly spreading flower shape emerges.
The work isn’t overly intricate, but the degree of opening changes depending on how you curl the strips, so it’s important to proceed with the final result in mind.
Bundling several together adds volume and creates a bouquet-like form.
Varying the color combinations changes the impression, allowing you to enjoy arrangements tailored to where you’ll display them.
Gerbera

The gerbera, with its striking shape that looks like tiny petals spreading out, gives a sense of softness and cuteness thanks to its unique appearance.
This craft recreates gerbera flowers using felt and arranges them to look like a bouquet.
You cut slits into circular felt pieces, shape them into petals, and layer them to form the gerbera.
If you assemble and attach them around a central piece, it creates a more three-dimensional look, which is highly recommended.
Finally, attach the felt gerberas to a sponge base and fill any gaps with leaves or other parts to complete the piece.
pressed-flower bookmark

Some older adults may enjoy reading books.
Pressed-flower bookmarks make perfect gifts for such people.
All you need are two pieces of cardboard, two paper towels, some rubber bands, and freshly picked flowers.
Place the petals between the paper towels and cardboard, then heat them in a 600-watt microwave for about 30 seconds.
Finally, glue the pressed flowers onto a rectangular piece of paper cut to your preferred size, and you’re done.
You can use it as a bookmark or simply display it and admire it!
a bouquet of tulips
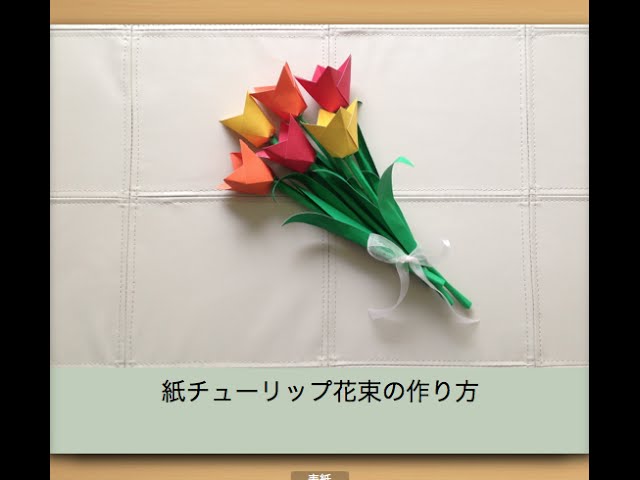
Tulip decorations with a gentle look are sure to create a warm, friendly atmosphere in the facility! All you need is origami paper in red, yellow, orange, and green.
The key is to start by making several inward creases, then fold along them to create a three-dimensional shape.
This step is crucial for forming the tulip, so if some participants have difficulty moving their hands, staff members might want to assist them.
Finally, cut the green origami into thin strips to make the stems, and you’re done!
Peach Blossom Wreath

A peach blossom wreath is an origami piece where arranging the flowers into a ring makes the overall cohesion clearly visible.
The work centers on two parts: making the flowers and assembling them by placing them onto the base.
The wreath’s impression changes greatly depending on where you start and how you gauge the spacing.
A notable feature is that you can create variation not only by arranging them evenly but also by intentionally varying the density.
While a single finished piece has a strong presence on its own, combining different sizes expands your options for spatial presentation.
It’s an origami idea that lets you enjoy the process of shaping while considering the placement.
Three-dimensional tulips

Tulips bloom with beautiful flowers as spring approaches.
Their colorful blossoms convey the excitement of warmer days.
This craft is like a three-dimensional picture inspired by a scene of blooming tulips, made by combining pieces of construction paper.
The key step is to cut petal shapes, curve them to add roundness, and assemble them—this layering of petals gives the tulips their 3D appearance.
After that, just attach the tulips to a backing sheet, and it’s complete.
Express your originality by deciding which colors of tulips to use and where to place them.