[Childcare] Simple fall origami ideas

Speaking of autumn, there are lots of events kids look forward to, like field trips, Halloween, and moon-viewing.
It’s also a comfortable season to spend time outside, so going for a walk to collect acorns and red and yellow leaves is lots of fun.
In this article, I’ll introduce origami ideas that are perfect for autumn.
I’ve gathered projects with simple steps that children can fold, so please give them a try.
You can string several finished pieces together to make a hanging decoration, or use the folded creations to make an autumn-themed wall display.
- [Preschool] Recommended for 3-year-olds! Easy-to-make fall origami craft ideas
- [Autumn] Easy Origami Ideas for November
- Simple Origami Ideas to Enjoy in Autumn (For 4-Year-Olds)
- A collection of fall origami ideas recommended for 2-year-olds! Make them easily and enjoy autumn!
- Preschool: Autumn-Themed Craft Ideas Recommended for November
- [November] Enjoy with 3-year-olds! Craft activity ideas recommended for autumn
- [Easy] Origami of fruits that are in season in autumn. Designs and decorations also introduced!
- Easy origami acorn folding method
- Parents and kids will be hooked! Easy pumpkin origami ideas—perfect for Halloween crafts.
- For 5-Year-Olds: Enjoy Autumn! Easy Origami Ideas
- [Childcare] Things to make in October! Easy origami ideas
- Super easy! Origami play ideas for autumn that even 1-year-olds can do
- Perfect for children in the middle year of kindergarten in September! A collection of origami ideas recommended for autumn
[Childcare] Simple Autumn Origami Ideas (71–80)
Grapes wreath
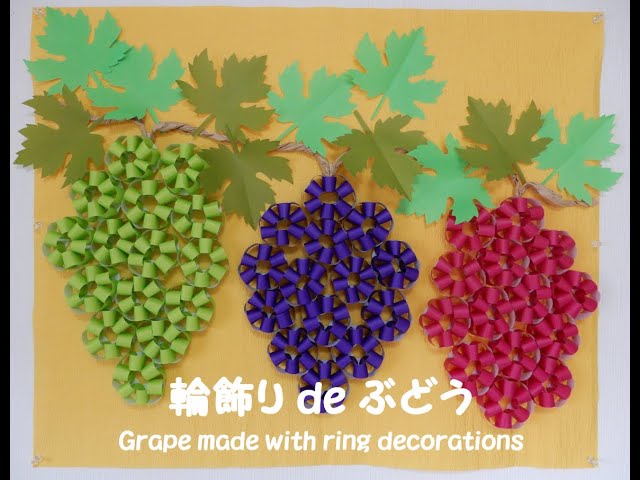
Using origami to make delicious-looking grapes is also perfect as a craft that stimulates fine motor development.
Prepare origami paper, glue, and scissors, and let’s get started.
Cut the origami into strips with scissors and glue the ends to make loops.
Make a total of 12 loops.
Glue the loops together to form a bunch of grapes.
If you use light green origami, you can make Shine Muscat grapes.
You can also make leaves and the stem, which might be fun for wall displays and other decorations.
How to fold tsukimi dango (paper craft)

Moon-viewing dango are essential sweets for the autumn full-moon night.
Prepare one sheet of origami paper, fold it into a triangle, then fold both sides up toward the center line.
Align the tip with the bottom corner, fold, and gently puff it out to form the dango.
A small slit with scissors is also a key step.
Fold the corners to shape the dango into a round form.
Finally, make the stand for the dango, attach the dango on top, and you’re done.
Try making these with children as the full-moon night approaches!
Origami dragonfly using scissors
Let’s make a dragonfly—often seen in autumn—using origami.
Prepare origami paper, round stickers, and scissors.
First, fold the origami paper into a triangle twice.
Fold it down along the center line, then unfold to create crease lines.
Make the dragonfly’s body and use scissors to make small cuts—be careful not to cut too much.
Fold to form the wings and the body separately.
Finally, add the eyes with round stickers, and it’s complete! Give it a try.
[Childcare] Simple Autumn Origami Ideas (81–90)
Maron-chan with arms and legs

Let’s make Chestnut Maron-chan! Here are some ideas for a Maron-chan with arms and legs.
Autumn brings all kinds of nuts and seeds—acorns, horse chestnuts, pine cones, walnuts, and more.
Activities that help children learn about these natural treasures sound fun too, don’t they? This time, among the many kinds of nuts and seeds, why not make Chestnut Maron-chan out of origami? You’ll need one sheet of origami paper, one quarter-size sheet of origami paper, and a pen.
With arms and legs, Chestnut Maron-chan looks so cute!
A maple leaf made from a single sheet of origami paper

Papercutting fun! We’re introducing an idea for making a maple leaf out of a single sheet of origami paper.
When you go for autumn walks or outings, you may have chances to see maples turning color.
Let’s make a maple leaf from origami so you can enjoy the arrival of autumn indoors too.
You’ll need one sheet of origami paper, a template, and scissors.
The video shows two patterns, so choose the one that suits your activity.
Also, cutting through layered origami with scissors requires strength, so take it easy and don’t push yourself.
Full moon rabbit made from a single sheet of origami

Perfect for moon-viewing events! Here’s an idea for a full-moon rabbit made from a single sheet of origami paper.
Autumn is the season for tsukimi (moon viewing), right? Some of you might prepare pampas grass and moon-viewing dumplings at school or at home and enjoy the beautiful moon.
This time, let’s make a full-moon rabbit that’s just right for such an event.
What you’ll need: yellow origami paper, scissors, glue, and a pen.
Some steps are a bit tricky, so it’s best to work together with a parent or teacher for safety and ease.
Be sure to give it a try on this occasion!
Autumn origami acorn

A big hit with kids! Here are some fall origami acorn ideas.
When you head out for a walk in the park, feeling the cool autumn breeze, you’ll often find acorns scattered on the ground.
Don’t children go hunting for them as if they’ve discovered treasure? This time, let’s make those beloved acorns with origami! All you need is one sheet of origami paper and a pen.
You can choose from long, slender acorns or round ones—the choosing itself is exciting.
Be sure to give it a try!