![[For Kids] Today’s Handmade Craft Ideas](https://i.ytimg.com/vi_webp/zcPEWkTJECg/maxresdefault.webp)

Empty boxes and cardboard tubes from snacks or toilet paper—don’t just throw them away! Why not try making something out of them? Don’t you ever feel a burst of creativity at times like that? If you want to make something but aren’t sure what to create, please check out this article! It features daily updates with handmade craft ideas for kids.
You’re sure to find a project you’ll want to try, so bookmark or favorite it and check back every day!
- [For Kids] Let's Fold! Today's Origami Idea Collection
- [For Elementary School Kids] Craft Ideas Using Tissue Boxes
- Crafts parents and kids can enjoy together. Recommended craft ideas to keep children entertained.
- [For Kids] DIY Snowman Craft Ideas!
- Handmade toys with cardboard! DIY game ideas that will captivate kids
- [Indoor Activities] A Collection of Craft Ideas Recommended for Elementary School Students
- [For Kids] Today's Recommended Recreation Idea Collection
- Let's make it with origami! Ideas for simple 3D creations
- Made of paper! A fun collection of DIY toy ideas you can play with
- [Let’s Make and Play!] Handmade Toy Ideas You Can Create Yourself
- Crafts you can make with 100-yen shop items! A collection of fun project ideas that elementary school kids will love
- Toys you can make from cardboard crafts! Authentic ideas you can build and play with
- Handmade piggy banks with fun mechanisms! A collection of summer vacation craft ideas that will amaze even adults
[For Kids] Today’s Handmade Craft Ideas (1–10)
string
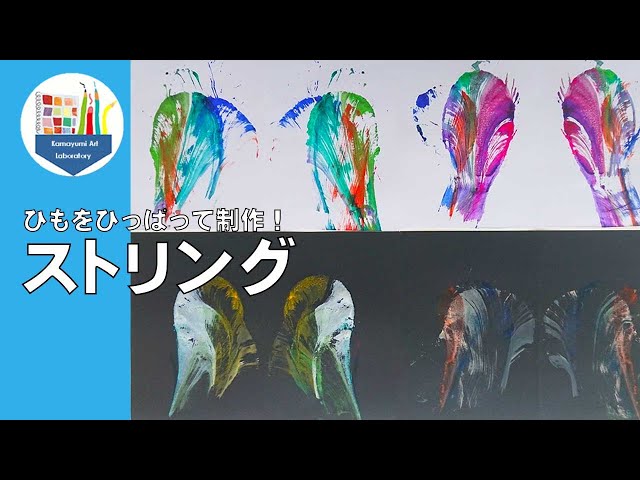
A piece made with the string-pulling technique—fun to make as well—would make a great graduation project keepsake.
Apply several colors of your favorite paint directly onto a hemp cord.
Use a water-dampened brush to spread the paint.
Place the cord between a sheet of drawing paper that has been folded to make a crease, and hold it firmly with one hand.
With your other hand, pull the cord out from between the paper to create a pattern.
The design changes depending on the colors you use and how you pull the cord.
The fact that no two pieces are the same is one of this project’s charms.
Once it’s finished, you can paste in memorable photos or write a message.
Besides a graduation project, it also works great as a card.
Fun for kids too! Fluid Art

Let’s try making an interesting piece using acrylic paints.
Put several colors of paint and liquid laundry starch (or glue) into separate paper cups and mix each well.
Then pour all the paints and starch together into one paper cup, and pour that onto drawing paper (Kent paper).
You can create a work with flowing patterns where the paints don’t fully blend.
Watching the paint flow is fascinating, making this perfect for young children’s art projects.
Because the flowing patterns are unique, you can create a one-of-a-kind, original piece.
Combining fluid art with other techniques also seems like a great way to broaden the scope of your work.
Heart-shaped paper bouquet

Let’s make a paper bouquet that anyone would be happy to receive.
This bouquet is heart-shaped, so it’s especially recommended as a gift for someone who loves cute things.
First, cut out a heart-shaped base and a handle from cardboard.
Next, stack about three sheets of tissue paper, accordion-fold them, round off both ends, and secure the center with wire.
From there, open the layers of paper one by one, alternating sides, to create the flower.
Arrange the flowers to cover the base and secure them with wire, then add color using eyeshadow or blush.
Finally, attach the handle and wrap it up, and you’re done!
Cherry-blossom-themed display

Perfect for graduation season! How about gifting a cherry blossom–themed display that’s fun to decorate and enjoy? Just put pink sequins and liquid laundry starch (or liquid glue) into a sealable clear bag, then sandwich it in a display stand to finish.
Tape any excess bag to the edge of the stand to secure it.
It looks beautiful as decor, and the squishy texture is fun to touch, making it a simple soothing item too.
Try decorating the stand itself for an even more festive look.
Stamping
A simple, easy-to-understand, and easy-to-try technique! Stamping refers to a method where you apply ink such as paint to a stamp (a mold) and press it onto paper, fabric, and so on to transfer the pattern.
You can also use familiar materials for the molds, so it seems you can create interesting works by using recycled items like plastic bottle caps or cardboard, cross-sections of vegetables, or uniquely shaped objects.
Also, the amount of water appears to be a key point, so it’s best to adjust it as you work.
Mini Bottle Keychain
@orukirulabcraft Sea? 🪼 Space? 🪐 Either way, here’s how to make a beautiful mini bottle keychain 💓Orkilla Lab#orukirulab#cuteSummerseaSpacebeautifulmysticalTranslationMini bottlekeychainSchoolHandmade
♫ Original song – 🎀 – っ ̫ ᴗ^👍🏻💘⭐️
Keychains are popular gifts because you can use them every day and swap them out to match your mood! So why not try making a keychain with a mini bottle? Just stuff the bottle with cotton, add sequins or holograms, then pour in liquid glue—anyone can enjoy making it.
If you color the glue, it becomes a lovely gift that looks like it captures a fantastical world! Customize it to your liking as you create.
For the keychain hardware, attach it by fixing a key ring to the lid.
Shaky Memory Photo Frame
@non_mama6 Perfect for graduation season too ✨ [Materials] • Acrylic frame stand, heart… Seria JAN code: 4978929915971 • Photo frame … Seria • Hard-type card case A5 … Seria • OHP film … Seria • Scissors • Tape glue • Clear tape The sheer look and the way it shakes around is just too cute 🥹💕 By intentionally not layering the acrylic frames and using the two pieces separately, you can make it more cost-effective 😆❣️ I’m pretty tight with my budget, so keeping costs down in areas like this is important 👍 Try making it with your favorite memories and photos ✨ 100-yen store remake, 100-yen store DIY, 100-yen store arrangement, acrylic block#OshiActivityGoods
♬ Original song – Non Mama 𓍯 Memory DIY ❤︎ – Non Mama 𓍯 Memory DIY ❤︎
Let’s make a DIY “shaka-shaka” memory photo frame using a heart-shaped acrylic frame stand! First, print your selected memorable photos onto OHP film.
Then, cut them to match the heart shape of the frame stand and attach them to the back.
Place it into the photo frame and tape a hard-type card case over the top—that’s it! Because OHP film allows you to print photos semi-transparently, the finished piece has a striking clarity that makes you want to hold it up to the light.