[For Kids] Let's Fold! Today's Origami Idea Collection

Origami is a fun activity you can easily buy at 100-yen shops.
When you buy a pack, it usually contains many sheets, but after you make what you want to fold, you often end up with quite a few sheets left over.
So in this article, we’re introducing today’s origami picks for kids.
Use this article as a guide and try challenging yourself with new folding methods!
Folding ideas are updated daily, so be sure to check back every day.
You’re sure to discover new folding techniques you’ve never seen before!
- [For Kids] Today’s Handmade Craft Ideas
- Cute origami ideas
- [Origami] She’ll love it if you fold these! Simple ideas for girls
- Kids will love it! Easy origami ideas—great as gifts too!
- [For Kids] Easy Origami Ideas to Enjoy in May
- Cute Origami Ideas for Girls
- [Origami] Have fun with kids! A collection of easy snowman origami ideas
- Let's make it with origami! Ideas for simple 3D creations
- [For Kids] Recommended in March! Easy Origami Ideas for Hinamatsuri (Girls’ Day) and Graduation Ceremonies
- Children’s Origami: Easy Single-Sheet Flower Ideas
- Easy flower craft ideas you can make with a single sheet of origami paper
- [April] Spring Origami for Kids: A Collection of Simple and Cute Ideas
- Origami ideas boys will want to make!
[For Kids] Let's Fold! Today's Origami Idea Collection (1–10)
Easy! How to fold Kaba-kun (the hippo)

Introducing an origami idea for Mr.
Hippo that brilliantly recreates his distinctive outline! Before you start folding in earnest, first fold the paper into a triangle twice to make creases.
Once the creases are set, fold the left and right corners to the center point, flip the paper over, and fold it in half by matching the top and bottom.
Next, fold both left and right edges together toward the center line, then open the bottom into a triangle and flatten it.
After that, fold down the back layer along the base of the triangle.
Use the folded-down section to form the nose and mouth, and use the upper part you flattened into a triangle to create the top of the face and the ears.
The steps are simple, but there are more folds than you might expect, so proceed carefully and finish it with care.
How to fold Shokupanman

Dokin-chan’s crush! This is an origami model of Shokupanman.
Fold the origami paper in half into a square twice to make creases, then open it.
Fold the top and bottom edges to the center crease to make additional creases.
Fold the upper left and right corners toward the center to create diagonal creases, then refold the corners along those diagonal lines.
Next, fold the bottom edge up to the lowest crease.
Then fold the left and right edges to the central vertical crease.
Open up the slanted sections and squash-fold them to form Shokupanman’s shape.
Finally, fold the left and right corners into small triangles to finish.
How to fold Dadandan No. 2

Dadan-dan has No.
1 and No.
2, and this is No.
2, the one with four antennas on its head.
First, fold the left and right edges of the origami together in half, make a crease, and open it.
Next, while aligning the lower-left corner with this crease, fold so that the right corner becomes sharp.
Then fold the lower-right corner up to meet the folded left corner, and also fold the right edge to align with the first crease you made.
In the end, fold all the corners and edges inward to form a hexagon, and create the antennas by making cuts with scissors.
The antenna folding itself is simple, but the positions of the cuts are fixed, so be careful not to make a mistake as you proceed.
[For Kids] Let's Fold! Today's Origami Idea Collection (11–20)
How to fold Anpanman candy

Why not try making Anpanman candies that are perfect for pretend play? By changing the origami colors and the character faces you draw, you can enjoy candies of various characters! Prepare 7.5 cm origami paper and fold about 5 mm along three sides except the top edge.
Apply glue to the folded part of the bottom edge, overlap it with the top edge, and stick them together to form a pouch.
Fold the left and right edges inward by about 5 mm, insert your fingers to puff up the pouch, then gently flatten the top and bottom to shape it like a candy.
Finally, draw your favorite character’s face, and cut the left and right edges with scissors into a zigzag pattern to finish!
How to fold Dokin-chan

Let’s make a cute Dokin-chan with orange origami! Fold the paper into a triangle to make a crease, then rotate it so the crease is vertical.
Fold the top two edges to the crease to make additional creases, open it up, and fold the lower parts of the left and right corners to the creases you just made.
Fold along the diagonal creases and return it to shape, then flip the paper over and fold the bottom corner up.
Fold it up just enough so a little bit of orange shows on the left and right.
Fold the top corner of the folded-up section down to create Dokin-chan’s facial pattern, then flip the paper over and fold the lower left and right corners inward to refine the outline.
Next, make a stepped fold on the top corner, and narrow the left and right edges toward the center line while flattening the stepped section into a triangle to complete the horn! Make two slits on each side, then round off the horn’s tip to finish.
A slightly more detailed way to fold cheese
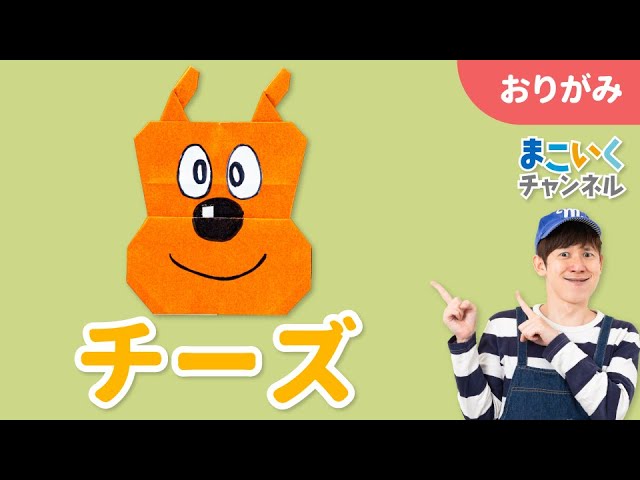
A dog named Meiken Cheese who lives in a bread factory.
You can make this origami idea with a single sheet, but since there’s one place where you need to make a cut, please prepare scissors.
First, fold the left and right edges of the origami to meet at the center to make a rectangle.
From there, create multiple horizontal crease lines and make two valley-mountain step folds to divide the paper into three sections: ears (top), the upper head, and the lower head.
The top section will be the ears, so make a cut at the center and split it into left and right.
While folding the left and right edges of the ears inward, squash the four lower corners into triangles.
Then, overlap the folded edges and tilt them diagonally to complete Meiken Cheese’s distinctive ears.
For the middle section, follow the same steps to form the outline, but fold the edges so they flare outward from the step line.
Finally, fold the lower left and right bottom corners of the bottom section into triangles, and you’re done!
A toy you can wiggle and play with

Let’s make an origami piece that moves in a mysterious way as it changes shape! Prepare 36 sheets of 7.5 cm square origami paper.
We’ll make many small parts and combine them to complete the piece.
Fold the paper in half so it becomes horizontally long, then fold the two corners toward the center on the opposite side.
Turn it over, fold it so the top and bottom are reversed, open the pocket and flatten it, and one part is complete.