Cute origami ideas

Origami can be used to make all kinds of things, right?
Of course, you can make children’s toys, but also wall decorations that work as interior decor, and even little containers.
In this article, we’ve gathered ideas from the wide world of origami with the theme of “cute.”
From adorable animals and characters to decorative fruits, small containers, accessories, and even toys.
It’s packed with all sorts of cute origami ideas!
If you want to make something cute with origami, be sure to use this as a reference and give it a try!
- Simple origami that can be folded from a single sheet
- [For Kids] Let's Fold! Today's Origami Idea Collection
- [Origami] She’ll love it if you fold these! Simple ideas for girls
- Popular characters that are easy to make with origami. A collection of creations you can enjoy with children.
- Cute Origami Ideas for Girls
- Children’s Origami: Easy Single-Sheet Flower Ideas
- Cool origami that boys will love and want to fold
- Origami ideas boys will want to make!
- [Grown-up Cute] Easy Handmade Ideas for Miscellaneous Goods and Interior Accessories
- Easy flower craft ideas you can make with a single sheet of origami paper
- [Origami] Have fun with kids! A collection of easy snowman origami ideas
- Let's make it with origami! Ideas for simple 3D creations
- [April] Spring Origami for Kids: A Collection of Simple and Cute Ideas
Cute Origami Ideas (21–30)
How to fold Anpanman candyNEW!

Why not try making Anpanman candies that are perfect for pretend play? By changing the origami colors and the character faces you draw, you can enjoy candies of various characters! Prepare 7.5 cm origami paper and fold about 5 mm along three sides except the top edge.
Apply glue to the folded part of the bottom edge, overlap it with the top edge, and stick them together to form a pouch.
Fold the left and right edges inward by about 5 mm, insert your fingers to puff up the pouch, then gently flatten the top and bottom to shape it like a candy.
Finally, draw your favorite character’s face, and cut the left and right edges with scissors into a zigzag pattern to finish!
Decorating is fun! A cake boxNEW!

Fold two origami papers into box shapes and stack them to represent the cake’s sponge and cream.
Place a three-dimensional strawberry and piped cream on top to finish.
Before forming the box shape, make fine creases, and proceed carefully.
For the cream, take a 5 cm origami sheet, fold it into a square twice, then squash the pocketed part into a triangle.
Fold it in half again, then roll it up from the edge to shape it.
For the strawberry, fold it into a triangle twice, squash the pocketed part into a square, and fold in the corners of the paper to make the calyx.
Finally, puff up the remaining part and it’s done!
How to fold a Pac-Pac AnpanmanNEW!

Here’s an idea to adapt the classic origami “fortune teller” into Anpanman.
First, do the blintz fold twice and complete the fortune teller.
Then paste a slightly smaller piece of red origami paper inside the fortune teller, fold it into a triangle twice to create an X-shaped crease.
Apply glue to the top and bottom two of the four triangles formed by the creases, fold it in half along the vertical center line, and press firmly to secure.
This creates Anpanman’s mouth.
Finally, round off the edges of the finger holes on the back, attach the facial parts, and you’re done!
A slightly more detailed way to fold cheeseNEW!
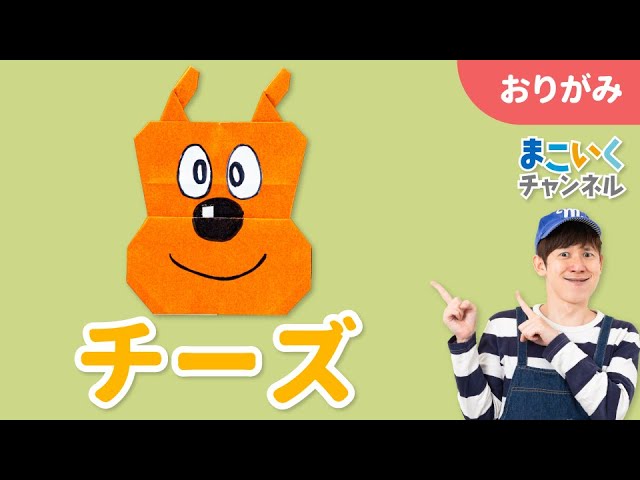
A dog named Meiken Cheese who lives in a bread factory.
You can make this origami idea with a single sheet, but since there’s one place where you need to make a cut, please prepare scissors.
First, fold the left and right edges of the origami to meet at the center to make a rectangle.
From there, create multiple horizontal crease lines and make two valley-mountain step folds to divide the paper into three sections: ears (top), the upper head, and the lower head.
The top section will be the ears, so make a cut at the center and split it into left and right.
While folding the left and right edges of the ears inward, squash the four lower corners into triangles.
Then, overlap the folded edges and tilt them diagonally to complete Meiken Cheese’s distinctive ears.
For the middle section, follow the same steps to form the outline, but fold the edges so they flare outward from the step line.
Finally, fold the lower left and right bottom corners of the bottom section into triangles, and you’re done!
Flat present boxNEW!

A flat present box you can make from a single sheet of origami paper is a cute idea to stick onto a birthday card.
First, fold the paper inward twice, crease firmly, then unfold.
Rotate it, fold back the other way, and fold to the crease; flip it over and repeat the same folds.
To create the ribbon in the center, fold triangles as if forming a bow, then open and squash-fold to give the ribbon a three-dimensional shape.
Finally, secure with glue and adjust the shape to finish.
Making crisp creases results in a neat finish, and simply changing the color or pattern can dramatically change the look.
A surprise box made of origami!NEW!

These days, you can get just about anything you want—even 100-yen shops have “packaging and wrapping” sections.
Precisely because we live in such a time, the charm of handmade items really stands out.
How about a surprise box for holding a small birthday present? You make a square box out of origami, and when you lift the lid, the four side walls—acting as the box’s sides—fall flat with a flip.
It sounds like a trick, but really it’s just that the four sides aren’t taped together! It’ll make for a little surprise that brightens up a birthday.
It would look great with homemade cookies or handmade accessories tucked inside as a gift.
Bouquet message cardNEW!

A bouquet message card made of origami is a perfect idea for a birthday when you want to express your feelings.
First, fold the origami paper in half, then rotate it and fold it in half again.
Trim the lower left and right edges to shape it, then fold up to the creases in order to create the base of the bouquet.
Make a separate triangular piece to form a ribbon and attach it, then evenly glue on colorful petals to finish it off as a vibrant bouquet.
The key is to layer them little by little to create a three-dimensional effect.
Writing a name in the center adds a special touch.
Make it with two sheets of origami! Dreamy-cute unicornNEW!
@akane_origami I'm reposting because there were some issues. 😣 Sorry to those who liked or saved it. 😭Origami#origamiUnicorn#unicornyume-kawaii
♬ Heartwarming cute bell and piano band BGM(896207) – Yatto_Aetane
A unicorn made with two sheets of origami paper looks extra cute when you use pastel colors.
The gentle hues match the unicorn’s aesthetic, and the finished figure seems as if it leapt straight out of a fantasy world.
The key step is making a slit with scissors and inserting the mane into it.
By inserting rather than gluing, you create depth and a sense of movement.
The mood changes dramatically depending on the color combination: soft tones give a fluffy, delicate feel, while strong contrasts result in a bold, eye-catching piece.
It’s an origami idea that lets you enjoy the making process and be satisfied with how it looks when finished.
Fun to make in many colors! How to fold a cosmos flowerNEW!

These are three-dimensional, cute cosmos flowers.
Prepare three 7.5 cm square sheets of origami paper: two for the petals and one for the yellow center.
Choose any colors you like for the petal papers.
Fold each sheet in half twice to make a triangle, then fold each corner toward the center where the creases intersect.
Fold the corners to align with the outer edges, make four cuts, then shape the petals and snip the petal tips into a jagged edge.
Make two petal pieces and the central piece, then assemble them to finish.
Try making them in various colors and display them!
Cute and easy! Origami unicornNEW!

Let’s combine colorful origami to make a cute unicorn.
Use one sheet of origami for the unicorn’s head and one for the body.
Make the unicorn’s mane and horn with the same origami paper, but finish them colorfully by pasting your favorite colors of origami on top or by coloring them.
Draw the face to complete the unicorn’s head.
Shape the unicorn’s body so it looks like a sitting dog.
After folding, color in the hooves.
Finally, attach the head and body to finish! Try making unicorns with manes in all sorts of colors and display them.