
Origami can be used to make all kinds of things, right?
Of course, you can make children’s toys, but also wall decorations that work as interior decor, and even little containers.
In this article, we’ve gathered ideas from the wide world of origami with the theme of “cute.”
From adorable animals and characters to decorative fruits, small containers, accessories, and even toys.
It’s packed with all sorts of cute origami ideas!
If you want to make something cute with origami, be sure to use this as a reference and give it a try!
- Simple origami that can be folded from a single sheet
- [For Kids] Let's Fold! Today's Origami Idea Collection
- [Origami] She’ll love it if you fold these! Simple ideas for girls
- Popular characters that are easy to make with origami. A collection of creations you can enjoy with children.
- Cute Origami Ideas for Girls
- Children’s Origami: Easy Single-Sheet Flower Ideas
- Cool origami that boys will love and want to fold
- Origami ideas boys will want to make!
- [Grown-up Cute] Easy Handmade Ideas for Miscellaneous Goods and Interior Accessories
- Easy flower craft ideas you can make with a single sheet of origami paper
- [Origami] Have fun with kids! A collection of easy snowman origami ideas
- Let's make it with origami! Ideas for simple 3D creations
- [April] Spring Origami for Kids: A Collection of Simple and Cute Ideas
Cute Origami Ideas (1–10)
How to Fold the One-Piece RandoseruNEW!

This three-dimensional randoseru even has properly attached shoulder straps and a flap.
Believe it or not, it’s made from a single sheet of origami paper.
What’s more, it’s created using only slits—without cutting any parts off.
About half of the process involves making creases.
Because it requires very fine folding, it’s a piece geared toward adults who enjoy crafting small items.
Proceed while checking carefully so you don’t make mistakes with the areas to be slit.
The shoulder straps in particular require delicate work, so be careful not to apply too much force and tear the paper.
Sanrio character(s)

The Sanrio character series leads the way in Japan’s “kawaii” culture.
Hello Kitty, Cinnamoroll, Pompompurin—there’s a parade of adorable characters! Try making these super-cute Sanrio origami designs that are easy to fold.
They use standard-size origami paper, and depending on the character, you may need to cut the paper with scissors or use different paper sizes, but the projects are simple enough for young children to enjoy.
They’re perfect to try with friends or as a parent-child activity!
Cute in a row! How to fold a unicornNEW!
@omotyabox_origami I'm going to make a unicorn out of origami. #origamiToy box#omotyabako#origami
♬ BGM with a cute atmosphere(819050) – Kobaken Film
This origami idea is all about enjoying how it looks once it’s finished.
Making just one figure is charming, but lining up several highlights the differences in expressions and colors, creating a lively atmosphere.
The parts—such as horns, ears, and mane—are composed simply, giving a cohesive feel when displayed together.
Changing the color scheme alters the impression: focusing on soft hues creates unity, while scattering colors gives a pop finish.
Even with the same method, individuality emerges through the choice of expressions and colors, expanding the fun of comparing creations.
It’s an idea that’s enjoyable not only to make, but also to spend time displaying the pieces and showing them to each other.
How to Fold a Flower with a Single SheetNEW!

A flower you can make with a single sheet of origami paper is a perfect idea for birthday decorations.
First, fold the paper toward the center to create creases all over.
Next, open the inside as you fold to shape it, and carefully fold to form triangles on the outside.
Then, fold while opening the inside further so the petals spread out softly.
Finally, lightly fold the edges of the paper and place a round sticker in the center to finish.
Pressing the creases firmly with your fingers helps the shape stay in place.
It also looks beautiful lined up in different colors, so it’s highly recommended.
How to Fold a Randoseru Using 3 SheetsNEW!

This is an origami school backpack that you can actually put small items into.
Use two sheets of origami paper for the main body of the backpack, and one more sheet for the flap and shoulder straps.
For the flap, use a half-size sheet; for the shoulder straps, use a quarter-size sheet and then fold it in half again.
For the first sheet that becomes the main body, perform the “zabuton” fold three times.
After each fold, rotate the paper so you’re folding on a different face.
After the third fold, you should see four squares with crease lines on the reverse side; open these sections and squash-fold them into rectangles.
For the second sheet, continue folding so that you create three of these rectangles.
Combine it with the first sheet to form a box, then insert the flap into the one remaining rectangle.
Attach the narrowly folded shoulder straps to complete the backpack!
Easy with a single card! Pikachu & EeveeNEW!

Pikachu, a figure that could be called the very symbol of Pokémon! Get some yellow origami paper and let’s fold it.
First, fold it in half vertically to make a crease and open it, then fold both sides in toward that crease.
Next, fold it in half from the other direction to make a crease and open it, then fold only one side in toward that crease and open it again.
Using the creases you’ve made, form a boat-like shape.
On the side where you didn’t make the boat, fold a small section upward, and round off the outline’s corners to finish.
If you switch the origami color to a brown tone, it can become Eevee, too! Flip it to the front and use a pen or round stickers to draw Pikachu’s and Eevee’s faces.
Cute and easy! How to fold a balloonNEW!

Origami balloons are highly recommended for those looking for decorations for a birthday message card or a little accent for a short letter.
The curled strips of paper create a fluffy, balloon-like look—such a clever touch.
The balloon part is surprisingly easy: just fold the paper a few times to gradually make it round.
For the string, cut origami paper into thin strips and wrap them around a pen to give them a springy curl.
You can make them quickly, so you’ll probably want to make a lot.
It’s also nice that you can choose colors to match the season—white like snow in winter, blue like the sea in summer, and so on.
Easy origami school backpackNEW!

This is an idea to make a complete randoseru (school backpack) from a single sheet of origami paper by creating the body, the flap, and the shoulder straps.
First, crease the origami paper and cut off one quarter.
Fold the short edge of the cut-off piece to make the flap.
Take the remaining origami, fold it in half by aligning the long edges, then fold it into thirds to make creases.
Open the tri-folded section, fold it in half by aligning the short edges to make creases; you should now have the paper divided into six blocks while folded in half.
Place it vertically with the creases on the right, and cut off the lower left end along the crease.
Fold this cut-off strip narrowly to make the shoulder straps, and assemble the remaining part into a box shape to form the body.
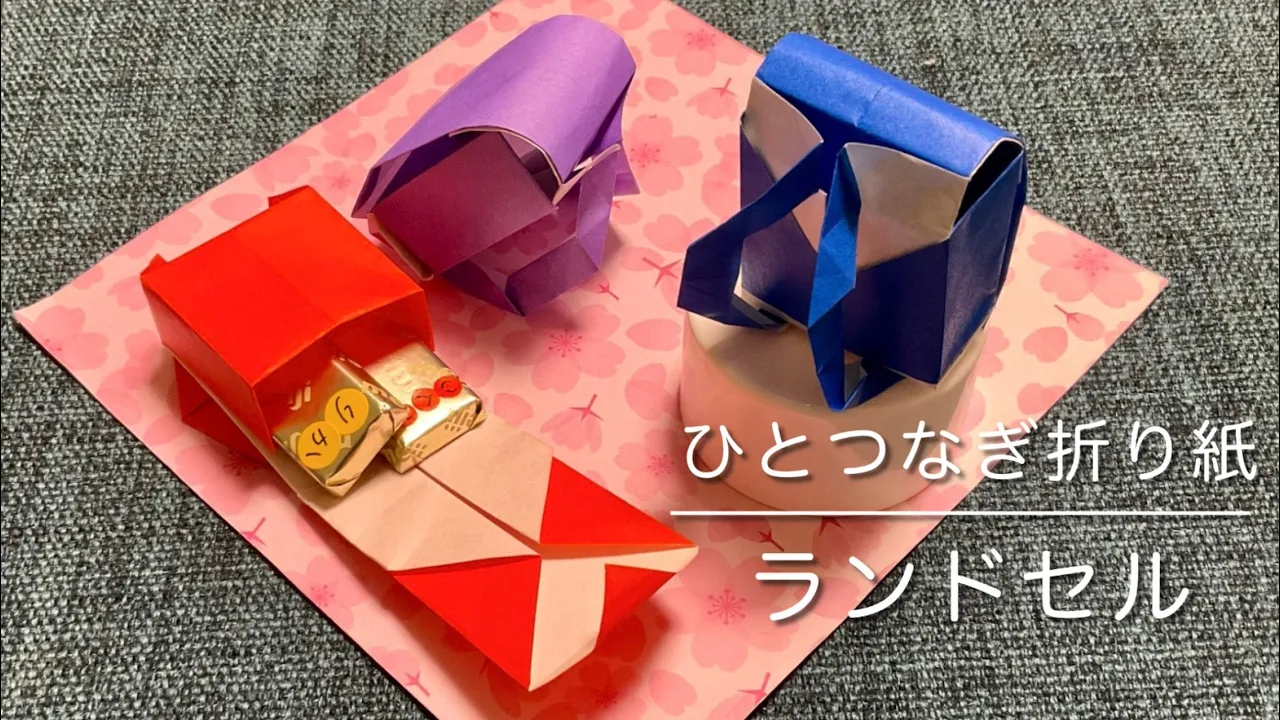
Cute Randoseru CardNEW!
You can write a message on the inside of the flap and even put candy in the inner pocket! Here’s a perfect randoseru (school backpack) card for gifts.
You’ll make the body, the flap, and the shoulder straps.
Use 15 cm origami paper for the body and flap, and use a sheet that’s half of a half (1/2, then halved again) for the shoulder straps.
For the body, fold the bottom edge up to a point 3 cm from the top, flip the paper over, and fold the left and right edges to meet at the center line.
For the flap, fold the paper in half by overlapping the left and right sides, then fold both bottom corners into small triangles.
Tuck those triangles inward, insert the top part into the body, and finish assembling the backpack.
For the shoulder straps, just fold the origami in half and attach them!
Holds a lot! Backpack-style gift boxNEW!

Make it with three sheets of origami! It’s a slightly larger randoseru (Japanese school backpack).
Fold two of the three sheets into the same shape for the main body, and use the remaining one to make the flap and shoulder straps.
First, fold the body sheet in half to make a crease and open it, then fold up the bottom edge to meet the crease.
Rotate the paper so the folded section is on the left, then fold it in half aligning top and bottom.
Open it once the crease is made, and fold the top and bottom edges to the center crease.
When you open the top and bottom folds, you should see three crease lines on the left section you first folded; make cuts along the lower two of those three lines.
Make two of these and assemble them into a box shape, then attach the flap and shoulder straps to finish the backpack.