For Seniors: Simple and Lovely Crafts – A Collection of Take-Home Project Ideas for Day Service


If you can take home the pieces made at day service centers and other senior facilities, you can display or use them at home, adding a little extra enjoyment to everyday life.
Many older adults also enjoy focusing on the act of making things.
So this time, we’ve gathered ideas for projects you can take home.
We’ve included practical items you can use at home, like small organizers and photo frames, as well as pieces you can simply display and enjoy!
The materials are easy to prepare, and we also make use of recyclables like empty jars.
Crafting involves using your fingertips, which can stimulate the brain and help prevent cognitive decline, while also providing a sense of accomplishment and fulfillment from creating something.
Please have fun making these projects!
- [For Seniors] Simple Handicrafts Recommended for Finger Exercise
- [For Seniors] Introducing Fun Crafts Made with Plastic Bottle Caps
- [For Seniors] Practical Crafts to Make in Day-Service Recreation: Idea Roundup
- [For Seniors] Recommended for day services! Simple and cute small craft ideas
- [For Seniors] Crafts to Enjoy with Yakult Containers: Ideas for Ornaments and Toys
- [For Seniors] Perfect for winter events! Easy craft ideas
- [For Seniors] Small craft ideas: for yourself and as gifts!
- [For Senior Daycare Centers] Ideas for Summer Take-Home Crafts
- [Day Service] Handmade Autumn Crafts: Take-Home Project Ideas
- [For Seniors] Easy and Fun! Tsumami Zaiku Craft Ideas
- Simple, Recommended Autumn Crafts for Seniors
- [Day Service] Spring Take-Home Crafts: Ideas to Warmly Brighten Your Room
- [For Seniors] Have Fun Making Things Based on Today’s Mood! Today’s Recommended Craft
[For Seniors] Simple and Lovely Crafts: A Collection of Take-Home Project Ideas for Day Service (141–150)
Grape brooch made with tsumami-zaiku
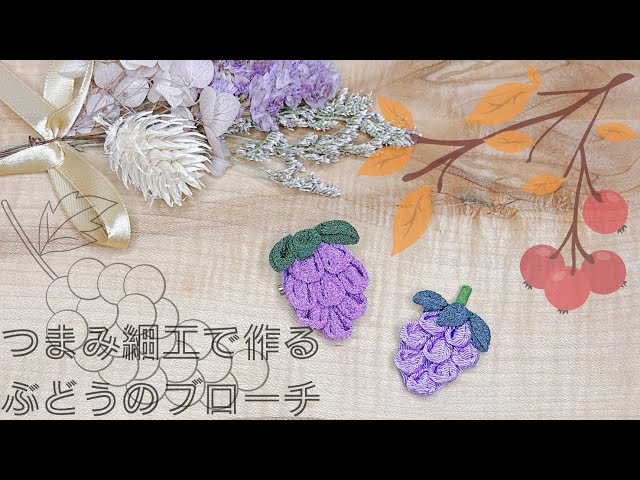
Tsumami-zaiku is made by folding small pieces of fabric.
Although it involves lots of delicate work, seniors who enjoy handicrafts or are good with their hands may find it fun to make.
Let’s try making a grape brooch, a great autumn craft using tsumami-zaiku.
Create the folded pieces and secure them with glue, then attach them to a base fabric in the shape of grapes.
Cut the base fabric into a grape shape, insert a piece of cardstock, and sew felt onto the back.
Add a brooch pin to complete the brooch.
The finished piece looks cute when attached to a bag or clothing.
Kalimba
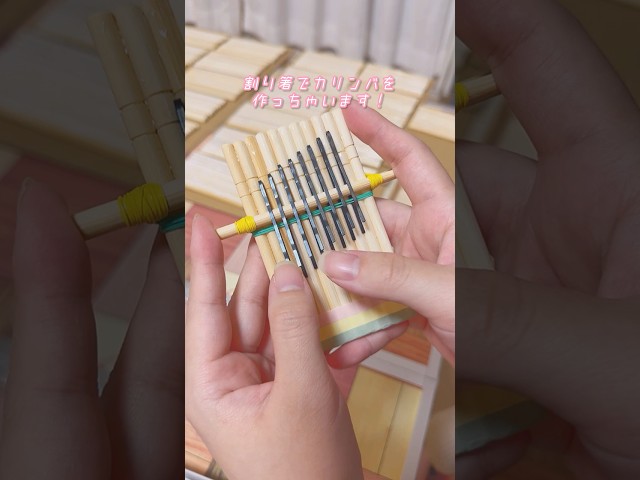
Are you familiar with an instrument called the kalimba? It’s an African instrument that you play by plucking thin metal tines with your fingers.
Other than the thin metal parts, the rest is made of wood.
Let’s try making the wooden part using disposable chopsticks.
Cut bamboo chopsticks to half their length and glue them together with wood glue.
Once the chopsticks are glued into a single board-like piece, attach chopsticks fitted with hairpins and secure them with rubber bands.
Adjust the position of the hairpins to tune the notes, and you’re done.
Once it’s finished, it can be fun for seniors to play together in a little concert along with music.
Brick-style coaster
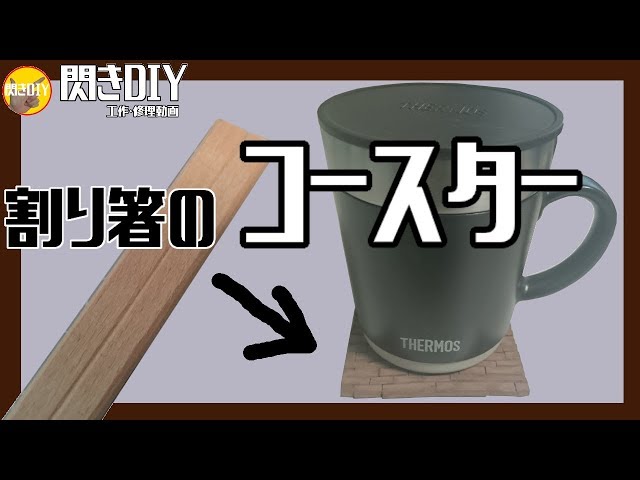
Here’s an introduction to brick-style coasters made with disposable chopsticks.
Cut the chopsticks into 1-centimeter pieces.
Since cutting them can be a bit tricky, it might be better to prepare the pieces in advance.
Stick the cut pieces onto a cork sheet with adhesive on one side, arranging them to look like bricks.
Once you’ve laid them out in a brick pattern, color them and let them dry—that’s it.
You can go for a brick-like color scheme, or use your favorite colors for a charming finish.
It’s great to have a handmade coaster to set your drinks on.
Washi paper lampshade
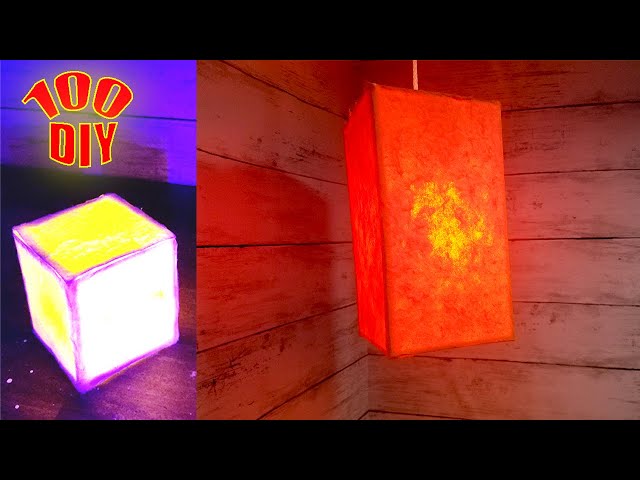
Introducing a washi paper lampshade with a gentle glow.
Prepare four chopsticks, ten half-length chopsticks, a hot glue gun, and a pendant light to hang inside, then let’s get started.
When building the frame with the glue gun, the key is to hold the pieces firmly in place at the moment you bond them so they stay stable.
When applying the washi paper on the outside, attach it one panel at a time, smoothing it out as you go while creating light creases.
Once you place the pendant light inside, it’s complete.
Try making this cute washi paper lampshade while imagining where you’ll use it.
string instrument

We’d like to introduce a string instrument you can make from disposable chopsticks that produces tones like a guitar or koto when played.
First, cut the chopsticks to about half their length.
Glue the cut chopsticks together to form a cylinder.
As you do, leave gaps for the strings and glue them in place together.
Once the adhesive has dried, try plucking the strings with a chopstick to make sound.
This chopstick-made instrument might pleasantly surprise older adults as well.
If you can tune it, you can even play nursery rhymes and more, so there’s plenty of fun beyond just making it.
Grapes made with torn newspaper (collage)

Let’s make a grape collage using torn paper (chigiri-e).
Chigiri-e uses your fingertips a lot, so it can be effective for fine motor training.
It also helps stimulate the brain.
Through detailed work, it is said to improve concentration as well.
Cut out photos or illustrations from newspapers that match your grape design.
To prepare the parts you’ll tear, trace the shapes on the newspaper with a brush moistened with water.
This makes it easier to tear along the shape you want to use.
Then, create the grapes on a backing sheet using the torn newspaper pieces to complete your work.
It’s also great for making calendars.
Simple lampshade

Doesn’t having small wooden items or furniture in a room help you feel at ease? You can sense the warmth and coziness of wood, too.
Here’s a simple lampshade you can make using disposable chopsticks.
Glue four chopsticks together to form a square.
Make several of these parts and stack and glue them together.
You’ll end up with a wooden lampshade with a charming, handcrafted look.
Because the method is simple, older adults may also find it easy to focus on making.
Place an LED light—available at 100-yen shops—inside the shade to beautifully accent your room.