For Seniors: Simple and Lovely Crafts – A Collection of Take-Home Project Ideas for Day Service


If you can take home the pieces made at day service centers and other senior facilities, you can display or use them at home, adding a little extra enjoyment to everyday life.
Many older adults also enjoy focusing on the act of making things.
So this time, we’ve gathered ideas for projects you can take home.
We’ve included practical items you can use at home, like small organizers and photo frames, as well as pieces you can simply display and enjoy!
The materials are easy to prepare, and we also make use of recyclables like empty jars.
Crafting involves using your fingertips, which can stimulate the brain and help prevent cognitive decline, while also providing a sense of accomplishment and fulfillment from creating something.
Please have fun making these projects!
- [For Seniors] Simple Handicrafts Recommended for Finger Exercise
- [For Seniors] Introducing Fun Crafts Made with Plastic Bottle Caps
- [For Seniors] Practical Crafts to Make in Day-Service Recreation: Idea Roundup
- [For Seniors] Recommended for day services! Simple and cute small craft ideas
- [For Seniors] Crafts to Enjoy with Yakult Containers: Ideas for Ornaments and Toys
- [For Seniors] Perfect for winter events! Easy craft ideas
- [For Seniors] Small craft ideas: for yourself and as gifts!
- [For Senior Daycare Centers] Ideas for Summer Take-Home Crafts
- [Day Service] Handmade Autumn Crafts: Take-Home Project Ideas
- [For Seniors] Easy and Fun! Tsumami Zaiku Craft Ideas
- Simple, Recommended Autumn Crafts for Seniors
- [Day Service] Spring Take-Home Crafts: Ideas to Warmly Brighten Your Room
- [For Seniors] Have Fun Making Things Based on Today’s Mood! Today’s Recommended Craft
[For Seniors] Simple and Lovely Crafts: A Collection of Take-Home Project Ideas for Day Service (141–150)
potted plant decoration
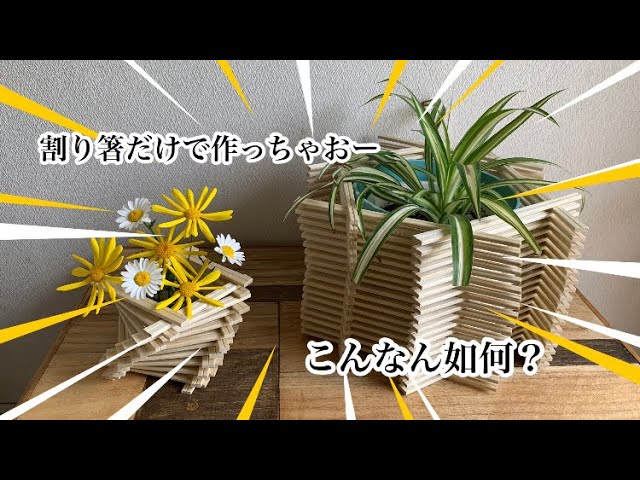
There are probably some seniors who grow houseplants at home, right? Here’s a planter cover you can make from wooden chopsticks that will hold a pot indoors.
Arrange and glue the chopsticks together to form a shape large enough to fit your pot.
If the chopsticks shift while gluing, the piece will tilt.
The key is to mark the glue points in advance.
You can also deliberately offset them to enjoy a diagonal design—this makes for an interesting piece.
Having a wooden planter cover indoors can create a stylish atmosphere.
A basket made of paper

Paper baskets that can be used for various purposes are also recommended.
First, make the base of the basket using old newspapers and cardstock.
Next, apply paper napkins to improve the appearance.
It’s fun that you can show your originality by using paper napkins with patterns you like.
You do need to let each step dry before moving on, but since all the materials are paper, they dry relatively quickly.
That way, you can keep the work going at a steady rhythm.
By the way, patterned paper napkins can be purchased at 100-yen shops.
Amulet strap made with Indian embroidered ribbon

Here’s an idea for a charm strap using Indian embroidered ribbon from a 100-yen shop.
Doing your own embroidery or adding sequins can be tough, but with this, you can make it easily.
First, cut a plastic sheet into a small piece and round the corners.
Apply double-sided tape along all four edges, then place a sequin in the center of the ribbon.
Stick it onto the plastic sheet, and wrap the back side with the ribbon as well.
Punch a hole for a ball chain, thread the chain through, and you’re done.
The sequin sparkling inside the ribbon looks adorable—give it a try!
[For Seniors] Simple and Lovely Crafts: A Collection of Take-Home Project Ideas for Day Service (151–160)
Strawberry wreath

Here’s a spring-like strawberry wreath you can make with supplies from a 100-yen shop.
First, prepare the wreath base.
Apply glue and wrap yarn around it so there are no gaps.
For the strawberries, use red felt—you can also use red gingham fabric.
Cut the felt into circles, then fold each circle in half and cut.
Stitch small seed patterns with thread.
Fold each half-circle in half again, sew along the top edge, open it once to stuff with filling, then close it up.
Make the calyx from green felt and glue it on to finish the strawberry.
Use more green felt for leaves and white felt for flowers, then glue them onto the wreath to complete it.
The arrangement can create many different looks, so you’ll end up with a unique wreath of your own.
Give it a try!
Shrinky-dink name tag clip

Here’s an idea for making name tag clips using shrink plastic.
Crafts made with shrink plastic have been around for a long time, and you can now buy the sheets at 100-yen shops.
Recently, they’ve become popular as an easy item for crafts and DIY projects.
Although the plastic sheets are thin, they shrink and become sturdy and thick when baked in a toaster oven.
Trace and draw your favorite designs with permanent markers, color them with acrylic paint or pens, and then bake them.
Since the toaster oven gets hot and can be dangerous, please have a staff member handle the baking.
Once your pieces are finished, simply attach them to clips with glue to complete your name tag clips.
Mask

How about handmaking a still-essential mask using soft, skin-friendly yarn? It’s easy to breathe through, you’ll grow attached to it when you make it yourself, and the simple, stylish look is a plus.
You’ll need a size 5 crochet hook, a tapestry needle, scissors, and about 30 g of basic cotton yarn, among other things.
The work of continuously connecting chain stitches is simple, but it also helps stimulate the brain, making it perfect for older adults.
Above all, the sense of accomplishment and joy when you finish is exceptional, so give it a try and enjoy a fulfilling time.
No-knit yarn coaster

This coaster is made by weaving with a piece of cardboard that has slits cut into it.
Since you don’t use tools like crochet hooks, it’s easy to enjoy even if you’ve never knitted or aren’t good at it.
First, wrap yarn around the cardboard by inserting it into the slits.
Then, pass yarn alternately over and under the wrapped strands at a right angle, and tie a knot at the trimmed end to tighten it—that’s it.
It’s appealing for its simple, large-movement steps and the soft look of the finished piece.