[For Seniors] Practical Crafts to Make in Day-Service Recreation: Idea Roundup


At day service craft activities, there are times when participants make items to take home.
I imagine many people display them at home, too.
This time, we’re sharing craft ideas for older adults that you can make and actually use!
We’ve gathered practical crafts you can keep using after you make them, as well as stylish pieces that look great on display.
Simply changing the origami patterns or the types of beads and ribbons can create a completely different feel, so have fun using these ideas as inspiration.
- For Seniors: Simple and Lovely Crafts – A Collection of Take-Home Project Ideas for Day Service
- [For Seniors] Small craft ideas: for yourself and as gifts!
- [For Seniors] Recommended for day services! Simple and cute small craft ideas
- [For Seniors] A Collection of Craft Ideas Using Paper Cups
- Take-Home Craft Ideas for Winter: Perfect for Day Services for Seniors
- For Seniors: Come, Spring! Recommended March Craft Ideas for Daycare Services
- [For Seniors] Simple Handicrafts Recommended for Finger Exercise
- [For Seniors] Recycle Everyday Materials: A Collection of Flyer Craft Ideas
- [For Seniors] Have Fun Making Things Based on Today’s Mood! Today’s Recommended Craft
- [Day Service] Craft Ideas for Seniors to Make in October
- [For Seniors] Easy Construction Paper Crafts Activity
- [For Seniors] Easy and Fun! Tsumami Zaiku Craft Ideas
- [For Seniors] Color Your Care Facility’s Spring: Wall Decoration Ideas
[For seniors] Practical crafts to make in day-service recreation: Ideas roundup (21–30)
Mini Cube Basket

An idea for a no-sew accessory case made using strong double-sided tape and fusible interfacing.
It explains in detail how to apply the fabric and interfacing, allowing you to nail the basics and achieve a neat finish.
The appeal is that you can create a three-dimensional shape without using needles or a sewing machine.
The cute, plump cube shape is great for organizing your desk area or shelves.
Adding a leather strap with hardware further elevates the design.
I felt it was a highly satisfying DIY idea that combines practicality with good looks.
Tissue cover without a box

It’s an appealing idea piece that stands out for how easy it is to make without sewing tools.
By using the fabric adhesive “Sewing Tools” in stick form, you can achieve a secure finish without stitching, which is reassuring.
The steps are simple—just cut the fabric and stick it together—so it feels approachable even for first-timers.
Being machine-washable is another welcome plus.
It’s practical, yet customizable with your favorite fabrics, so you can enjoy an original design that matches your interior.
The materials are affordable and easy to gather, making this a highly recommended, low-effort handmade project.
[For Seniors] Practical Crafts to Make in Day-Service Activities: Ideas Collection (31–40)
Paper Bag Remake Pouch

An idea for transforming your favorite paper shopping bag you had tucked away into a practical pouch.
By arranging it into a vanity-style shape, it achieves both storage capacity and stability.
It’s impressively sturdy—hard to believe it can be made without sewing.
You can enjoy the design inside and out, so it’s a delight right up to the moment you open it.
It’s also great for organizing cosmetics, stationery, and small odds and ends.
Since it makes use of paper bags you already have on hand, it’s an easy remake project that we highly recommend trying.
Vertical spring pouch

A long, vertical spring pouch that pops open with one hand—its easy, breezy convenience is the charm.
The slim shape makes it handy not only as a glasses case but also as a pen case.
It’s surprisingly practical for a method that requires no sewing, making it an easy project to try.
Because it can be made with scrap-sized fabric, it’s perfect for using leftover material or upcycling a cherished garment.
Use clothes your child has outgrown to create a one-of-a-kind original case.
It struck me as a gentle DIY idea that could also boost motivation for the new school term.
pressed-flower bookmark

A pressed-flower bookmark that captures the warmth of spring is a craft that lets seniors enjoy the seasonal atmosphere.
Prepare flowers you like, place them between tissues on an ironing board, and dry them with an iron.
The key is to dry them slowly at a low temperature so they keep their shape and become neatly pressed flowers.
Arrange the pressed flowers on DIY laminating film, then laminate carefully to avoid trapping air.
Punch a hole, thread a ribbon through, and it’s complete.
It also makes a great gift with a message for your family.
pencil case
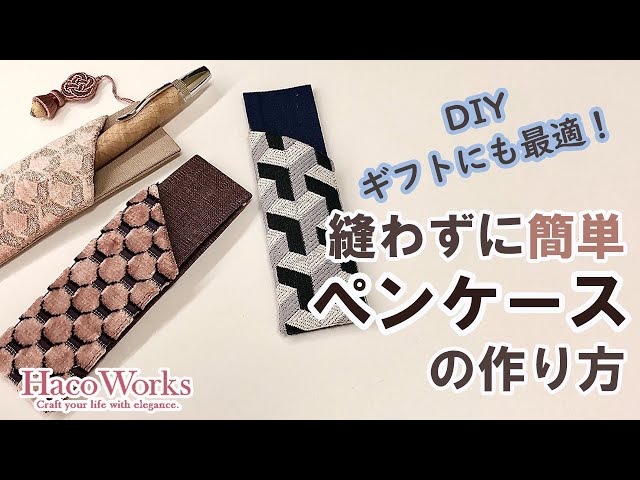
Introducing a pen case you can make just by gluing! Attach cardboard to the base fabric, then layer and adhere the pocket fabric on top.
The pocket has a slanted opening for a striking look.
Add a small decoration for a nice accent—perfect for gifts.
Basically, you just cut the fabric with scissors and glue it together, so you can complete a fabric accessory with a fun, craft-like feel.
Use solid fabric for the base and patterned fabric for the pocket to create a simple yet stylish piece.
Suede-like 3D mask

There are many occasions to wear a mask, such as preventing infections or when you have a cough.
So why not try making your own mask using a mask kit? While there are gauze-style mask kits, here we’ll introduce a chic suede-style mask kit.
The kit includes suede fabric, elastic, and a pattern.
Besides the included suede fabric, you can also use suede in other colors.
You can make two types of masks.
For one, trace the pattern onto the fabric and cut it out with scissors.
Sew the fabric with a sewing machine to finish.
For the other, attach elastic to the ear sections of the mask to make it.
A mask you make yourself is likely to bring a happy feeling when worn, especially for older adults.