[December Wall Displays] Cute Winter Craft Ideas You Can Use Beyond Christmas!


When it comes to December wall decorations, Christmas is the classic choice, but it’s also a time when we want to create a cozy, heartwarming atmosphere.
Here are some cute wall decor ideas perfect for this season—like snowmen, warm quilts, and adorable bears—that gently wrap children’s hearts in comfort! Even beyond Christmas themes, you’ll find plenty of tips to create wonderful winter walls that make kids smile and feel warm inside.
Be sure to bring a gentle touch of winter into your indoor space.
- [Childcare] Perfect for December wall displays! A collection of Christmas tree ideas
- [Childcare] Ideas for snowman wall decorations. Recommended for January crafts.
- [Childcare] December Wall Decoration Ideas: Festive Crafts for Christmas and Winter
- Brighten up your winter daycare room! A collection of recommended wall decoration ideas
- [For Toddlers] A Big Collection of Craft Ideas to Enjoy at Christmas [Part 3]
- [Childcare] Christmas wall decoration ideas
- [Childcare] Ideas for January wall decorations
- Origami ideas for December! Easy Christmas and winter crafts to make with kids
- [December Wall Decorations] Christmas Trees and Wreaths! Ideas You Can Use in Childcare
- December craft ideas! A collection of childcare activities to enjoy with Christmas and winter themes
- Cute Santa Claus wall decorations! A collection of perfect ideas for December childcare
- [For 3-year-olds] Winter craft activities and bulletin board decoration ideas for use in childcare
- Create with Disney characters! Recommended wall display ideas for December
[December Bulletin Board] Not just for Christmas! Cute Winter Craft Ideas (31–40)
Recommended for walls too! Disney-style candy strap

The candy strap, with the cozy feel of yarn as its highlight, can be enjoyed as a strap or as wall decor.
Cut construction paper into Mickey shapes, apply glue, and wrap yarn in a swirling motion to create it.
It’s best to make each part separately—face, ears, and so on.
Changing the yarn color for each part adds a unique touch and could make it extra cute.
If you’re using it as wall decor, skip the strap charm and simply display it on the wall for a festive look with a warm, Christmas-like feel.
Also for the wall! Minnie’s wreath

The Minnie Mouse wreath with green and red Christmas colors is absolutely adorable.
The method is very simple: prepare construction paper cut into separate parts for the face and ears.
You’ll layer red paper onto green paper; if you keep the widths even as you attach them, the finished piece will look well-balanced.
When making the ear parts, keep their proportions in harmony with the face to create a well-balanced Minnie wreath.
Hanging it on an interior wall may heighten the excitement of the Christmas season.
Three-dimensional Christmas tree wall
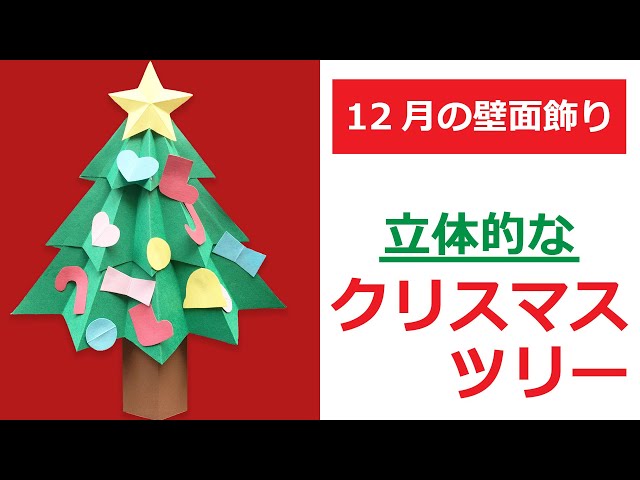
Even if you can’t display a real Christmas tree, this is a lovely idea to brighten up your room.
When you think of Christmas, many people probably picture a tree, right? This time, let’s make a three-dimensional, charming Christmas tree using construction paper.
The materials you’ll need are green construction paper, red construction paper (and other colors if you like), a template, scissors, a stapler, glue, and a ruler.
It’s also fine to choose any colors you like for the construction paper besides green.
Since some steps in making the tree involve small, detailed work, it’s best for children to do this together with a teacher or guardian.
No-sew Felt Disney Ornaments

The charm of these no-sew Disney ornaments is that they look cute no matter what colors you use.
Get felt, scissors, glue, and ribbon ready, and let’s make one.
Cut eight circles out of felt, then glue the outer center edges of the felt pieces together.
Take the pairs you’ve glued into halves and attach them with glue so they form a sphere.
Finally, glue on the ears and add a decorative ribbon at the center—then it’s done.
Adding some large sparkly beads as accents could be adorable, too.
Cinderella Castle made with colored construction paper

Its nighttime appearance illuminated with lights—especially Cinderella Castle—shines beautifully, doesn’t it? Once you’ve prepared the photo or illustration of the Cinderella Castle you want to make, place it over construction paper and trace the outlines with a pencil to transfer the shapes onto the paper.
Since Cinderella Castle has many intricate parts, it’s best to break it down: trace the shapes, cut them out, and assemble them piece by piece.
After each part is finished, glue the parts together to build a large Cinderella Castle.
If you use navy or purple poster paper as the background, you’ll create a stunning nighttime Cinderella Castle that glows.
[December Wall Decorations] Cute Winter Craft Ideas (41–50) You Can Use Beyond Christmas
Cute Minnie Santa origami

Let’s make a Minnie Santa with origami! It’s cute to stick on the wall as is, and it would also look great combined with other Christmas-themed origami pieces to create a garland or hanging decoration.
First, use one sheet of origami paper to make the face, body, and hat.
Then use several other sheets to make the ears, bow, and scarf.
Since there are parts that require cutting, prepare scissors, a pen for drawing the face, and glue for assembly.
There aren’t any complicated steps, but because you’ll be putting several pieces together, fold each part carefully, one by one.
3D Santa Claus made with colored construction paper
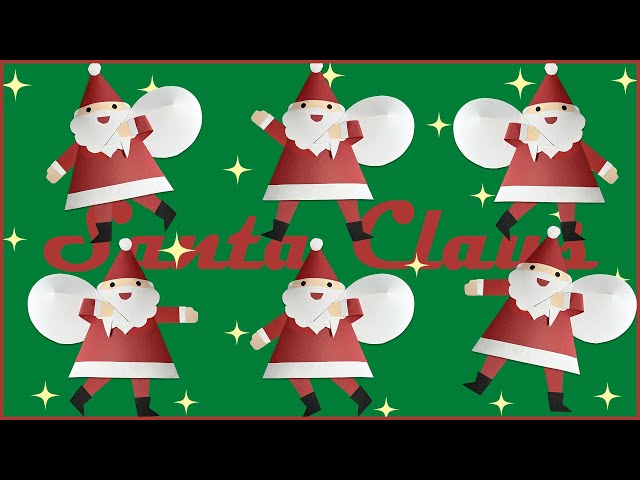
A cute, plump, three-dimensional Santa Claus made from construction paper.
Get your construction paper, scissors, and glue ready and let’s get started.
First, make Santa’s face by cutting and gluing the parts—eyes, mustache/beard, and mouth—out of construction paper.
When making the hat, glue it into a tube shape to create the hat, leaving some hollow space inside the back; that’s the key point.
For the body, roll a sheet of construction paper and glue it so that the tip is inserted into the back side of the hat.
Attach the arms, legs, and boots, then cut slits into white construction paper to make Santa’s sack, and you’re done.
It might also be fun to create your own original Santa by changing the direction of the parts, the facial expression, and the colors of the paper.