![[Childcare] Ideas for January wall decorations](https://i.ytimg.com/vi_webp/_1SpAL5GoFw/maxresdefault.webp)
[Childcare] Ideas for January wall decorations


In this article, we introduce January wall decoration ideas that are useful both in childcare settings and at home! For children, January is full of fun—New Year’s Day otoshidama gifts, traditional New Year’s games, playing in the snow, and more.
Let’s create an original wall display that incorporates all the fun events of January! We’ve gathered New Year–themed ideas like ema wishing plaques, hanetsuki paddles, and shishimai lion dances, as well as wall art projects you can make together with children.
Create a bright, festive display that’s perfect for welcoming the New Year!
[Childcare] January Wall Decoration Ideas (1–10)
cute plum blossom decoration
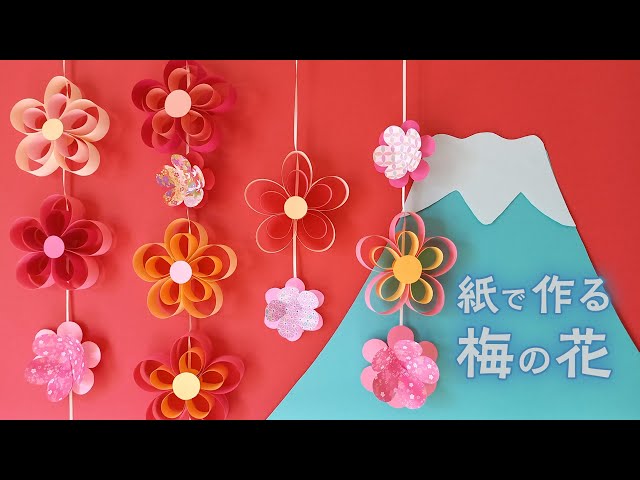
Plum blossoms, a lucky motif, are adorably charming and perfect for winter wall decorations! Here’s a cute plum blossom ornament you can make with paper.
It’s great as a winter craft to do with your child, so why not try it during your time at home? Prepare two kinds of colored construction paper cut into strips.
Combine each set and staple them together.
If using a stapler with preschoolers, make sure an adult handles it.
Make five of the same pieces, glue them together, and finish by attaching a circle of paper in the center.
You can also combine two differently shaped petal pieces to create a plum blossom with a different look—give it a try! They look lovely either stuck directly on the wall or hung as decorations.
Battledore of the Twelve Zodiac Animals
https://www.instagram.com/p/Cl3bspnp7Id/For a January wall decoration, how about a design featuring hagoita (traditional battledores) adorned with the twelve zodiac animals? Not only would it create a lively display with the animals, but it could also be a great opportunity for children to learn about the Chinese zodiac.
It would also be lovely to add an extra hagoita that highlights the zodiac animal of the year.
Additionally, by combining auspicious motifs like plum blossoms, pine, and bamboo with the zodiac animals, you can create a festive New Year’s atmosphere.
You can easily make it by cutting and pasting construction paper or origami paper, so please give it a try!
Kamakura snowman

Sometimes, just hanging your craft on the wall can feel a bit unsatisfying, right? In those moments, using paper tape is a great idea.
For example, say you’ve hung a snowman craft made from a paper plate on the wall.
You can use light blue paper tape to create an igloo shape around it, making it look like the snowman is inside an igloo.
You can also use paper tape to represent the ground, walls, or a house.
Try thinking of different ways to use paper tape to match the crafts you’re displaying.
A warm oden-themed wall
https://www.instagram.com/p/CX8SKVouuCT/Perfect for winter! Here’s a fun craft where you can make your own original oden pot.
You’ll need double-sided tape, glue, crayons, and colored construction paper.
First, use your favorite crayon colors to draw patterns all over a sheet of paper.
Cut the paper into the shape of a pot, then cut colored paper for the inside of the pot and glue it on.
Next, make oden ingredients out of colored paper.
It’s also a great idea to prepare some in advance and let the children choose.
Stick double-sided tape on the ingredients and place them in the pot, and you’re done! You can also make the ingredients together with the children, adjusting the difficulty to their age.
Osechi ryori (traditional Japanese New Year’s dishes)
https://www.instagram.com/p/CmrDs5kpTBh/We propose a wall display themed around osechi cuisine, perfect for welcoming the New Year! Teachers can do the prep and then create the ingredients together with the children, letting them enjoy learning about the origins and meanings of osechi as they celebrate the New Year.
For example, colorful paper renditions of lotus root, datemaki, and shrimp will make for an eye-catching display.
You can also adjust the process by age: in the infant class, children can simply stick on parts, while in the oldest class they can make as many components as they can themselves.
This way, kids in any class can take on the challenge!
Making Daruma dolls
https://www.instagram.com/p/CmWIjGXpmf6/Cute with a traditional Japanese vibe! Here’s a recommended Daruma craft for the New Year to make with kids.
You’ll need red and white construction paper, glue or another adhesive, chiyogami (Japanese patterned paper), and pens for drawing the face.
First, cut out the Daruma body and face from the construction paper and glue the face onto the body.
Next, attach pieces of cut chiyogami to the belly area, and add arms and legs made from colored paper to finish! Using a brush pen or even blush for the face can make it extra cute.
Adjust the cutting and gluing steps to suit the children’s ages and have fun with it.
Kagami mochi made with stamps
https://www.instagram.com/p/DCv_onhzATN/Perfect for a January wall display! Here’s a craft where you can make a kagami mochi using stamping.
You’ll need colored construction paper, glue, stickers, paint, origami paper, a pen, thick paper (cardboard), and a tampo (dauber).
First, draw and cut out the shapes for the daidai orange and the stand on the colored paper.
Next, cut the thick paper into an oval, place it on the colored paper as a template, then dip the tampo in white paint and stamp within the template.
Once the paint is dry, decorate around the base paper with stickers and more—then you’re done! Tailor the decorations to the children’s ages: they can draw pictures, fold origami, and glue pieces on.
Get creative and have fun!