[For Seniors] Easy Construction Paper Crafts Activity

Among crafts for seniors, those using construction paper are especially well known.
Because construction paper is a type of cardstock, it’s more useful than regular paper or origami paper.
With construction paper, you can make wall decorations as well as small containers and gift bags.
In this article, we’ll introduce easy construction paper craft activities for seniors.
To make them beginner-friendly, we’ve selected projects that can be completed easily with materials sourced from 100-yen shops.
Please use these ideas to support construction paper craft activities for seniors.
- For Seniors: Simple and Lovely Crafts – A Collection of Take-Home Project Ideas for Day Service
- [For Seniors] A Collection of Craft Ideas Using Paper Cups
- [For Seniors] Simple and Fun: Craft Ideas You Can Make with Everyday Items
- [For Seniors] Introducing Fun Crafts Made with Plastic Bottle Caps
- [For Seniors] Fun to Make! Paper Quilling Ideas
- [For Seniors] Lovely Crafts Made with Tissue Paper: Ideas Collection
- Easy origami that delights the elderly. Enjoy a heart-lifting time with seasonal origami.
- [For Seniors] Simple Handicrafts Recommended for Finger Exercise
- [For Seniors] Have Fun with Recreation! Origami Ideas
- [For Seniors] Easy Craft Activity Using Straws
- [For Seniors] Easy Origami Recommended for Winter
- [Recreation] Summary of Recommended Origami Ideas for Seniors
- [For Seniors] Recommended for day services! Simple and cute small craft ideas
[For Seniors] Easy Construction Paper Crafts Activities (21–30)
Shaker-style goldfish from the 100-yen shop

This craft uses paper quilling parts shaped into goldfish and flowers, arranged so they can move inside a case.
By inserting a sheet of paper in the center of the case and attaching pillars to both the front and back, you can enjoy two different worlds—one on each side—which is a fun feature.
It’s important to decide how to spread and combine the coiled paper: make the elements you want to stand out, like goldfish or flowers, larger, and create the surrounding decorations smaller.
By changing the colors of the paper and how you coil it, you can design your own beautiful world inside the case.
butterfly
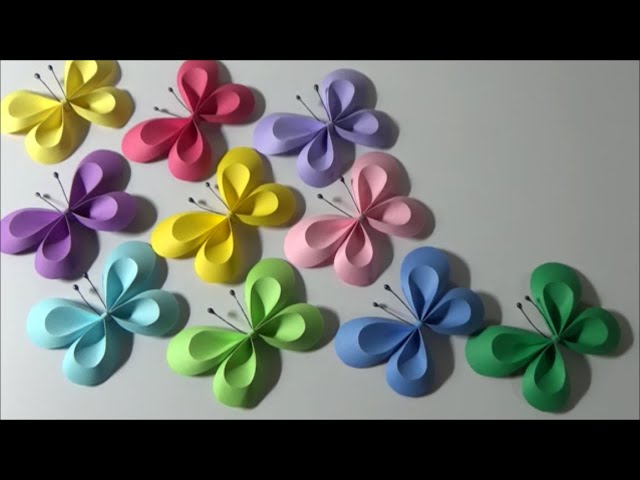
Here’s a fun idea for making butterflies—the more you make, the more enjoyable it gets.
First, prepare two pieces of paper: one measuring 2 cm × 7 cm and another measuring 6 cm × 10 cm.
Cut out the parts from each and combine them to create a three-dimensional butterfly.
Once the butterfly’s shape is complete, attach antennae made from wire to finish.
You can make a colorful array of butterflies inspired by spring, or choose color schemes that resemble real butterflies.
[For Seniors] Easy-to-Make Construction Paper Crafts (31–40)
A beautiful card with flowers popping out

We’d like to introduce a card that reveals an unexpectedly large flower when you open it.
Prepare four sheets of origami or construction paper in different colors and patterns.
Draw a circle that fits on the paper and cut it out.
You can use a plate or similar object as a template.
Fold each circle and cut it so it becomes a heart shape.
Use glue to attach the four cut pieces together to form a flower.
Glue the flower onto the card to finish.
You can also make a butterfly and attach it alongside the flower.
Some older adults might feel their hearts lift at the sight of this large, beautiful, and striking flower card.
Hydrangeas made with paper strips

Here’s an introduction to making hydrangeas by flipping a paper strip with a quick twist.
Hydrangeas, which are at their best during the rainy season, show us beautiful forms.
Let’s try to express that using paper strips.
Cut long, narrow paper strips and fold them accordion-style with a width of 3.5 centimeters.
Staple the tip, then flip it over with a quick twist.
You’ll have a hydrangea flower piece.
Make several of these and connect them to complete the hydrangea.
Using purple, blue, or light blue paper will make it look more realistic.
Older adults should also be able to enjoy making hydrangeas with this unique method.
Three-dimensional jellyfish made of paper

A jellyfish gently swaying its body as it swims underwater.
Some people say that watching jellyfish at an aquarium calms and soothes them.
When you think of a jellyfish, you probably picture its distinctive long, trailing parts and its dome-shaped part.
Let’s focus on those two features and make a craft.
Take several strips of construction paper cut lengthwise, align their centers, and spread them out in a circle.
Prepare a ring made from construction paper, then attach the tips of the spread-out strips to the ring.
For the jellyfish’s long, trailing parts, make fine slits in the paper.
Cut them into thin, thread-like strands and curl them using a toothpick.
This uses lots of fine finger movements, which can help stimulate the brain.
Attach the dome-shaped part and the long, cut strands together to complete your jellyfish.
The finished piece also makes a great hanging decoration.
Wall decoration made with colored construction paper: wind chimes

Because colored construction paper is vibrant and comes in many varieties, it’s easy to express a sense of the seasons and individuality, which makes crafting even more enjoyable.
For example, you can draw goldfish or morning glories for a summery feel, or stick to cool shades of blue—let your imagination run free.
This time, we’ll introduce an easy-to-make wind chime using colored paper.
It’s a familiar material for many older adults as well, so it’s a simple craft they can try with ease.
First, follow the steps to cut and paste the origami paper.
When it comes to popular wind chime motifs, goldfish are a classic.
They evoke the refreshing feeling of summer, so they’re highly recommended.
Add fireworks, and you’ll have a wind chime that lets you fully enjoy the summer season!
cake

Use a plastic bottle cap as the base and decorate it to create a cake-like appearance.
Since the paper decorations will stand out more, we recommend using caps with minimal designs.
The way you wrap the paper is key: by wrapping paper cut into curves or opening up rolled paper, you can create various cake decorations.
Think of decorating the cap with parts inspired by roses and ribbons.
In addition to paper decorations, incorporating beads and similar elements will make the cake look even more gorgeous.