[For Seniors] Lovely Decorations Made with Construction Paper: Ideas to Brighten Up Your Room


It can be hard to decide how to decorate for parties and events, right? For anyone feeling that way, construction paper is a great material to use.
With construction paper, you can actually make eye-catching, beautiful decorations quite easily.
In this guide, we’ll introduce decorations that show a variety of looks depending on your creativity—classic accordion-fold paper fans, floral ornaments made by combining several rolled pieces of paper, and seasonal pieces.
Most of the methods are simple, so even seniors can try them with ease! Another appeal is how dramatically the impression can change just by switching color combinations.
Have fun arranging them freely to suit your space!
- For seniors: Year-round ideas for wall decorations
- [For Seniors] Spring Wall Decorations: A Collection of Ideas to Brighten Up Your Room
- For Seniors: Feel the Arrival of Warm Spring. Cherry Blossom Wall Decoration Ideas
- [For Seniors] Lovely Crafts Made with Tissue Paper: Ideas Collection
- [For Seniors] Ideas for Winter Wall Decorations and Hanging Ornaments: Introducing Projects That Are Easy to Try
- [For Seniors] Heartwarming and Cozy: Perfect Wall Decoration Ideas for Winter in Care Facilities
- [Respect for the Aged Day] Boost the mood with handmade touches! A roundup of lovely decoration ideas
- For Seniors: Simple and Lovely Crafts – A Collection of Take-Home Project Ideas for Day Service
- [For Seniors] Brighten Up Your New Year’s Party: A Collection of Handmade Decoration Ideas
- [For Seniors] Easy Origami Recommended for Winter
- For seniors: Decorate the December wall with a tree. Easy ideas using origami and yarn.
- [For seniors] Birthday message board designs that delight: group messages, pop-up mechanisms, and brush-lettering art
- [For Seniors] Color Your Care Facility’s Spring: Wall Decoration Ideas
[For Seniors] Lovely decorations made with construction paper: Ideas to brighten up your room (1–10)
Strawberry wall decoration

The cute design is the key point! Here are some ideas for strawberry-themed wall decorations.
Many people probably associate strawberry motifs with a sense of cuteness.
They may also evoke feelings of spring or a youthful vibe.
This time, let’s make not only the strawberries themselves but also the leaves and flowers.
You’ll need construction paper, scissors, glue, and double-sided tape.
Rather than just cutting and pasting, we’ll be using a technique called quilling, so be sure to give it a try.
Butterfly
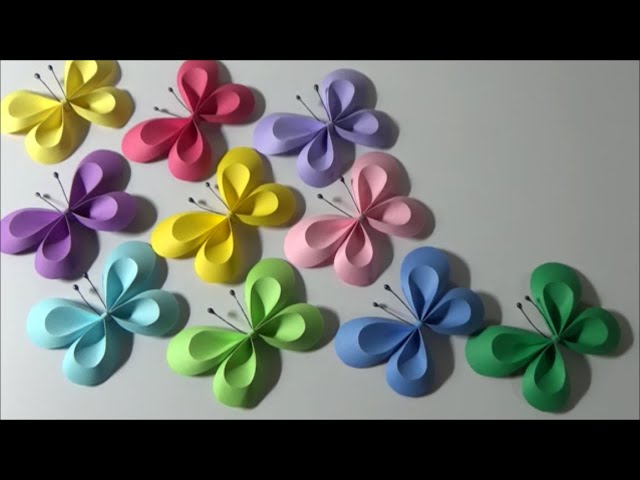
I think many people decorate with flowers at parties.
One item I’d love for you to display alongside them is butterfly decorations.
This idea recreates butterflies by giving the wings a three-dimensional, papercraft-like look and adding eyes made from wire.
They can be hung or simply set down as decor.
Since construction paper is the base, you can match the colors perfectly—for example, using white if the flowers you’re displaying are vivid.
Bending the wire takes a bit of strength, so ask for help if needed.
flower decoration

These flower decorations are simple yet look luxurious.
They can be used in a wide range of settings—home interiors like windowsills and walls, as well as party and event décor.
Cut construction paper into strips of three different lengths.
Roll each strip and staple it to form a petal shape.
Make several identical pieces and stick them together with double-sided tape to finish! Another plus is that you can freely adjust the size to suit the space.
Changing the color of the paper can dramatically alter the mood, so be sure to give it a try.
[For Seniors] Lovely decorations made with construction paper: ideas to brighten up your room (11–20)
Hydrangeas made with paper strips

Here’s an introduction to making hydrangeas by flipping a paper strip with a quick twist.
Hydrangeas, which are at their best during the rainy season, show us beautiful forms.
Let’s try to express that using paper strips.
Cut long, narrow paper strips and fold them accordion-style with a width of 3.5 centimeters.
Staple the tip, then flip it over with a quick twist.
You’ll have a hydrangea flower piece.
Make several of these and connect them to complete the hydrangea.
Using purple, blue, or light blue paper will make it look more realistic.
Older adults should also be able to enjoy making hydrangeas with this unique method.
Plump-scaled koinobori (carp streamer)

Why not make koi-shaped streamers with cute, plump scales to decorate your wall? Just hanging them in a senior facility or your own room will instantly brighten the atmosphere and let you feel the season anytime.
Use two sheets of colored construction paper to make the base of the koi streamer.
Add a slight curve to suggest it’s swimming.
Join the two pieces together and trim the tail into a triangle.
For the scales, cut origami paper into teardrop shapes, snip them slightly, and glue them on so they become three-dimensional.
Using multiple origami patterns makes them extra cute.
The more scales you add, the more impactful it will look, so why not work together during activity time to create them as a group?
Carp streamer craft with clothespins

These are carp streamers made with clothespins that are fun to decorate.
First, make a template for the carp streamer and trace it onto construction paper.
Since you’ll be attaching them to a clothespin, prepare two carp streamer pieces for each clothespin.
Once traced, cut along the outline.
Next, apply double-sided tape to both sides of the clothespin.
Mix a small amount of water into some paint and use your finger to add a scale pattern.
After it dries, use round stickers or pens to draw the eyes and patterns, and enjoy decorating.
Peel off the backing of the double-sided tape and attach the carp streamers to the clothespin.
For the base, cut a paper cup to a suitable height and put floral foam inside as a weight.
Insert a chopstick and attach the carp streamer to finish.
Dandelion wall decoration

Introducing a remarkably realistic dandelion wall decoration that could be mistaken for the real thing at first glance.
You’ll need yellow, green, and white construction paper, plus wooden coffee stirrers.
First, cut out eight leaf shapes from the green paper.
Then cut another strip of green paper lengthwise, crease along the top edge, and make fine slits below the crease to create the flower stem.
For the flower, cut a long strip of yellow paper, fold it in half, and cut fine slits along the edge without leaving gaps.
Attach the stem to the flower strip, then roll it up from the flower side.
Once glued, gently fluff and open up the stem and flower by hand.
You’ll have a beautiful blossom.
Glue wooden stirrers together in a grid—three vertically and three horizontally—then attach the leaves and flowers to finish.
You can also make seed heads by using white paper for the flowers.
The work involves fine details, but the sense of accomplishment when you finish is exceptional.
Give it a try!