[For Seniors] Lovely Decorations Made with Construction Paper: Ideas to Brighten Up Your Room


It can be hard to decide how to decorate for parties and events, right? For anyone feeling that way, construction paper is a great material to use.
With construction paper, you can actually make eye-catching, beautiful decorations quite easily.
In this guide, we’ll introduce decorations that show a variety of looks depending on your creativity—classic accordion-fold paper fans, floral ornaments made by combining several rolled pieces of paper, and seasonal pieces.
Most of the methods are simple, so even seniors can try them with ease! Another appeal is how dramatically the impression can change just by switching color combinations.
Have fun arranging them freely to suit your space!
- For seniors: Year-round ideas for wall decorations
- [For Seniors] Spring Wall Decorations: A Collection of Ideas to Brighten Up Your Room
- For Seniors: Feel the Arrival of Warm Spring. Cherry Blossom Wall Decoration Ideas
- [For Seniors] Lovely Crafts Made with Tissue Paper: Ideas Collection
- [For Seniors] Ideas for Winter Wall Decorations and Hanging Ornaments: Introducing Projects That Are Easy to Try
- [For Seniors] Heartwarming and Cozy: Perfect Wall Decoration Ideas for Winter in Care Facilities
- [Respect for the Aged Day] Boost the mood with handmade touches! A roundup of lovely decoration ideas
- For Seniors: Simple and Lovely Crafts – A Collection of Take-Home Project Ideas for Day Service
- [For Seniors] Brighten Up Your New Year’s Party: A Collection of Handmade Decoration Ideas
- [For Seniors] Easy Origami Recommended for Winter
- For seniors: Decorate the December wall with a tree. Easy ideas using origami and yarn.
- [For seniors] Birthday message board designs that delight: group messages, pop-up mechanisms, and brush-lettering art
- [For Seniors] Color Your Care Facility’s Spring: Wall Decoration Ideas
[For Seniors] Lovely decorations made with construction paper: ideas to brighten up your room (11–20)
Heart paper fan

Recommended for events and parties like Valentine’s Day! Here’s how to make a cute and stylish heart-shaped paper fan.
Prepare construction paper cut into a 2:1 rectangle.
Fold it in half, then fold it in half again, and cut it into a rounded shape.
When you unfold it, it will become an oval.
Next, crease it and start folding it into an accordion from the bottom.
If you fold it from the center, it will form a heart shape! If you make the accordion folds even finer, the heart will look smoother, so give it a try.
Making mini versions to attach to gifts would also be adorable.
wind chime
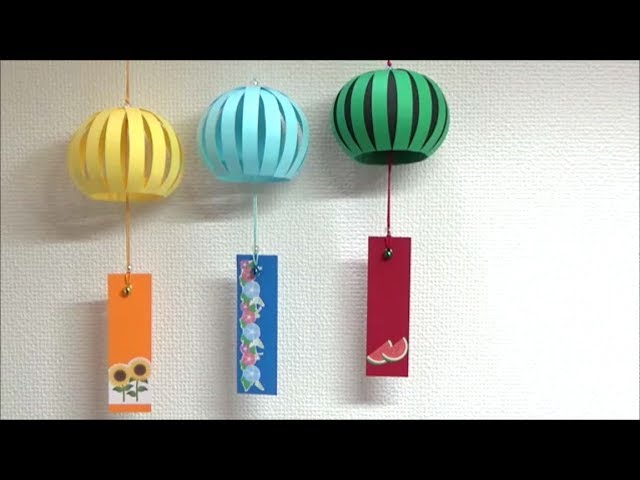
You can even make a wind chime out of drawing paper.
It’s a craft where you combine cut-out parts, so it’s similar to papercraft.
However, the structure itself is simple, so even those who aren’t good with intricate work can feel at ease.
If you’re not confident about measuring and cutting the parts, you can download templates from the internet.
By the way, this wind chime doesn’t make sound as is, of course, but if you tie on a small bell, you can enjoy the chime as well.
Since the sound won’t resonate much, using a slightly larger bell might be a good idea.
Simple and elegant hagoita ornament

Hagoita, paddles that are used for a feathered shuttlecock game or displayed as charms to ward off evil, can also be made using origami and construction paper.
Why not try making one yourself? After cutting out the shape of a hagoita from construction paper, paste a sheet of Japanese-pattern origami over it.
For the handle, it’s best to use black construction paper.
You can also make decorative elements by folding or cutting origami paper.
Create and attach auspicious motifs such as plum blossoms, pine, folding fans, and cranes.
Making the decorations three-dimensional will make the hagoita look even more gorgeous, so it’s highly recommended.
Display all the hagoita you’ve made, and you’ll have a wonderfully festive scene!
Snowflakes

If you use snowflake-themed decorations, they can create a magical atmosphere in your room.
This idea uses four sheets of construction paper cut into snowflake shapes and assembled in a three-dimensional way.
Thanks to this, it looks like a snowflake from any angle—even while it’s swaying.
Taking advantage of that feature, you can make it with sparkly construction paper and enjoy it by shining light on it as it gently moves.
It’s perfect not only for the Christmas season but also for households with grandchildren who love snow-themed anime.
Simple paper poinsettia decoration

Let’s make a poinsettia—the plant that brings festive color to Christmas—using construction paper.
Pay attention to the size of each piece and how you layer them; that’s the key to creating a sense of depth.
Cut the red construction paper into a leaf shape that spreads in four directions, then stack two identical pieces to form an eight-point shape.
Next, cut the green construction paper into leaves larger than the red ones, layer the red piece on top, and glue it down to complete your poinsettia.
It has a three-dimensional look, yet the base is paper, so it should work well in a variety of decorations.
Christmas decorations, cute wreath

There’s a classic Christmas decoration: the wreath.
Believe it or not, you can make one using nothing but construction paper.
The structure is simple.
First, prepare red and green construction paper.
Cut them into rectangles and make slits.
Finally, stack the two sheets, wrap them around something cylindrical, and you’re done.
Because it’s three-dimensional, it stands out nicely when hung on a door or wall.
You can also add a ribbon or other accents to finish it off beautifully.
Try this idea to easily get into the Christmas spirit.
[For Seniors] Lovely decorations made with construction paper. Ideas to brighten up your room (21–30)
Hanging decoration of stars and a moon made from origami and construction paper

When we think of Christmas, we often imagine a romantic night.
These three-dimensional decorations, featuring motifs of the moon and stars, are perfect symbols of such an evening.
For the star motif, fold each point, sandwich a string between the pieces, and glue them together one by one.
The folding is very intricate, using tweezers, so if it’s difficult, make sure those around you offer solid support.
For the moon motif, cut construction paper into thin strips, shape them into a crescent, and attach paper cut to match that shape to finish.
Punch a hole in the moon and thread the star motif through it; this arrangement lets the stars appear in the gaps of the moon, creating a romantic atmosphere.