[For Seniors] Add Color to Your Room: A Collection of Flower Craft Ideas


Here are some flower craft ideas for older adults.
Why not try making seasonal flowers—like tulips, hydrangeas, sunflowers, and cherry blossoms—using tissue paper, construction paper, or origami paper?
In addition to crafts that create the flowers themselves, there are plenty of cute and charming ideas for wall decorations and displays, as well as projects that you’ll want to give as gifts to family and friends once they’re finished.
These are recommended not only for those who love flowers and crafting, but also for anyone looking to exercise their fingers and hands.
Handmade paper flowers never wilt, so once you make them, you can enjoy your favorite blossoms for a long time.
- [For Seniors] Lovely Crafts Made with Tissue Paper: Ideas Collection
- [For Seniors] Perfect Finger Exercises! Seasonal Flower Origami
- Craft ideas with plum blossoms for seniors
- [For Seniors] Feel the Arrival of Spring: A Collection of Cherry Blossom Craft Ideas
- [For Seniors] A Collection of Craft Ideas Using Paper Cups
- For Seniors: Simple and Lovely Crafts – A Collection of Take-Home Project Ideas for Day Service
- [For Seniors] Fun to Make! Paper Quilling Ideas
- [For Seniors] Enjoy Something New Every Day! Today’s Origami
- [For Seniors] Small craft ideas: for yourself and as gifts!
- [For Seniors] Practical Crafts to Make in Day-Service Recreation: Idea Roundup
- Easy origami that delights the elderly. Enjoy a heart-lifting time with seasonal origami.
- [For Seniors] Easy Construction Paper Crafts Activity
- [For Seniors] Simple Handicrafts Recommended for Finger Exercise
[For Seniors] Add Color to Your Room: Flower Craft Ideas (11–20)
Carnations that change color in waterNEW!

Let’s make carnations that become stylishly colored when you sprinkle water on them! First, cut a double layer of kitchen paper into four pieces, stack them all together, fold them in an accordion, and secure the center with a rubber band.
Cut both ends into triangles, then spread out the kitchen paper as if you’re opening a flower.
Attach a straw to serve as the stem, and randomly add color to the kitchen paper with water-based pens.
Finally, mist it with water, and the water-based ink will bleed and spread, coloring the carnation! Once the water has dried, wrap it up to give as a gift or use it as decoration.
Carnations made with paper cups and construction paperNEW!

This is a simple flower craft made with a paper cup and construction paper.
First, make slits along the rim of the paper cup and cut it.
Next, prepare lots of 5 cm squares of construction paper, fold them into triangles, and trim off the tip slightly.
Insert these pieces one by one into the slits around the bottom of the paper cup.
After going all the way around once, apply wood glue and insert the construction paper again to secure it firmly.
Stack and glue to your desired height, then let it dry.
Once dry, gently peel it off the paper cup to reveal a pretty, softly spreading flower decoration!
Felt Rose Flower WreathNEW!

This content describes attaching felt roses to a wreath base to add color and softness.
First, cut felt into a circle and wrap it around a core, shaping it into a rose through the overlapping layers.
The way you layer the felt changes the volume and beauty, so being mindful of this step is crucial.
Finally, attach the roses to the wreath to complete it, and add parts like leaves to make the roses stand out.
Osmanthus made of felt – easy, no sewing requiredNEW!
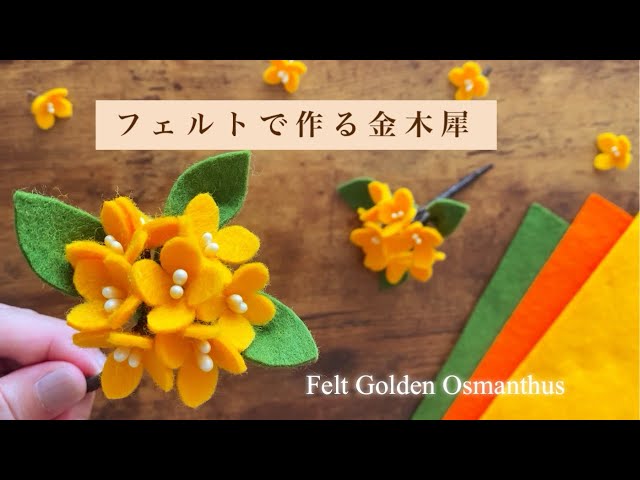
Here’s an introduction to making osmanthus from felt—a simple way to enjoy an autumn vibe.
Cut red and orange felt into small pieces and form flower shapes.
Place a wire over the stamen and bend the tip into a U-shape.
Thread the wire through the felt, then wrap the stem with floral tape to create a natural-looking branch.
Gently bend the wire and gather the flowers along it.
Wrap the leaves on with floral tape to finish.
The completed osmanthus can be displayed as autumn decor or arranged into a corsage or small accessories.
It’s a recommended handmade item for easily enjoying autumn colors.
Carnation brooch made with tissue paperNEW!

Layer several sheets of origami or tissue paper and accordion-fold them, then secure the center tightly with wire or a chenille stem.
Next, round off both ends with scissors to refine the shape.
Gently fan out and separate each layer one by one to create a fluffy carnation.
Once shaped, attach a safety pin or brooch pin to the back.
Finish by decorating with a ribbon or stickers for extra flair.
It’s easy to make, so this brooch is perfect for seniors’ crafts or as a Mother’s Day gift.
Papercut Cosmos

Here’s a simple project you can make with scissors.
Prepare one 7.5 cm × 7.5 cm pink origami sheet for the petals and one 7.5 cm × 3.75 cm yellow origami sheet for the pistil.
First, take the pink origami, fold it into a triangle three times with the colored side on the inside, then fold it once more from the edge.
Cut off the part that sticks out, open it back by one fold, mark the shape of cosmos petals, and cut along the marks.
Make a small cut in the center to create a slit, then open it up to complete the petals.
For the pistil, fold the yellow strip lengthwise twice, open one of the folds, make fine slits along the edge, and roll it up tightly.
Finally, insert it into the center of the cosmos you made, and you’re done! You can attach a chenille stem for the stalk and display it.
[For Seniors] Add Color to Your Room: A Collection of Flower Craft Ideas (21–30)
Tulip bouquet

Tulips are an essential flower of spring, and landscapes where they bloom beautifully in a variety of colors evoke the excitement of warmer days.
This craft recreates tulip flowers using felt and bundles them together like a bouquet.
Cut felt into shapes that look like open petals, place a strip of felt—cut thin and rolled tightly—at the center, then close the petals around it to form the whole tulip.
Next, arrange the flowers on a Styrofoam ball, attach leaf pieces, and fill in any gaps.
Once everything is snugly packed, your bouquet is complete.