[For Seniors] Add Color to Your Room: A Collection of Flower Craft Ideas


Here are some flower craft ideas for older adults.
Why not try making seasonal flowers—like tulips, hydrangeas, sunflowers, and cherry blossoms—using tissue paper, construction paper, or origami paper?
In addition to crafts that create the flowers themselves, there are plenty of cute and charming ideas for wall decorations and displays, as well as projects that you’ll want to give as gifts to family and friends once they’re finished.
These are recommended not only for those who love flowers and crafting, but also for anyone looking to exercise their fingers and hands.
Handmade paper flowers never wilt, so once you make them, you can enjoy your favorite blossoms for a long time.
- [For Seniors] Lovely Crafts Made with Tissue Paper: Ideas Collection
- [For Seniors] Perfect Finger Exercises! Seasonal Flower Origami
- Craft ideas with plum blossoms for seniors
- [For Seniors] Feel the Arrival of Spring: A Collection of Cherry Blossom Craft Ideas
- [For Seniors] A Collection of Craft Ideas Using Paper Cups
- For Seniors: Simple and Lovely Crafts – A Collection of Take-Home Project Ideas for Day Service
- [For Seniors] Fun to Make! Paper Quilling Ideas
- [For Seniors] Enjoy Something New Every Day! Today’s Origami
- [For Seniors] Small craft ideas: for yourself and as gifts!
- [For Seniors] Practical Crafts to Make in Day-Service Recreation: Idea Roundup
- Easy origami that delights the elderly. Enjoy a heart-lifting time with seasonal origami.
- [For Seniors] Easy Construction Paper Crafts Activity
- [For Seniors] Simple Handicrafts Recommended for Finger Exercise
[For Seniors] Add Color to Your Room: A Collection of Flower Craft Ideas (21–30)
Carnations made with paper food cupsNEW!

This is a simple carnation craft you can make with cupcake liners.
First, prepare two liners and thread a wire through the center.
Next, bend the bottom end of the wire to secure it, then spread the liners to shape the petals.
Fluff and shape them gently to resemble a carnation bloom.
Finally, tie a ribbon or decorate with pens and stickers to make it more festive.
Since it uses easy-to-find materials, it’s a perfect idea for seniors’ crafts or a Mother’s Day gift!
Carnation Pop-up CardNEW!

This is a stylish, easy-to-make pop-up card craft featuring carnations.
It’s perfect as a Mother’s Day greeting card, with a mechanism that makes the flowers pop out when opened.
Materials include colored construction paper, scissors, glue, a pencil, a ruler, a toothpick, and a plate.
To make it, trace carnation petals onto the paper using a plate or similar round object, cut them out, and fold them to create a three-dimensional effect.
Attach the flowers to the inside of the card so that they gently pop up when opened.
Finish by writing a message to complete a vibrant, handmade-feel card.
Carnation Toy PoodleNEW!

Perfect for gifts! Here’s how to make a carnation toy poodle using simple tissue paper.
Prepare tissue paper in your preferred size and some wire; accordion-fold the tissue paper and secure it with the wire.
Get a basket or any gift container you like, decorate it, and you’re done! The key is to offset the head and mouth carnations.
Insert the ears sideways so each carnation reads as a separate part—that’s the idea.
Shaping the mouth carnation by flattening it horizontally makes it even cuter.
Be sure to give it a try!
Mall’s Mr. Bear SunflowerNEW!

When you think of flowers that represent summer, many people probably answer “sunflowers,” right? Here’s a perfect summer craft: a chenille-stem creation that combines a sunflower and a bear.
Sunflowers have a brown center, don’t they? The fun twist in this piece is turning that brown sunflower center into a bear.
You attach sunflower petals around the bear’s face.
Its unique style is likely to bring smiles to older adults as they make it.
It’s the kind of finished piece that would delight family members or grandchildren if you give it as a present.
Sunflowers at the mallNEW!

Let’s make sunflowers that give you energy with their sun-like vibrance and brighten up your room! First, fold yellow pipe cleaners into petal shapes about 4 cm long.
Make 10 of these with yellow pipe cleaners and 10 with green ones.
Also, using green pipe cleaners, make 8 more of the same shape, slightly smaller.
Fold a brown pipe cleaner into a small accordion, then wrap it tightly around a wire, and start assembling by attaching each part to form a sunflower.
Finally, spread the petals outward firmly to finish!
Gerberas at the mallNEW!
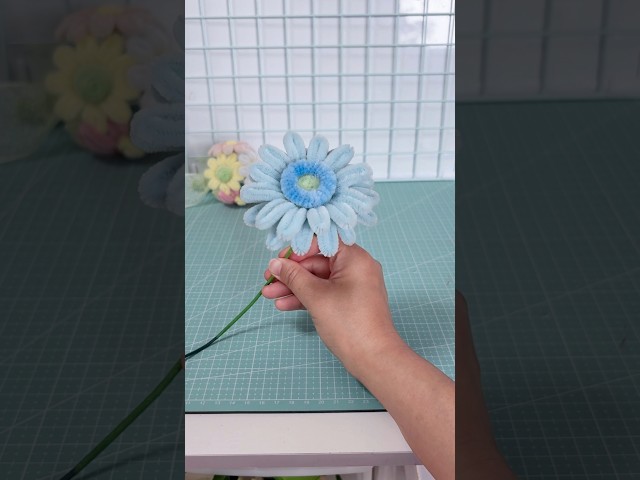
Gerbera daisies bloom in a variety of vibrant colors.
Why not make some with chenille stems and brighten up your room? First, prepare seven stems of the same color, accordion-fold each one to create four peaks, and shape them into petals.
For the flower’s center, tightly coil another stem, then attach a circular stem around it.
After that, assemble each part into the shape of a flower to complete your gerbera.
You can also use wire to make the stem and leaves to create a single bloom.
Try making many and displaying them in a vase.
Hydrangeas at the mallNEW!

It’s a very rewarding project because you’ll make lots of flowers.
But the method is simple! First, wrap a chenille stem (pipe cleaner) around a pen 5–6 times to make a coil, slide it off, shape each resulting loop, and attach a bead or other decoration in the center.
Prepare as many of these as needed to match the size of the hydrangea you want to make.
Attach a piece of wire to each one as a stem substitute, combine several into small bundles, make a few of those bundles, and then bring the bundles together to finish the hydrangea.
If you want a larger bloom, keep at it and make lots of little flowers.