[For Seniors] Add Color to Your Room: A Collection of Flower Craft Ideas


Here are some flower craft ideas for older adults.
Why not try making seasonal flowers—like tulips, hydrangeas, sunflowers, and cherry blossoms—using tissue paper, construction paper, or origami paper?
In addition to crafts that create the flowers themselves, there are plenty of cute and charming ideas for wall decorations and displays, as well as projects that you’ll want to give as gifts to family and friends once they’re finished.
These are recommended not only for those who love flowers and crafting, but also for anyone looking to exercise their fingers and hands.
Handmade paper flowers never wilt, so once you make them, you can enjoy your favorite blossoms for a long time.
- [For Seniors] Lovely Crafts Made with Tissue Paper: Ideas Collection
- [For Seniors] Perfect Finger Exercises! Seasonal Flower Origami
- Craft ideas with plum blossoms for seniors
- [For Seniors] Feel the Arrival of Spring: A Collection of Cherry Blossom Craft Ideas
- [For Seniors] A Collection of Craft Ideas Using Paper Cups
- For Seniors: Simple and Lovely Crafts – A Collection of Take-Home Project Ideas for Day Service
- [For Seniors] Fun to Make! Paper Quilling Ideas
- [For Seniors] Enjoy Something New Every Day! Today’s Origami
- [For Seniors] Small craft ideas: for yourself and as gifts!
- [For Seniors] Practical Crafts to Make in Day-Service Recreation: Idea Roundup
- Easy origami that delights the elderly. Enjoy a heart-lifting time with seasonal origami.
- [For Seniors] Easy Construction Paper Crafts Activity
- [For Seniors] Simple Handicrafts Recommended for Finger Exercise
[For Seniors] Add Color to Your Room: A Collection of Flower Craft Ideas (21–30)
Pop-up rose card

Here’s a birthday card that reveals a large rose when you open it.
We’ll make the rose using three circles cut from construction paper.
Cut the paper into petal shapes, and use a stick to curl the tips.
Glue the three petal pieces to the card base with craft glue.
A lovely rose card like this is sure to delight older adults.
What’s more, a realistic rose card can be an enjoyable craft project for seniors as well.
It also makes a great gift for family members.
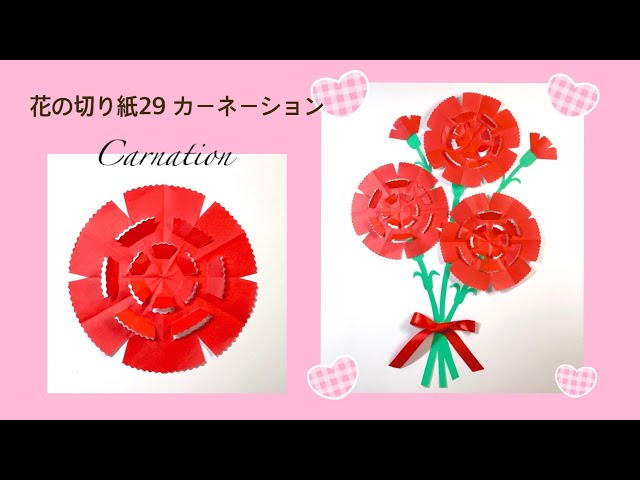
A bouquet of carnations made from tissue paperNEW!

The red and white flowers look gorgeous and are perfect for a Mother’s Day decoration.
First, stack 4–5 sheets each of red and white tissue paper, fold them in an accordion, and secure the center tightly with a twist tie.
Round the edges to shape the petals, then fan out each sheet to create a soft, three-dimensional carnation.
Next, use green construction paper to make leaves and stems, attach them to the flowers, and stabilize the arrangement.
Gather the flowers and leaves and tie them with a twist tie or ribbon, then layer lace paper around them to finish with a more festive, authentic bouquet.
Adjust the spread and angle of the petals, and alternate red and white to improve the overall balance.
This method is also recommended beyond Mother’s Day: by changing the flower type and colors, you can adapt it for seasonal decorations.
[For Seniors] Add color to your room: A collection of flower craft ideas (31–40)
Carnation message cardNEW!

When giving carnations for Mother’s Day, a message card is a must.
This set you can gift together starts by preparing regular origami paper cut down to 1/16 size, then making small carnation petals.
Bundle three of these together, add leaves, and finish one carnation.
Prepare about five sets like this.
Next, make a bouquet wrapper from another sheet of origami, arrange the carnations inside, and add a ribbon made from a different origami sheet.
Finally, attach a message card in the center, and you’re done! You can also hang it on the wall, so be sure to give it a try.
Carnation in a single-stem bouquet styleNEW!

This is a craft project for making a single-stem bouquet-style carnation out of colored paper.
You can get all the materials at a 100-yen shop, and you can also use colored copier paper.
First, divide a 15×15 cm sheet of colored paper into four, draw circles with a compass, and cut them into petal shapes.
Open them up, add random crease lines, and draw the flower centers with a pen to create the flowers.
Next, for the bouquet wrap prepare a 10×10 cm piece of paper, and for the handle a 5×15 cm piece; wrap them around a straw or a round chopstick and shape them.
Finally, tie on a ribbon about 1.6 cm wide and around 38 cm long to decorate, and your vibrant carnation bouquet is complete.
Papercut CarnationNEW!
This is a papercutting craft to make a carnation.
First, place the origami paper face down with a corner toward you, and fold it into a triangle twice.
Open it once, then fold both sides upward at an angle using the center as the axis, and fold it in half again, aligning the center carefully.
Draw a papercutting pattern on the origami, and carefully cut it out with pinking shears or similar scissors.
Adding slits and patterns will give the petals a three-dimensional look and movement.
When you finally unfold it, it will take on a fluffy carnation shape, which you can display as is or enjoy by attaching it to a card.
Realistic carnations made from paperNEW!

If preparing fresh flowers feels like a high hurdle but you want to give carnations that look just like the real thing, this is for you! First, make long, narrow leaves from green construction paper measuring 1 cm × 6 cm, and punch a hole in the center.
Next, prepare colored construction paper 7 cm × 7 cm for the carnation flower, fold it into a small, triangle-like shape, and make cuts so they will become carnation petals.
Unfold it, make deeper cuts, and prepare six sets like this; for some pieces, cut off a few petals.
Then punch a hole in the center, thread them onto wire starting with the pieces that have fewer petals, tidy everything with floral tape, attach the leaf, and you’re done! Even a single bloom looks impressive!
Carnations to decorate the framed pictureNEW!
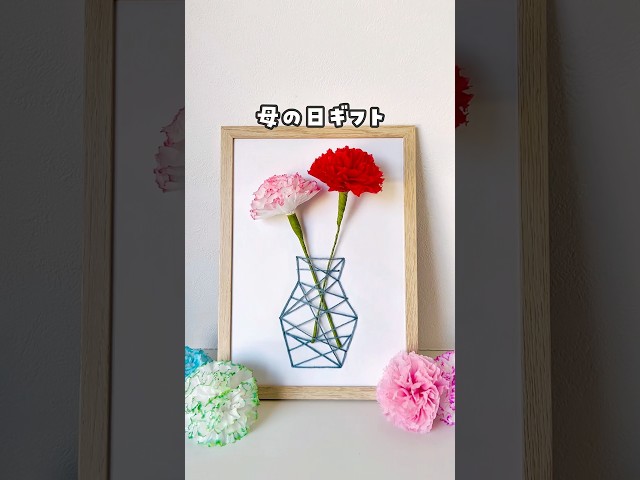
Here’s an idea for creating easy, eye-catching, three-dimensional carnation decorations.
First, get mini floral paper from a 100-yen shop and gently fluff it into the shape of a carnation.
Once the shape is formed, attach a wire to the center and wrap the whole piece with tape to complete the flower.
If you color white paper and lightly mist it with water, the pigment will naturally bleed to create a more realistic gradient.
Next, draw a vase and punch holes along the lines.
Wrap tape around the end of a thread and pass it through the holes so you can stand and display the carnations.
Finally, place the vase backing into a frame and arrange the carnations in a balanced way.
You’ll have a vibrant piece that looks like three-dimensional flowers are blooming inside the frame!