![[For Seniors] Recommended for Craft Activities! Handmade Name Tag Ideas](https://i.ytimg.com/vi/YFXmbIo9BYk/sddefault.jpg)

Many facilities place name tags on tables used by older adults or have them wear name tags during recreation and events.
Using name tags they’ve made themselves may help residents feel more attached to the facility.
Here, we’ll introduce name tags and ideas you can create in craft activities.
We’ve also collected ideas for clips and other accessories that pair well with name tags and could be adapted for them.
Some older adults, due to conditions like dementia, may find it difficult to remember other people’s names.
If they don’t know the names of those seated nearby, it can be harder to speak up, and opportunities for conversation may be lost.
Name tags can help spark communication.
- [For Seniors] DIY Strap Craft Ideas. Great as Gifts, Too!
- For Seniors: Simple and Lovely Crafts – A Collection of Take-Home Project Ideas for Day Service
- Handmade Gifts: Ideas That Will Delight Older Adults
- [For Seniors] A Collection of Craft Ideas Using Paper Cups
- [For Seniors] Amazing Scrap Fabric Hacks! Easy Handmade Small Item Ideas
- [For Seniors] Small craft ideas: for yourself and as gifts!
- [For Seniors] Recommended for Craft Activities! Milk Carton Accessory Box
- [For Seniors] Practical Crafts to Make in Day-Service Recreation: Idea Roundup
- [For Seniors] Handmade gifts they’ll love: a roundup of simple ideas
- [For Seniors] Have Fun with Recreation! Origami Ideas
- [For Seniors] Recommended for day services! Simple and cute small craft ideas
- For Seniors: Needle-Free Crafts. A Safe and Easy Collection of No-Sew Project Ideas
- [For Seniors] Simple and Fun: Craft Ideas You Can Make with Everyday Items
[For Seniors] Recommended for Craft Activities! Handmade Name Tag Ideas (1–10)
Cute nameplate
Here’s a cute nameplate idea using felt, buttons, and lace.
Use a plastic nameplate as the base, and first cut felt in your favorite color to match its size.
Cut out the center, leaving about a 1 cm border, then attach it to the nameplate.
Add decorations like buttons, lace tape, or ribbons on top, and it’s done.
By decorating each one as you like, you can create a unique, personalized nameplate.
name tag rosette

Here’s an idea for a wearable name-tag rosette.
It consists of two main parts.
The first is the rosette body—decorate it with any design you like.
The second is the pin attachment.
Make this by sticking masking tape together in a Y shape.
Then combine the body with the pin attachment and add the pin to finish.
If you write your name on it, it could be very handy at events with lots of people.
Start by looking for masking tape with a cute pattern!
Stylish confetti name tags you can get at the 100-yen shop!
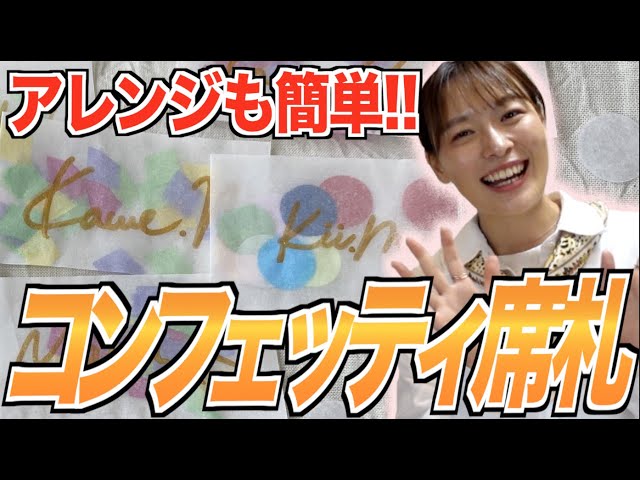
Let’s make stylish name tags using colorful confetti, the kind often used at weddings! Create a pouch-style tag from translucent materials like tracing paper or parchment/oven paper.
Because it’s see-through, it’s easy to trace names or any designs you want to add—another great perk.
Make firm creases, apply glue, and form a pouch; then fill it with confetti and seal the top to finish.
Adding glitter makes it look even prettier, and the shake-shake texture is fun too.
Origami stand-up name tag

Let’s try making a cute heart-shaped nameplate out of origami.
Origami is often used as a recreational activity, right? It’s fun to enjoy origami during a rec session, and this project is also recommended as a practical craft you can use afterward.
Plain origami paper works fine, but using patterned paper makes it even cuter.
The white area on the back is where you write the name.
The key feature of this nameplate is that it stands on its own.
It’s a nameplate you can casually place on the table during a tea party or a chat.
Laminated pressed-flower card
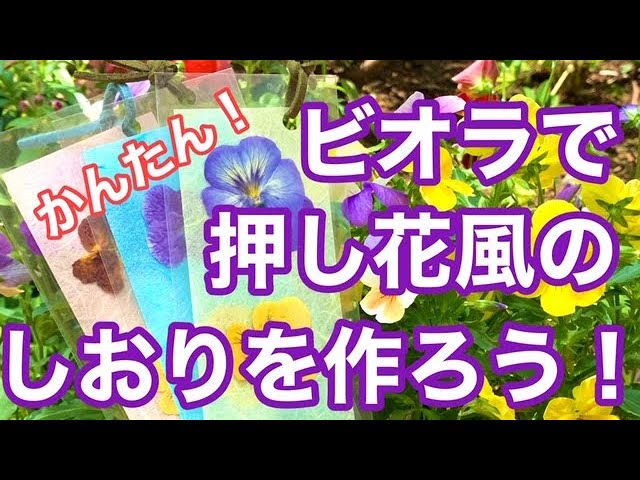
Why not make a vibrant, long-lasting nameplate using pressed flowers and a laminating card? Pressed flowers might sound time-consuming, but if you use a microwave, they dry in no time—you can make pressed flowers in about a minute.
Carefully place the finished pressed flowers with tweezers onto a piece of paper with the name written on it so they don’t tear, then seal it in a laminating film to finish.
These days you can find easy-to-use laminating films at 100-yen shops, so take advantage of those.
Punch a hole and you can hang it from a bag, too.
Cute felt name tag

Let’s try making a cute name tag with felt! Felt is easy to find at 100-yen shops, comes in all sorts of colors, and is sold in various sizes.
If you combine your favorite characters or animals to create a name plate, it will really stand out—and best of all, you’ll grow attached to it.
If using a needle and thread feels difficult, you can simply cut the felt with scissors and glue it onto fabric with fabric adhesive.
You can write your name on the felt with a permanent marker, or you can even make the letters of your name out of felt as well.
Shrinky-dink name tag clip

Here’s an idea for making name tag clips using shrink plastic.
Crafts made with shrink plastic have been around for a long time, and you can now buy the sheets at 100-yen shops.
Recently, they’ve become popular as an easy item for crafts and DIY projects.
Although the plastic sheets are thin, they shrink and become sturdy and thick when baked in a toaster oven.
Trace and draw your favorite designs with permanent markers, color them with acrylic paint or pens, and then bake them.
Since the toaster oven gets hot and can be dangerous, please have a staff member handle the baking.
Once your pieces are finished, simply attach them to clips with glue to complete your name tag clips.